Introduction
Modern user interface design has evolved dramatically in the last few years, with animation-rich interactions becoming the norm. On mobile devices, where screen space is at a premium and users expect ease of use, animations can greatly increase an application's appeal, fluidity, and even its usability, as they guide the user’s attention to explain the mental models at work. Google's latest Material Design guidelines for Android* place a heavy emphasis on the use of animations for this reason. However, animations are difficult to visualize before they are implemented, and they can be time-consuming to implement for novice developers or non-programmers.
The Intel® Animation Interpolator helps designers and developers prototype Android user interface animations. A user can create an animation, play it on a device, and tweak its parameters in real time, all without any programming. Once the animation is in a suitable form, its parameter settings can be passed to a programmer for implementation in an Android app.
What does Intel® Animation Interpolator do?
Intel Animation Interpolator animates a single graphical block on an Android device using one of these types of animation:
- Translation: moves the block horizontally.
- Opacity: fades the block in/out.
- Scale: scales the block up/down on both the vertical and horizontal axes.
- Rotation: rotates the block 270 degrees about its center, alternating between clockwise and counterclockwise directions.
The user can modify three parameters for each type of animation:
- The duration of the animation (in milliseconds).
- The interpolation to apply. The interpolation defines how the value of the property being animated (horizontal position, opacity, scale, or rotation) changes over time. See below for more details.
- The factor for the animation (may not be available for some types of animation). This modifies how the animation changes over its duration.
The interpolation itself is the key parameter, as this governs how the block appears over time: its position, opacity, scale or rotation, depending on the type of animation selected.
Understanding interpolation
On Android, properties of objects can be changed over time (or “animated”) using a variety of APIs. These properties include the size, position, rotation, scale, opacity, etc. of user interface elements. For example, an animation could change the opacity of a dialog box to fade it in and out; or move an item in a list off-screen when swiped by a user.
At the start of an animation, a property has its original value, which will change during the animation. By the end of the animation, the property will reach a target value (Note: this could be the same as the original value). For example, you could define a 100 millisecond animation to move a block on the screen from x=0 to x=100 (where the x value represents a pixel position). At the start of the animation, the block's x property has the value 0; by the end of the animation (after 100 milliseconds), the block's x property has the value 100.
But what about the period between the start and end? If an animation simply updated the block's x value after 100 milliseconds, it would appear to jump instantaneously across the screen.
This is where interpolations come in. An interpolation describes how a value changes over the course of an animation. More formally, an interpolation is a calculation of an intermediate value for a property at each “step” of an animation, based on the animation's elapsed time. On Android, each step has a default length of 10 milliseconds (Android's default “frame refresh rate”). So for the example animation above, the interpolation would need to be applied 10 (100/10) times to calculate the x values over the animation's duration.
The input to the interpolation is a value between 0 and 1, representing the fraction of the animation's duration that has elapsed (0 = animation start, 1 = animation end). The return value is another number that is used to calculate the property's value at that point in time. Typically, this will also range between 0 and 1 (though it doesn't have to).
All of this is explained very nicely in the Android documentation: http://developer.android.com/guide/topics/graphics/prop-animation.html
The Android API provides an interpolator object that encapsulates an interpolation and enables it to be applied to an animation. The simplest interpolator is the LinearInterpolator: for each step in an animation, it returns a value equal to its input value. For the example animation above (translating x from 0 to 100 over 100ms), applying the LinearInterpolator at each 10ms step returns these values:
| Time (ms) | Input value (fraction of animation elapsed) | Value returned by interpolation function | Interpolated value (x) |
| 0 | 0 | 0 | 0 |
| 10 | 0.1 | 0.1 | 10 |
| 20 | 0.2 | 0.2 | 20 |
| 30 | 0.3 | 0.3 | 30 |
| 40 | 0.4 | 0.4 | 40 |
| 50 | 0.5 | 0.5 | 50 |
| 60 | 0.6 | 0.6 | 60 |
| 70 | 0.7 | 0.7 | 70 |
| 80 | 0.8 | 0.8 | 80 |
| 90 | 0.9 | 0.9 | 90 |
| 100 | 1 | 1 | 100 |
The input values and corresponding return values for the LinearInterpolator can be graphed as follows:
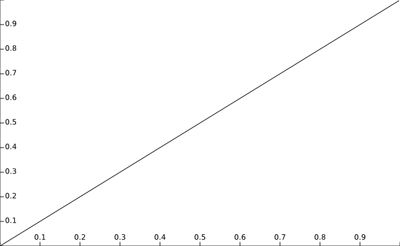
The x axis is time, and the y axis is the return value from the interpolator. One aspect not captured by the graph above is the appearance of the animation as the property value changes. For the x=0 to x=100 translation animation, consider how the block accelerates and moves:
- At time 0, its speed is 0 pixels per ms.
- At 10ms, it is moving at 1 pixel per ms.
- It continues to move at this rate until it reaches time 100, then stops abruptly.
This is difficult to visualize or understand in the abstract; but this situation is exactly where Intel Animation Interpolator can be useful.
Testing interpolators with Intel Animation Interpolator
Intel Animation Interpolator enables you to select one of the stock Android interpolators and manipulate its parameters so that any changes you make are immediately reflected in the animation on the screen. This makes it easy to find the correct interpolator and adjust it until it produces the animation you want. (By contrast, prototyping animations directly in code is time-consuming and requires Java* programming skills.)
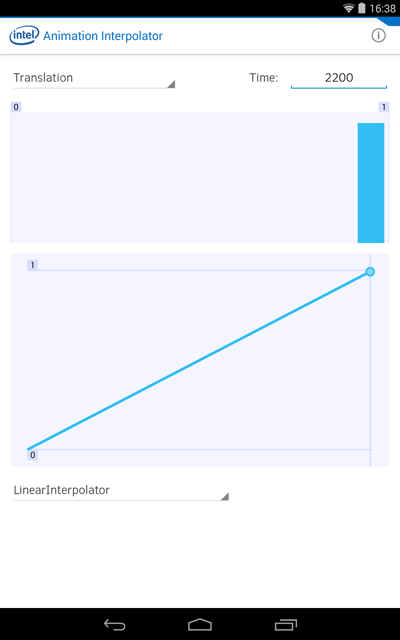
The screen shot above shows Intel Animation Interpolator with a LinearInterpolator applied to a translation animation. Note that the graph displayed matches the one from the previous section.
Running the animation moves the block at the top of the screen forwards and backwards in a loop. As soon as you see this in Intel Animation Interpolator, as part of a real animation sequence, it immediately feels stiff and unnatural. This is because an animation using linear interpolation lacks "authentic motion" (http://www.google.com/design/spec/animation/authentic-motion.html): humans are accustomed to seeing objects take time to reach full speed and slow down gradually. A LinearInterpolator accelerates the translation instantaneously to full speed, maintains that for the duration of the animation, then decelerates immediately to a stop. This movement has the characteristics of an alien spacecraft, instead of something you might see on earth.
Intel Animation Interpolator makes it easy to adjust the animation by selecting a different interpolator: just choose one from the drop-down menu in the bottom left of the app. The graph immediately updates to show the “shape” of the animation over time.
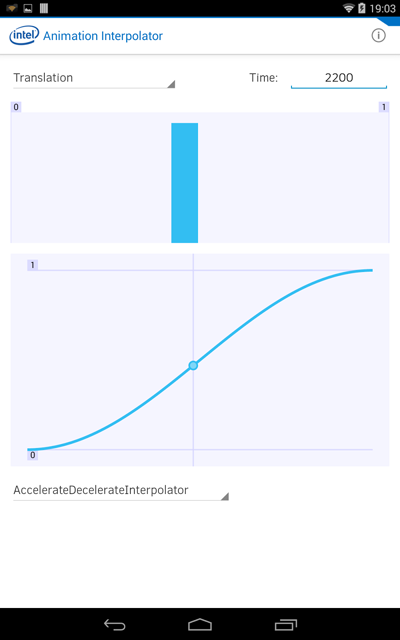
The image above shows an AccelerateDecelerateInterpolator, the default one used by Android animations. The translation animation produced by this feels more natural: the movement gradually accelerates to full speed, remains constant for a few milliseconds, then gradually decelerates.
However, there may be many cases where the default interpolator is not appropriate. To give a feel for how Intel Animation Interpolator can be used to handle such cases in the “real world”, here is an example of how a designer can use the tool to communicate ideas to a developer.
The designer
Designers typically build animations using graphical applications, rather than building them in code. At some point, animations have to be converted into code. But at that point, there is often a mismatch between the terminology used in a designer's tool and the terminology required to implement code for Android.
To give one example: design tools often use the terms “ease-in” and “ease-out” to describe the curve produced by an interpolation. These terms do not appear directly in the Android API, but are approximately equivalent to the AccelerateInterpolator and DecelerateInterpolator, respectively. But this is not necessarily obvious to a designer or developer.
Designers can use Intel Animation Interpolator to try different interpolators and parameters, until they find one that matches their desired animation as closely as possible, helping to ease the transition between design and development. For example, the image below shows an Ease Out/Quint curve designed using Adobe Edge Animate*:
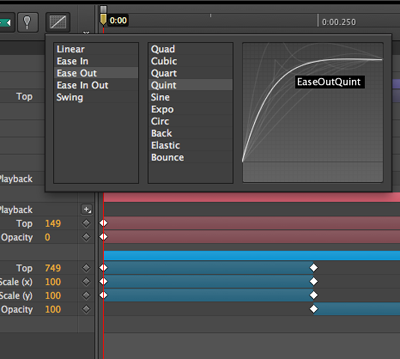
Through some trial and error, the same curve can quickly be approximated using Intel Animation Interpolator:
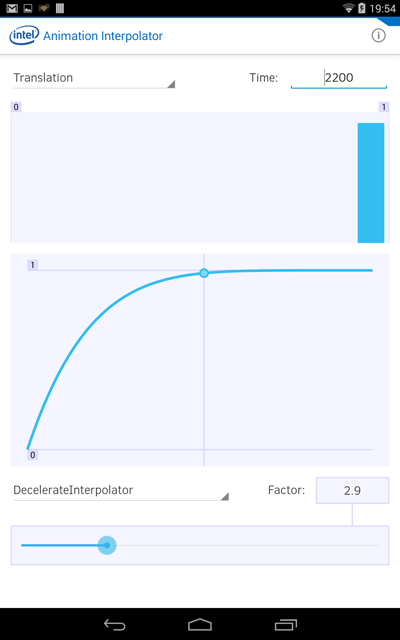
Note that the Factor field has been adjusted to give the right shape to the curve.
To quote one of Intel's designers, Intel Animation Interpolator enables him to “speak the same language as developers”. He can find the correct Android interpolator and adjust it to match his design, then communicate the name of the interpolator and parameters directly to a developer. This in turn helps reduce the time it takes for his designs to be coded.
Conclusion
User interface animations can bring extra depth and elegance to Android applications. But, often, prototyping animations can be laborious and time-consuming, and the fine details of designs can be lost as they are translated into code. Intel Animation Interpolator kick-starts the initial phases of constructing an animation by making it easy to try different interpolators and parameters with “live” visual feedback showing how they will appear. This bridges the gap between design and implementation, providing a simple, creative environment where designers and developers can explore Android’s animation capabilities together.
The Intel® Animation Interpolator app is available for free download on Google Play.
