CodeProject
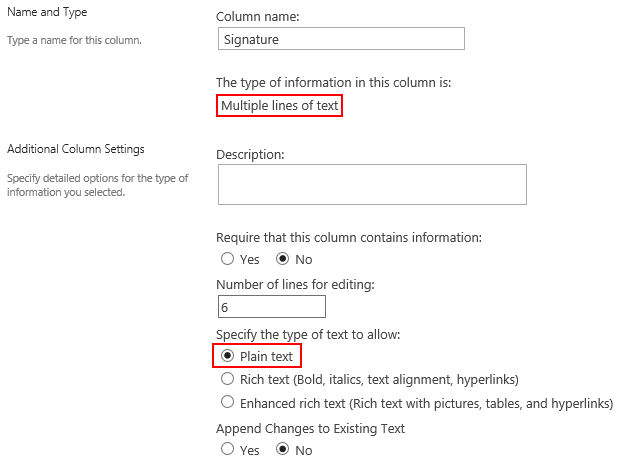
In this article, I will describe the implementation of two business cases which require capturing hand-written marks and a signature in a form. I will use SharePoint Forms Designer 2.8.12 where Ink Sketch control appeared. With the help of this control, you can save a hand-written note created with a tablet, a cell phone, or a mouse to a SharePoint 'Multiple lines of text' field with picked 'Plain text' option:

It supports all editions of SharePoint 2010/2013 and SharePoint Online in Office 365.
Review of End-of-course Questionnaire
The first scenario relates to a training process that ends with questionnaires which have to be filled in by trainees and verified by a trainer. We will simplify the verification process by providing a trainer with the touch interface allowing them to leave marks and notes by using iPad, a cell phone or another touch screen device. The result form for trainers will have the following view:

First, we should create a form for questionnaire and design different views for students and trainers. I will split them into separate SharePoint groups and create different forms for these groups in Forms Designer. Forms Designer for Office 365 doesn't support groups functionality, so you should modify the result form with the help of JavaScript based on the current user. The first group, students, will be able to edit all fields except the score. The second group, trainers, will be able to score a student and leave marks and notes near each answer. We have to create a number of text fields to save trainer's notes in accordance with the number of Ink Sketch controls on a form. In our case, we will use a separate Ink Sketch control for each student's answer, so we need to create the same number of text fields as the number of questions in the questionnaire.
Notice: Fields for storing sketches must have 'Multiple lines of text' type with picked 'Plain text' option. You must select the field where you're going to store the sketch in the Ink Sketch properties in Forms Designer.
Here is the first form designed for trainees:

Here is the form designed for trainers:

As you can see, I turned all fields into read-only mode and put Ink Sketch controls near each field to allow trainers to make a separate note for each answer. Also the form for trainers contains the score field in edit mode.
Invoice with Signature
The second scenario covers creating an invoice form with signature. As previously, we should create a text field to store the signature. Here, you can see my invoice form:

I used the Related items control to display product items and the Ink Sketch control to capture the signature. Quite easy isn't it? You can use Forms Designer in conjunction with Workflow Actions Pack to create an invoice in PDF format with the signature and send it to your customer or accounting department by e-mail.
SharePoint 2010 and HTML 5
By default, Internet Explorer opens SharePoint 2010 pages in Internet Explorer 8 document mode but Internet Explorer 8 doesn't support HTML 5. So the Ink Sketch control uses flash component to provide the capability of drawing on a form. This component is quite slow and requires Adobe Flash Player. But you can switch the Ink Sketch control to HTML 5 mode by modifying your master page. Open it in SharePoint Designer and replace the following line of code:
<meta http-equiv="X-UA-Compatible" content="IE=8"/>
With this one:
<meta http-equiv="X-UA-Compatible" content="IE=Edge"/>
Save the master page and check in. Now all pages will work in the highest mode of Internet Explorer available.
Conclusion
The visual data is saved into SharePoint text fields as base64 string, so you can use it in Render Text Template workflow action of Plumsail Actions Pack to prepare an HTML-page and generate a PDF-file based on it with a signature and other notes created by a user directly on a form. To inject a note into HTML-template, you should use the following syntax:
<img src="${{Signature}}" />
In the code above, 'Signature' is the internal name of a 'Multiple lines of text' field containing the signature.
