Introduction
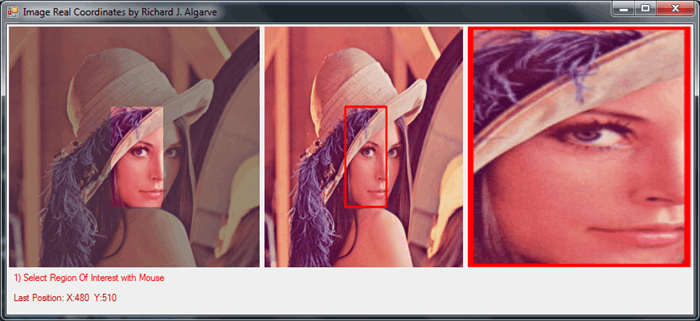
This tip deals with a way to select a ROI (Region of Interest) using the mouse on identical images that do not have the same size. This product was developed based on Emgu CV framework by C# .NET language. The creation of this tip is justified because many developers are paralyzed when using ImageBox or PictureBox to render and manipulate a region of interest in an image, so I decided to prepare a tip that would allow the reader an understanding of how to select a ROI same the input image and output do not have the same sizes. I hope this tip is useful to you. Share it! Happy reading and successes.

Background
For a better understanding of the reasons for this product, please read the posts below present in the Emgu CV forum.
Using the Code
Below is the main function that returns the actual coordinates of an image. This function is essential for the implementation of ROI selection by mouse and found the csharphelper site.
public static void ConvertCoordinates(PictureBox pic,
out int X0, out int Y0, int x, int y)
{
int pic_hgt = pic.ClientSize.Height;
int pic_wid = pic.ClientSize.Width;
int img_hgt = pic.Image.Height;
int img_wid = pic.Image.Width;
X0 = x;
Y0 = y;
switch (pic.SizeMode)
{
case PictureBoxSizeMode.AutoSize:
case PictureBoxSizeMode.Normal:
break;
case PictureBoxSizeMode.CenterImage:
X0 = x - (pic_wid - img_wid) / 2;
Y0 = y - (pic_hgt - img_hgt) / 2;
break;
case PictureBoxSizeMode.StretchImage:
X0 = (int)(img_wid * x / (float)pic_wid);
Y0 = (int)(img_hgt * y / (float)pic_hgt);
break;
case PictureBoxSizeMode.Zoom:
float pic_aspect = pic_wid / (float)pic_hgt;
float img_aspect = img_wid / (float)img_wid;
if (pic_aspect > img_aspect)
{
Y0 = (int)(img_hgt * y / (float)pic_hgt);
float scaled_width = img_wid * pic_hgt / img_hgt;
float dx = (pic_wid - scaled_width) / 2;
X0 = (int)((x - dx) * img_hgt / (float)pic_hgt);
}
else
{
X0 = (int)(img_wid * x / (float)pic_wid);
float scaled_height = img_hgt * pic_wid / img_wid;
float dy = (pic_hgt - scaled_height) / 2;
Y0 = (int)((y - dy) * img_wid / pic_wid);
}
break;
}
}
Assign the following events in the form of events.
#region EVENTOS PICTURE BOX | DEFINIÇÃO DE ROI
private Point RectStartPoint;
private Rectangle Rect = new Rectangle();
private Rectangle RealImageRect = new Rectangle();
private Brush selectionBrush = new SolidBrush(Color.FromArgb(128, 64, 64, 64));
private int thickness = 3;
private void pictureBox_MouseDown(object sender, System.Windows.Forms.MouseEventArgs e)
{
RectStartPoint = e.Location;
Invalidate();
}
private void pictureBox_MouseMove(object sender, System.Windows.Forms.MouseEventArgs e)
{
#region SETS COORDINATES AT INPUT IMAGE BOX
int X0, Y0;
Utilities.ConvertCoordinates(imageBoxInput, out X0, out Y0, e.X, e.Y);
labelPostionXY.Text = "Last Position: X:" + X0 + " Y:" + Y0;
if (e.Button != MouseButtons.Left)
return;
Point tempEndPoint = e.Location;
Rect.Location = new Point(
Math.Min(RectStartPoint.X, tempEndPoint.X),
Math.Min(RectStartPoint.Y, tempEndPoint.Y));
Rect.Size = new Size(
Math.Abs(RectStartPoint.X - tempEndPoint.X),
Math.Abs(RectStartPoint.Y - tempEndPoint.Y));
#endregion
#region SETS COORDINATES AT REAL IMAGE
Utilities.ConvertCoordinates(imageBoxInput, out X0, out Y0,
RectStartPoint.X, RectStartPoint.Y);
int X1, Y1;
Utilities.ConvertCoordinates(imageBoxInput, out X1, out Y1, tempEndPoint.X, tempEndPoint.Y);
RealImageRect.Location = new Point(
Math.Min(X0, X1),
Math.Min(Y0, Y1));
RealImageRect.Size = new Size(
Math.Abs(X0 - X1),
Math.Abs(Y0 - Y1));
imgEntrada = new Image<Bgr, byte>("lena.jpg");
imgEntrada.Draw(RealImageRect, new Bgr(Color.Red), thickness);
imageBoxOutputROI.Image = imgEntrada;
#endregion
((PictureBox)sender).Invalidate();
}
private void pictureBox_Paint(object sender, System.Windows.Forms.PaintEventArgs e)
{
if (imageBoxInput.Image != null)
{
if (Rect != null && Rect.Width > 0 && Rect.Height > 0)
{
e.Graphics.SetClip(Rect, System.Drawing.Drawing2D.CombineMode.Exclude);
e.Graphics.FillRectangle(selectionBrush, new Rectangle
(0, 0, ((PictureBox)sender).Width, ((PictureBox)sender).Height));
}
}
}
private void pictureBox_MouseUp(object sender, MouseEventArgs e)
{
if (RealImageRect.Width > 0 && RealImageRect.Height > 0)
{
imgEntrada.ROI = RealImageRect;
imageBoxROI.Image = imgEntrada;
}
}
private void pictureBox_MouseDoubleClick(object sender, MouseEventArgs e)
{
Rect = new Rectangle();
((PictureBox)sender).Invalidate();
}
#endregion
To succeed in the build of the attached application in this tip referencing the DLLs Emgu CV on the project preventing them stay with an exclamation highlighted in yellow. In the image below, the DLLs are properly referenced in the project.

Another point worth mentioning is present in the wrapper DLLs (which are linked to C++ code) that must be referenced pointing to the application of the output directory. Below is an example of applied configuration in Visual Studio 2013.

Points of Interest
I stayed a week researching ways to implement the ROI with the mouse but did not succeed . After a week without resolving, I returned to the research and managed to solve it in half an hour.
Reference
This tip is based on doubts in the official forum Emgu CV. As a research source, I used the site: http://csharphelper.com/blog/2014/10/select-parts-of-a-scaled-image-picturebox-different-sizemode-values-c/
