Introduction
Imagine the following:
- You have built the world's best Silverlight twitter client, but every now and then your app crashes
OR
- You deployed your great Line Of Business Silverlight application, but you have no idea if people like it or not
OR
- Every now and then you get a phone call from your customer: "I can't see the details"
What the??
So what do you do?
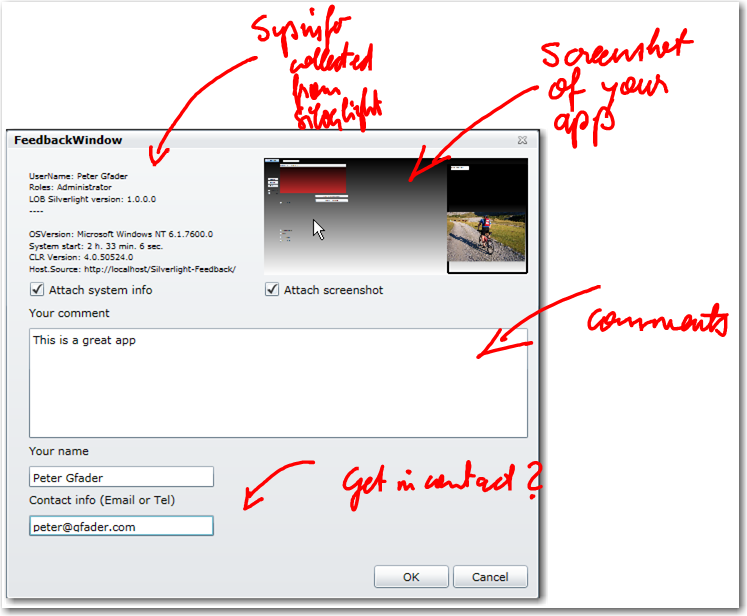
Instead of having endless support calls, email conversations, tracing in log files, lookups in log-databases, etc… use the below Feedback Control:

With this feedback control, you will get:
- A screenshot of what the user is looking currently at
- All system information like:
- OS version
- Last reboot
- Silverlight version
- Your application version
- …. and heaps more…
Background
- We use this nice ImageTools library from Codeplex (
PNGEncoder can be found there) to convert a Bitmap to PNG.
- The file upload is done via a nice and easy
HTTPHandler on the server side that receives PNGs and saves them to a specific folder.
More information can be found in Tim Heuer's video about Uploading files in Silverlight with source code.
How To
- We create a screenshot of the current Silverlight app with a WriteableBitmap:
feedback.ScreenShot = new WriteableBitmap(this.LayoutRoot, null);
- We collect system information in Silverlight with classes like:
Environment HtmlPage.Document HtmlPage.BrowserInformation Application.Current.Host - …
StringBuilder sbStringBuilder = new StringBuilder();
sbStringBuilder.AppendLine("OSVersion: " + Environment.OSVersion);
sbStringBuilder.AppendLine("System start: " +
Environment.TickCount.ConvertToNiceTime());
sbStringBuilder.AppendLine("CLR Version: " + Environment.Version);
- We upload the screen to our server by converting the WriteableBitmap to a PNG:
ImageTools.Image image = ImageTools.ImageExtensions.ToImage(_screenShot);

using (MemoryStream writestream = new MemoryStream())
{
    PngEncoder encoder = new PngEncoder();
    encoder.Encode(image, writestream);

    byte[] bytes = writestream.ToArray();

    MemoryStream readStream = new MemoryStream(bytes);

    UploadFile(readStream);
}
Once we have the screen and the system information on the server, we can send emails, create work-items in TFS or your favorite bug tracking system...
Using the Code
- Copy the Feedback control to your Silverlight app.
- Fix the Upload URLs
string _baseUrl = "http://{0}/Silverlight-Feedback/UploadHandlers/";
- Download ImageTools library from Codeplex and add 3 references to your Silverlight app:
ImageTools ImageTools.IO.Png ImageTools.Utils
- Insert the following code on your "Feedback" button or "About" button:
FeedbackWindow feedback = new FeedbackWindow();
feedback.ScreenShot = new WriteableBitmap(this.LayoutRoot, null);
feedback.Show();
All done - have fun!
Other Usages
On start up or log-off your Silverlight application, phone home and tell usage...
There is no user interaction needed to do this...
Make sure to include a privacy statement somewhere. ;-)
History
