Introduction
This is a reservation of classroom web system, but you can change it to make another reservation of the things web system. Such as professional classroom, meeting room or hotel room. Its operation is very easy and design or redesign is very simple. This is an open source code of the web system, you can free use and change it. No pay for me. I will teach you how to operate and redesign it.
The roles are an administrator and many teachers. The administrator manages this web and the teacher is reservation classroom of the operator. We need the administrator create many classroom’s name, item’s name, context (subject), teacher’s name and office’s name. He can query all reservations of whole teacher status. The teachers are able to reserve a classroom. They can choose which classroom, which context, which office, which item and which time and they also are able to review reversation status.
The web system is very small and the database is using access 2003 format. You also are able to using Microsoft Access to edit it. There are two interfaces that you can manage the database. Firstly, the web system provided a management interface. Secondly, To use Microsoft Access, manage and edit the database.
Because it is using Microsoft.Jet.OLEDB.4.0, if you install the Internet Information Services (IIS) 7, you should enable 32 bit application.
Background
Equipment
Operation System: Microsoft Windows 7 (64 bit)
Web System: Internet Information Services (IIS) 7
Development Utility: Microsoft Visual Studio 2010
Using the code
- Copy this web system to your hard disk.
- To extract the ZIP file to your hard disk and copy the folder to under the folder called ‘wwwroot’ that is the root folder of IIS 7.
- To rename the folder name to ‘WebApplication1’.
- To convert the ‘WebApplication1’ to application.
- Enable 32 bit application, it needs to setup that is true.
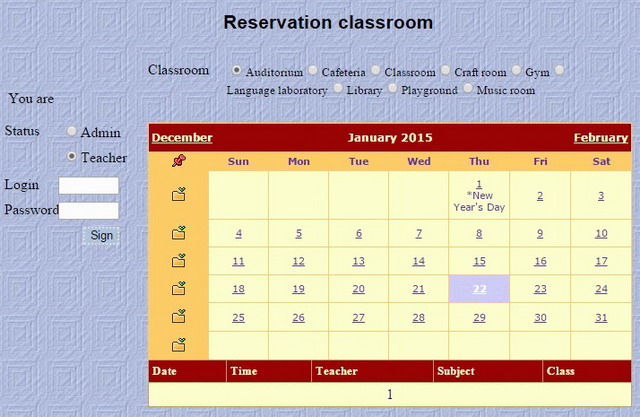
- This is a homepage of mainly. The default administrator is ‘admin’ and default password is ‘admin’. The default teacher login name is ‘1’ and default password is ‘1’.
You can choice a classroom and a date and review the reservation status.

- This is the admin utility. You can see those topics, including classroom, context, office, teacher, item and reservation and you are able to manage the classroom, the context, the office, the teacher and the item.

- You can use the same interface to add, update, delete, edit and cancel those items, such as the classroom, the context, the office, the teacher and the item.

- The reservation provided review status of reservations.

- If you are using a teacher account to login this web system, you should reserve to a classroom.

- You can review the reservation of status. It is can choose different classroom and review who reserve the classroom.

- You are able to redesign the source code. One of the easiest way that is changing whole title and text of item. Such as classroom to change it like as a meeting room. Using a text editor to replace string in whole files. That is very easy.

- If you want to add another function of items, you could add a new link to two files, including admin.aspx or teacher.aspx. Such as reservation monthly of status.
Sub hypTeacher2( sender As Object, e As Eventargs )
     HyperLink2.NavigateUrl="(The name of your homepage).aspx?ID=" & Request.QueryString("ID")
End Sub

<asp:HyperLink id="HyperLink3" style="Z-INDEX: 102; LEFT: 8px; POSITION: absolute; TOP: 100px" runat="server" Height="20px" Width="88px" Target="main" OnLoad="hypTeacher3">	Reservation monthly of status</asp:HyperLink>
10. If you want to add a new table of database, you can copy the old table and rename it. And then you can copy any dot aspx of homepage and modify it. Almost you just change the field name to your field name. Because almost functions were enough. There can help to user that add, edit, update, delete and cancel. Such as you create a new table in the "order.mdb" from "PhotoStudio" table, the new table called "meeting". That code you have to modify as below.
Sub BindList()
    Dim strSQL As String = "Select * From [meeting]"
    myDataList.DataSource = CreateDataSet(strSQL, "./DB/order.mdb", "[meeting]")
    myDataList.DataBind()
End Sub

 Sub DataList_DeleteCommand(sender As Object, e As DataListCommandEventArgs)
  Dim strSQL As String = "Delete From [Meeting] Where [" & _
      myDataList.DataKeyField & "]=" & myDataList.DataKeys(e.Item.ItemIndex)
  ExecuteSQL(strSQL)
  myDataList.EditItemIndex = -1
  BindList()
End Sub

Sub DataList_UpdateCommand(sender As Object, e As DataListCommandEventArgs)
  Dim strPAdds As String = Ctype(e.Item.FindControl("txtPAdds"), TextBox).Text
  Dim UpdateDate As DateTime = DateTime.Now.Date()
  Dim strSQL As String = "Update [Meeting] Set [P-Adds]='" & strPAdds & "' " & _
                         "Where [" & myDataList.DataKeyField & "]=" & myDataList.DataKeys(e.Item.ItemIndex)
  ExecuteSQL(strSQL)
  myDataList.EditItemIndex = -1
  BindList()
End Sub

Sub PAdds_Insert (sender As Object, e As Eventargs)
  If txtPAdds_Insert.Text = "" Then Exit Sub
  Dim strSQL As String = "Insert Into [Meeting] ([P-Adds]) Values ('" & txtPAdds_Insert.Text & "')"
  ExecuteSQL(strSQL)
  txtPAdds_Insert.Text = ""
  BindList()
End Sub
Exception
1. HTTP error 403.14 - Forbidden
You should add default homepage is Main.apsx.
2. If you encounter as below situation, you have to change in the administrator mode.
C:\Windows\Microsoft.NET\Framework64>cd %windir%\Microsoft.NET\Framework64\v4.0. 30319
C:\Windows\Microsoft.NET\Framework64\v4.0.30319>aspnet_regiis -i
Microsoft (R) ASP.NET RegIIS version 4.0.30319.34209
Administration utility to install and uninstall ASP.NET on the local machine.
Copyright (C) Microsoft Corporation. All rights reserved.
Start installing ASP.NET (4.0.30319.34209).
An error has occurred: 0x8007b799
You must have administrative rights on this machine in order to run this tool.
If you are in administrator mode, you should get as below these instructions.
Microsoft Windows [Version 6.1.7601]
Copyright (c) 2009 Microsoft Corporation. All rights reserved.
C:\Windows\system32>cd %windir%\Microsoft.NET\Framework64\v4.0.30319
C:\Windows\Microsoft.NET\Framework64\v4.0.30319>aspnet_regiis -i
Microsoft (R) ASP.NET RegIIS version 4.0.30319.34209
Administration utility to install and uninstall ASP.NET on the local machine.
Copyright (C) Microsoft Corporation. All rights reserved.
Start installing ASP.NET (4.0.30319.34209).
.........
Finished installing ASP.NET (4.0.30319.34209).
3. If you can not run ASP.NET 4.0, please refer to the instruction ‘aspnet_regiis –i'.
Reference
- http://www.iis.net/learn/get-started/planning-your-iis-architecture/understanding-sites-applications-and-virtual-directories-on-iis
- https://msdn.microsoft.com/zh-tw/library/k6h9cz8h.aspx
- https://msdn.microsoft.com/en-us/library/k6h9cz8h%28v=vs.140%29.aspx
Acknowledge
Thank you (ASP.NET) very much for this great development utility.
