Let's come back to ASP.NET tips and trick series. We are once again going to learn a new trick related to GridView. Previously, I have posted the following articles related to GridView.
Requirement
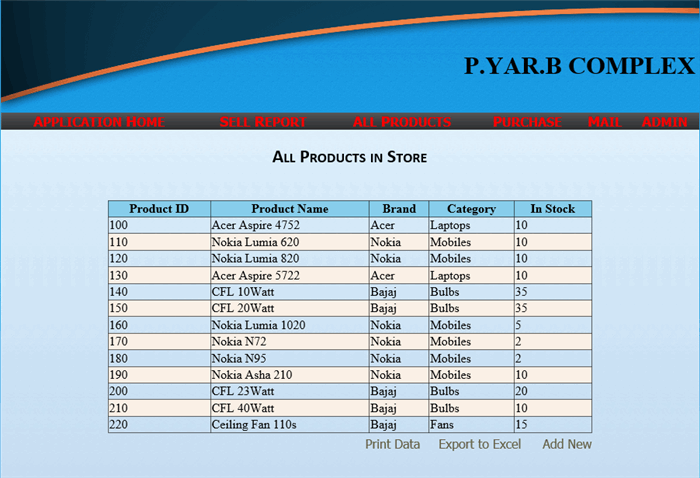
Suppose you have a page where you are displaying any kind of data to user. You want to add a functionality to print these records. But the problem with Browsers' Default Print options (Ctrl+P) is that it will print the whole page. All header images, footer, sidebar and colors will printed, which is not required. You have two options, either create a new page for print view and redirect user to that page or just print the required area, in our case it is GridView.
Most of the developers working in web applications have a MasterPage for their web-application. MasterPages are similar to templates in normal HTML having some advanced functionality and customized code for maintaining easier and common look of website or application.
Let's have a look at the below screen to make our requirement more clear.
Code for Default.aspx
This is the code for GridView.
<asp:GridView runat="server" ID="gvProducts"
AutoGenerateColumns="false" AllowPaging="false"
AlternatingRowStyle-BackColor="Linen" HeaderStyle-BackColor="SkyBlue"
Width="100%" OnPageIndexChanging="gvProducts_PageIndexChanging"
EmptyDataText="Sorry! No Products to List. First Add from Add Product Link.">
                    <Columns>
                        <asp:TemplateField HeaderText="Product ID">
                            <ItemTemplate>
                                <asp:Label ID="lblProductID"
                                runat="server"
                                Text='<%#Eval("ProductID")%>'
                                ToolTip="ID of Product as stored in Database.">
                                </asp:Label>
                            </ItemTemplate>
                        </asp:TemplateField>
                    </Columns>
                    <Columns>
                        <asp:TemplateField HeaderText="Product Name">
                            <ItemTemplate>
                                <asp:Label ID="lblProductName"
                                runat="server" ToolTip="Name of Product"
                                Text='<%#Eval("ProductName")%>'>
                                </asp:Label>
                            </ItemTemplate>
                        </asp:TemplateField>
                    </Columns>
                    <Columns>
                        <asp:TemplateField HeaderText="Brand">
                            <ItemTemplate>
                                <asp:Label ID="lblBrandName"
                                runat="server" ToolTip="Brand of Product"
                                Text='<%#Eval("BrandName")%>'>
                                </asp:Label>
                            </ItemTemplate>
                        </asp:TemplateField>
                    </Columns>
                    <Columns>
                        <asp:TemplateField HeaderText="Category">
                            <ItemTemplate>
                                <asp:Label ID="lblProductCat"
                                runat="server" ToolTip="Category of Product"
                                Text='<%#Eval("CategoryName")%>'>
                                </asp:Label>
                            </ItemTemplate>
                        </asp:TemplateField>
                    </Columns>
                    <Columns>
                        <asp:TemplateField HeaderText="In Stock">
                            <ItemTemplate>
                                <asp:Label ID="lblProductinStock"
                                runat="server"
                                ToolTip="Quantity available in Stock"
                                    Text='<%#Eval
                                    ("UnitsInStock")%>'></asp:Label>
                            </ItemTemplate>
                        </asp:TemplateField>
                    </Columns>
                </asp:GridView>
Code for Default.aspx.cs
We do not have much more at the backend, we are just going to bind data to GridView.
protected void Page_Load(object sender, EventArgs e)
    {
        if (!IsPostBack)
        {
            SqlConnection con = new SqlConnection
            (ConfigurationManager.ConnectionStrings["ConToStore"].ConnectionString);
            SqlDataAdapter adp = new SqlDataAdapter
            ("Select * from Products,Brands,Category where
            Products.BrandID=Brands.BrandID and
            Products.CategoryID=Category.CategoryID", con);
            DataSet ds = new DataSet();
            adp.Fill(ds);
            gvProducts.DataSource = ds.Tables[0];
            gvProducts.DataBind();
        }
    }
Printing Page
Lets press Ctrl+P key combination to print page, before printing, see the Preview.

Printing GridView Only
We need to make the following change to print GridView only. Let's start with HTML.
Wrap the GridView inside a Table or Panel. I am using Table. You can also go with Panel.
<table width="70%" id="pnlGridView"
runat="server" align="center"
class="ContentTable">
        <tr>
            <td colspan="2" align="center">
                <h1>All Products in Store</h1>
            </td>
        </tr>
        <tr>
            <td> </td>
        </tr>
        <tr>
            <td colspan="2">
                <asp:GridView runat="server"
                ID="gvProducts"
                AutoGenerateColumns="false" AllowPaging="false"
    AlternatingRowStyle-BackColor="Linen"
    HeaderStyle-BackColor="SkyBlue" Width="100%"
    OnPageIndexChanging="gvProducts_PageIndexChanging"
    EmptyDataText="Sorry! No Products to List.
    First Add from Add Product Link.">
                    ...............
     .............
                </asp:GridView>
            </td>
        </tr>
        <tr>
            <td align="right">
                <asp:LinkButton ID="lnkPrint" runat="server"
                ToolTip="Click to Print All Records"
                Text="Print Data"
                OnClick="lnkPrint_Click"></asp:LinkButton>
                <asp:LinkButton ID="lnkExportAll"
                runat="server" ToolTip="Export this List"
                Text="Export to Excel"
                OnClick="lnkExportAll_Click"></asp:LinkButton>

                <asp:LinkButton ID="lnkAddNew"
                runat="server" ToolTip="Add New Product"
                    Text="Add New"
                    OnClick="lnkAddNew_Click"></asp:LinkButton>
            </td>
        </tr>
    </table>
Now, just add the following JavaScript function in head section and assign that function to Print linkbutton.
<script language="javascript" type="text/javascript">
        function PrintPage() {
            var printContent = document.getElementById
            ('<%= pnlGridView.ClientID %>');
            var printWindow = window.open("All Records",
            "Print Panel", 'left=50000,top=50000,width=0,height=0');
            printWindow.document.write(printContent.innerHTML);
            printWindow.document.close();
            printWindow.focus();
            printWindow.print();
        }
    </script>
Now let's click on Print Link button which we have created. Following will be the output for the above code.
Bingo! It was the requirement.
Hope you enjoyed reading. If you have any feedback or suggestions, please send me as comment or use the contact options. Keep sharing.

