In this instalment of my series on implementing continuous delivery with TFS we pick up where we left off in the previous post and add the automated web tests we created to Microsoft Test Manager. We then look at how to schedule these tests for automatic execution through the deployment pipeline. Exciting stuff so lets get started…
Configure a Test Controller
Our starting point is to configure our TFS admin machine as a test controller. (You could create a dedicated machine of course but in our demo environment it’s an unnecessary overhead.)
- Create a new domain account called TFSTEST and add to the Administrators group on your ALMTFSADMIN machine.
- Download the Agents for Microsoft Visual Studio 2013. See here for 2013.4 releases.
- Mount the Agents for Microsoft Visual Studio 2013 iso and from the TestController folder install the test controller on ALMTFSADMIN configuring it to run with the TFSTEST account and for the appropriate Team Project Collection:
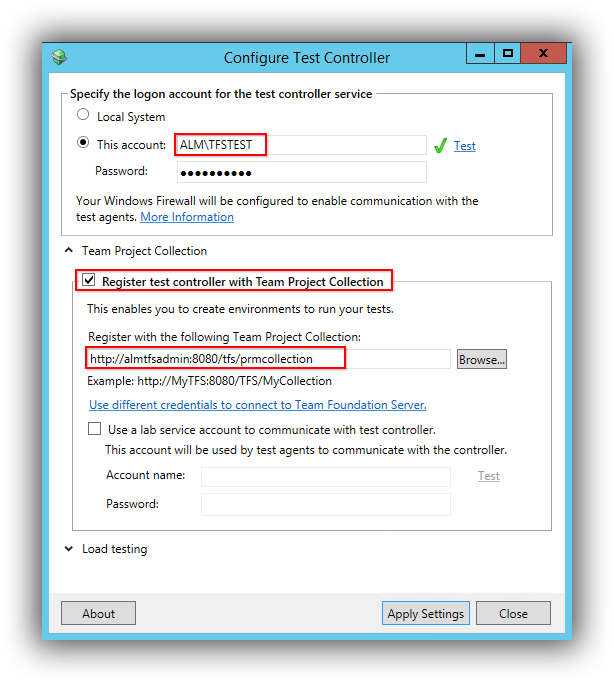
- Click Apply settings to ensure that the configuration steps were successful.
Configure a Web Client Test Machine
The big picture here is that we will deploy the Contoso University application to the DAT (Development Automated Test) environment and then run the automated tests against DAT. We won’t be using our development machine and instead will make use of a dedicated web client test machine which should be configured as follows:
- Create an new Azure VM from a Windows 8.1 Enterprise (x64) image called ALMCLIENTWIN81. (Note that Windows desktop editions are only available to MSDN subscribers).
- Add the RMDEPLOYER and TFSTEST to the Administrators group.
- Install the Release Management Deployment Agent and ensure it is in the Ready status in the Release Management client. (See here for details.)
- Install Microsoft Test Manager 2013.
- Mount the Agents for Microsoft Visual Studio 2013 iso (see above) and from the TestAgent folder install the test agent configuring it to run with the TFSTEST account and to register with the test controller installed above:
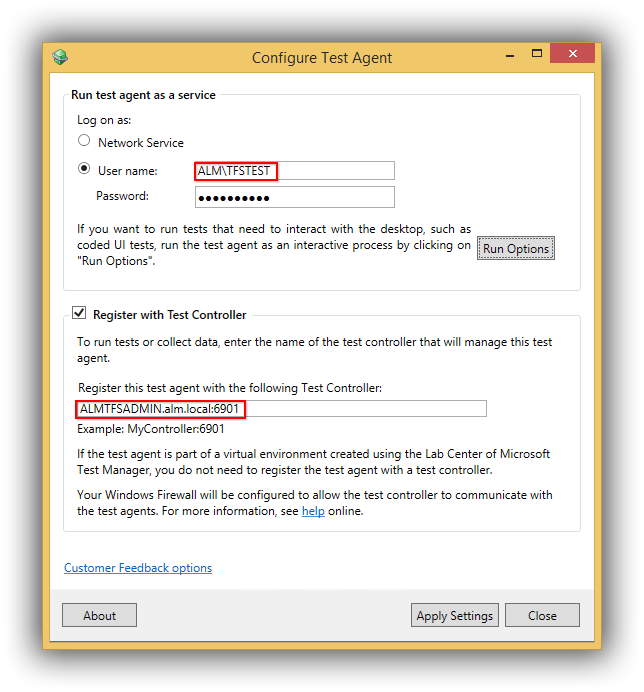
- Click Apply settings to ensure that the configuration steps were successful.
- Install FireFox.
Configure Microsoft Test Manager
As usual I’m assuming you have a degree of familiarity with the tooling, in this case Microsoft Test Manager 2013. If not then see my getting started with Microsoft Test Manager blog post here. You will need to have installed MTM on to your development machine and successfully connected to your ContosoUniversity Team Project. Now carry out the following steps.
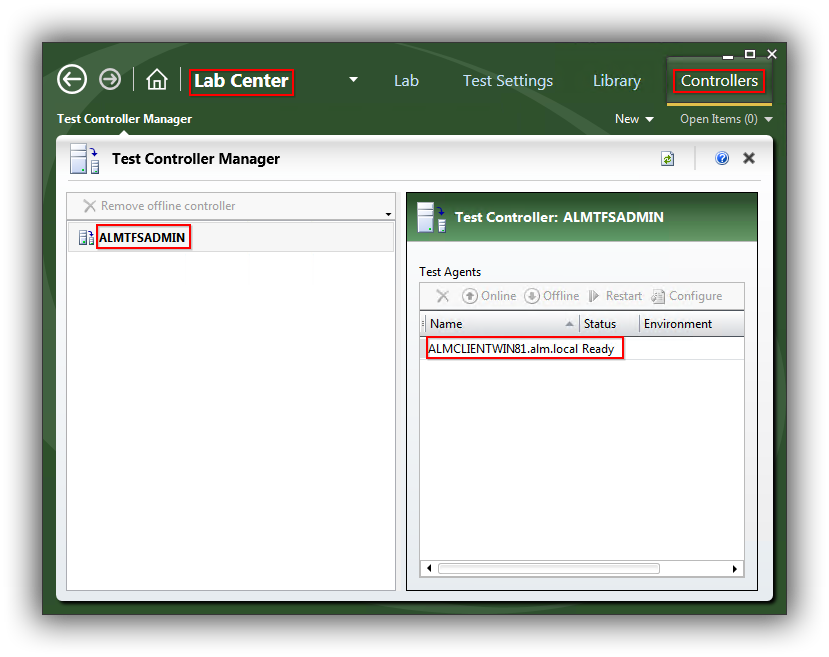
- Open MTM and connect to Lab Center. Navigate to Controllers and ensure that ALMTFSADMIN is registered as the Test Controller and that the Test Agent on ALMCLIENTWIN81 is in the Ready status:
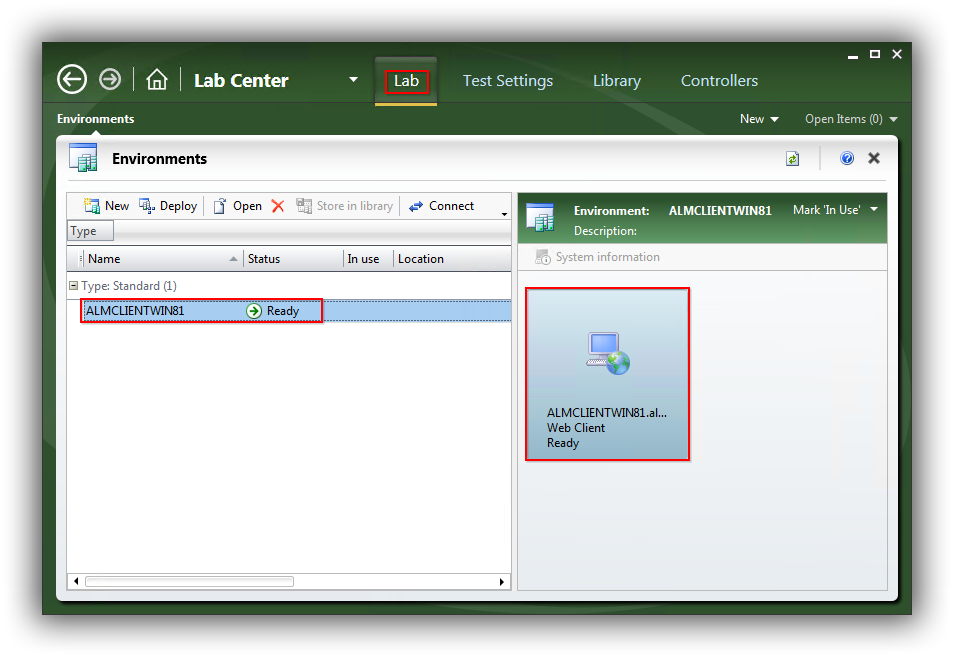
- Navigate to Lab and create a new Standard environment called ALMCLIENTWIN81. From the Machines page add ALMCLIENTWIN81 and give it the Web Client role. From the Verification page click Verify to initiate the verification procedure. If all verifications pass you should end up with a new environment in the ready state:
- Navigate to Test Settings and create a new entry called Automated Test Run and choose Automated for the What type of tests do you want to run? question. From the Roles page choose the Web Client role which should match the environment created above. From the Data and Diagnostics page choose everything except Screen and Voice Recorder and feel free to configure each option as you see fit. Click on Finish to save the settings and close MTM.
- Open MTM and connect to Testing Center. If this is the first time you have connected you will need to Add a Test Plan:
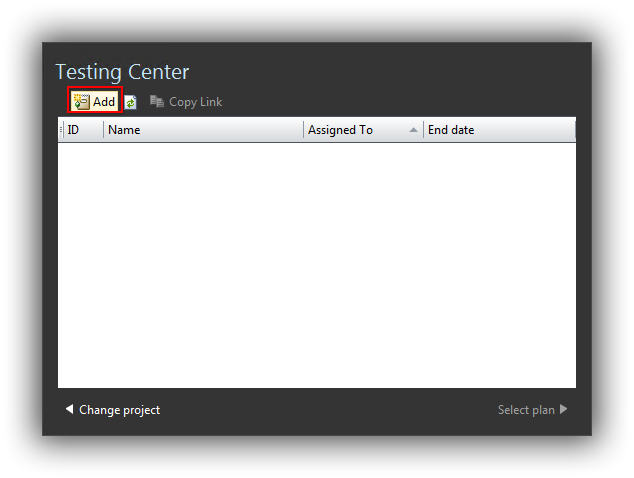
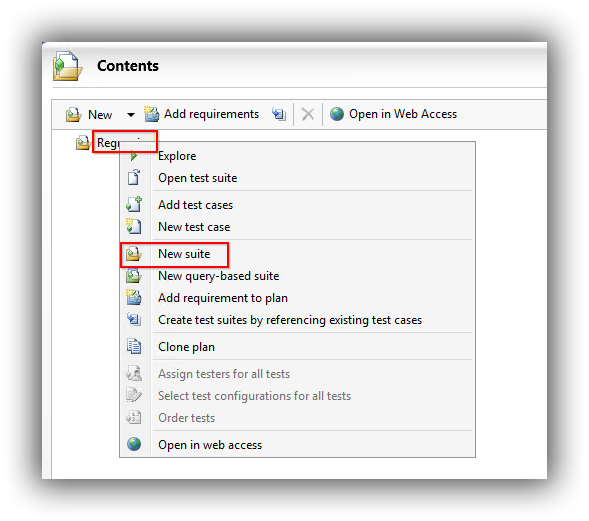
- Add a test plan called Regression and then choose Select plan to open it at the Contents tab. Add a new suite called Department by right-clicking the Regression node and choosing New suite:
- Now over in the right-hand pane create two new test cases called Can_Navigate_To_Departments and Can_Create_Departmemt:

- Note the IDs of these new test cases and switch to Visual Studio, opening the ContosoUniversity solution if it isn’t already open. From Team Explorer > Work Items search for each of the two new test cases and in turn open them to carry out the next step for both test cases.
- Click on the Associated Automation tab and then choose the ellipsis at the right of the Automated test name field. This brings up the Choose Test dialog from where you can select the required test:
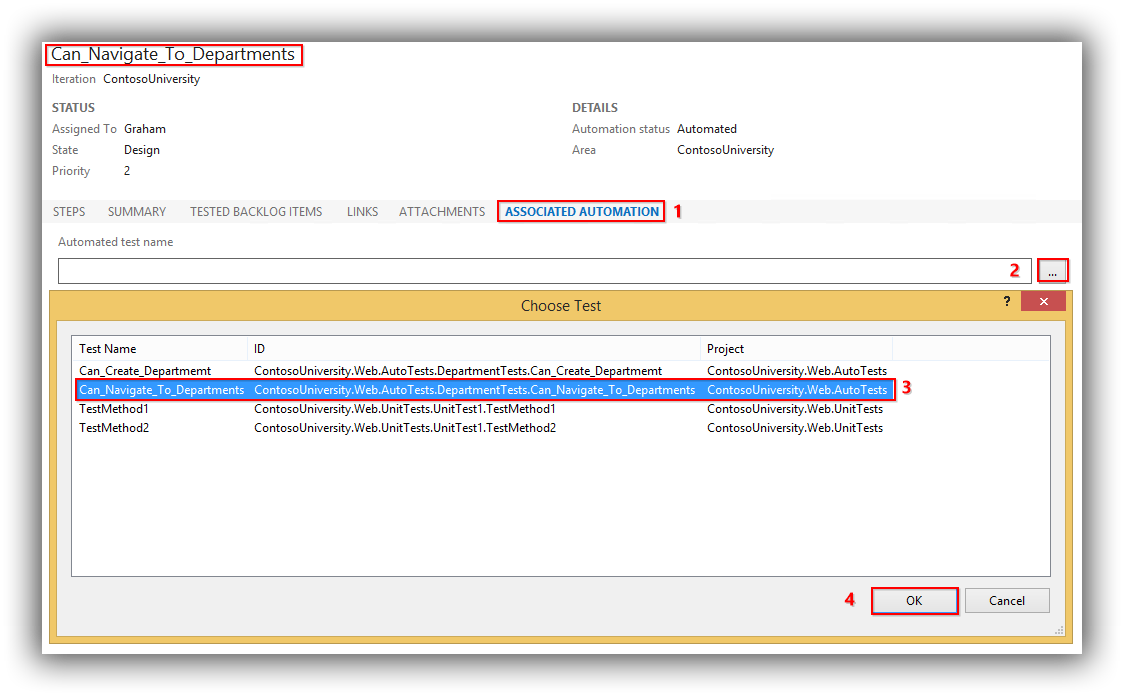
- Make sure to save the test case work items after associating the automated tests.
- Back in Microsoft Test Manager navigate to the Run Settings tab of the test plan. Under Automated runs set Test settings = Automated Test Run and Test environment = ALMCLIENTWIN81 – the items we created above. Make sure you Save and Close.
Configure Release Management
With our automated web tests incorporated in to an MTM Test Plan the next step is to configure Release Management to run them as part of the DAT stage of the deployment pipeline. Carry out the following steps from within Release Management:
- From Configure Paths > Servers add ALMCLIENTWIN81 and ensure it is in the Ready status.
- From Configure Paths > Environments add ALMCLIENTWIN81 via the Link Existing button.
- From Configure Apps > Components create a new component called Contoso University\Run MTM Auto Tests and configure as follows:
- Source > Builds with application (= selected) > Path to package = \
- Deployment > Tool = MTM Automated Tests Manager
- Configuration Variables > Variable Replacement Mode = Only in Command
- From Configure Apps > Agent-based Release Templates open Contoso University\DAT>DQA and edit the Deployment Sequence for DAT as follows:
- From Toolbox > Servers drag ALMCLIENTWIN81 to the Deployment Sequence below ALMSQL01.
- From Toolbox > Components right click the node and add Contoso University\Run MTM Auto Tests.
- Now drag Contoso University\Run MTM Auto Tests to ALMCLIENTWIN81 and configure the compnent as follows:
- TestRun Title = Department Tests
- PlanId = 28 (or whatever your Plan ID is as it is likely to be different)
- SuiteId = 29 (or whatever your Suite ID is as it is likely to be different)
- ConfigId = 1 (or whatever your Configuration ID is as it is likely to be different)
- TfsCollection = http://almtfsadmin:8080/tfs/PrmCollection (or whatever your Team Collection URL is as it is likely to be different)
- TeamProject = ContosoUniversity
- TestEnvironment = ALMCLIENTWIN81
- Build Directory = $(PackageLocation)
Some Final Configuration
In order for automated tests to run I’ve found that as a minimum the Deployment Agent account (RMDEPLOYER) needs to be in the Project Collection Administrators group. It may be possible to fine tune this requirement but it’s a level of trial and error I haven’t had time to perform. This permission can be granted on your TFS admin machine from Team Foundation Server Administration Console > $(TfsAdminMachineName) > Application Tier > Team Project Collections > $(TeamProjetName) > General > Group Membership > [$(TeamProjetName)]\Project Collection Administrators > Properties.
If your Visual Studio solution contains a mix of unit test and automated test projects and the build definition is configured to run unit tests you are going to want to ensure the automated tests are excluded as they will fail and cause the build to report it only partially succeeded. There are various ways to do this but the technique I’ve used is to modify all build definitions to change Process > Build Process Parameters > 3. Test > 1. Automated tests > 1. Test source > Test sources spec to unittest where it was previously just test. This obviously ties in with my project naming convention of ContosoUniversity.Web.UnitTests and ContosoUniversity.Web.AutoTests.
Start a Deployment
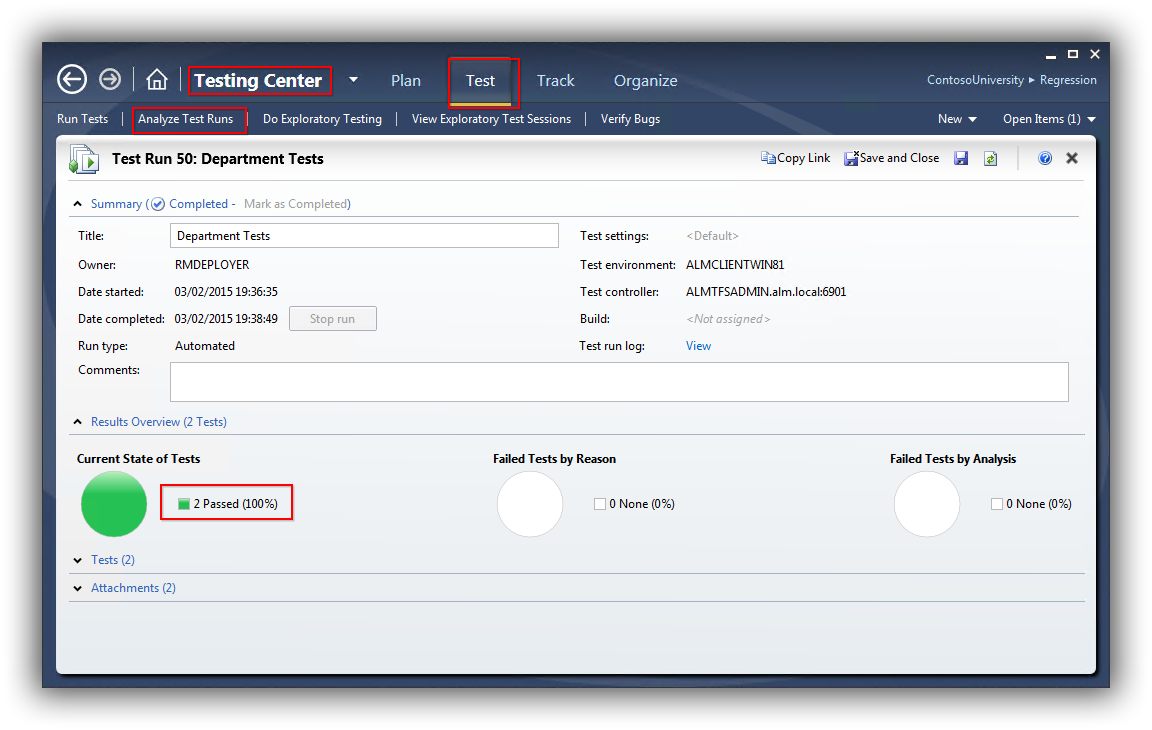
From Visual Studio manually queue a new build from ContosoUniversity_Main_Nightly. If everything is in place the build should succeed and you can open Microsoft Test Manager to check the results. Navigate to Testing Center > Test > Analyze Test Runs. You should see your test run listed and double-clicking it will open up the fruits of all our endeavours so far, the test run results:
Wrap-Up
If getting to this stage felt like it required a huge amount of detailed configuration you are probably right. There are a great many moving parts to get working correctly and any future simplification of the process by Microsoft in the in the future will be welcomed.
Although we’ve reached a major milestone on this continuous delivery journey there is still plenty more to talk about so do watch out for the next installation.
Cheers – Graham
The post Continuous Delivery with TFS: Running Automated Web Tests with MTM appeared first on Please Release Me.
