At this point in my series of posts on building a continuous delivery pipeline with TFS, we have installed and configured quite a lot of the TFS infrastructure that we will need, however as yet we don’t have an environment to deploy our sample application to. We’ll attend to that in this post, but first a few words about the bigger environments picture.
Thinking About the Bigger Environments Picture
When thinking about what can cause an application deployment to fail, the first things we probably think about are the application code itself and then any configuration settings the code needs in order to run. That’s only one side of the coin though, and the configuration of the environments we are deploying to might equally be to blame when things go wrong. It makes sense then that we need tooling to manage both the application and its configuration and also the environments we deploy to. The TFS ecosystem addresses the former but doesn’t address the latter. So what does? There are two large pieces to consider: provisioning the servers that form the environment our application needs to run in and then the actual configuration of those servers our application will run on.
Provisioning servers is very much a horses for courses affair: what you do depends on where your servers will run and whether they need to be created afresh each time they are used. On premise, it might be fine for servers to be long-lived and always on. In the cloud, you may want the ability to create a test environment for a specific task and then tear it down afterwards to save costs. In the Windows world, dynamically creating environments can be achieved pretty much anywhere using scripting tools such as PowerShell. In Azure, there are further options since there is now tooling such as Brewmaster or Resource Manager that can create servers using templates that describe what is required.
Managing the internal configuration of servers using tooling once they have been created can and should be done wherever your servers are running. The idea is that the only way a server gets changed is through the tooling so that if the server needs to be recreated (or more of the same are needed), it’s pretty much a push-button exercise. (This is probably in contrast to the position most organisations are in today where servers are tweaked by hand as required until they become works of art that nobody knows how to faithfully recreate. If you are in the position of needing to know the configuration of an existing server, then a product such as GuardRail can probably help.) The tooling to manage server configuration includes Puppet, Chef and Microsoft’s new offering in this space PowerShell Desired State Configuration (DSC).
The techniques and tools mentioned above are definitely the way to go, however in this post I’m ignoring all that because the aim is to get the simplest thing working possible (although researching and writing about automating infrastructure and server configuration is on my list). Additionally, because we are setting up a demo environment, we’ll be working in multi-tenancy mode, i.e., multiple environments are hosted on the same server to keep the number of VMs that will be required to a minimum.
Provisioning Web and Database Servers
Our sample application consists of a web front end talking to a SQL Server database so we’ll need two servers – ALMWEB01 running IIS and ALMSQL01 running SQL Server 2014 or whatever version makes you happy. I use a basic A2 VM for the web server and a basic A3 for SQL Server, both created from a Windows Server 2012 R2 Datacenter image and configured as per my Azure foundations post. Once stood up, the VMs need joining to the domain and configuring for their server roles, the details of which I’m not covering here as I’m assuming you already know or can learn. One point to note is that you need to resist the temptation to create the SQL Server VM from a preconfigured SQL Server image from the gallery. This will eat your Azure credits as you pay for the SQL Server licence time with these images. Rather, download SQL Server from MSDN and do the installation yourself on a vanilla Windows Server VM.
Installing the Release Management Deployment Agent
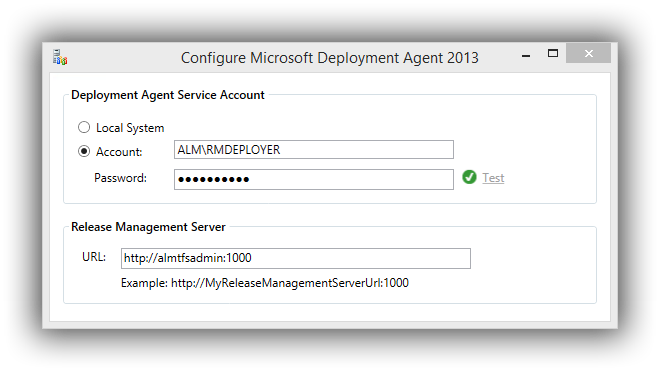
The final configuration we need to perform to make these VMs ready to participate in the delivery pipeline is to install the Release Management Deployment Agent. The agent needs to run with a service account so create a domain account (I use ALM\RMDEPLOYER) and add it to the Administrators group of the two servers. Next open up the Release Management client and add this account (Administration > Manage Users) giving it the Service User role. Back on your deployment servers, you can now run the Deployment Agent install and provide the appropriate configuration details:

After clicking Apply settings, the installer will run through its list of items to configure and if there are no errors, the agent will be up-and-running and ready to communicate with the Release Management server. To check this, open up the Release Management client and navigate to Configure Paths > Servers. Click on the down arrow next to the New button and choose Scan for Agents. This will bring up the Unregistered Servers dialog which allows one to scan for and then register servers. If all is well, you’ll be able to register your two servers which should appear in the Servers tab as follows:

We’re not quite ready to start building a pipeline with Release Management yet and in the next instalment, we’ll carry out the configuration steps that will take us to that point.
Cheers – Graham
The post Continuous Delivery with TFS: Standing up an Environment appeared first on Please Release Me.
