This post picks up from a previous post in my series on building a continuous delivery pipeline with TFS where we got to the point of adding the sample application to version control. The next step is to configure the application for continuous integration (CI).
The ThoughtWorks people have a nice definition of CI here. The practice is essential where multiple developers are working on the same code branch because of the very real possibility of one developer making changes in the same area of code as another. By checking code in to version control and then running a build on that checked-in code, any conflicts that have broken the build are detected early and can be fixed early.
Configuring a Build Controller and Build Agents
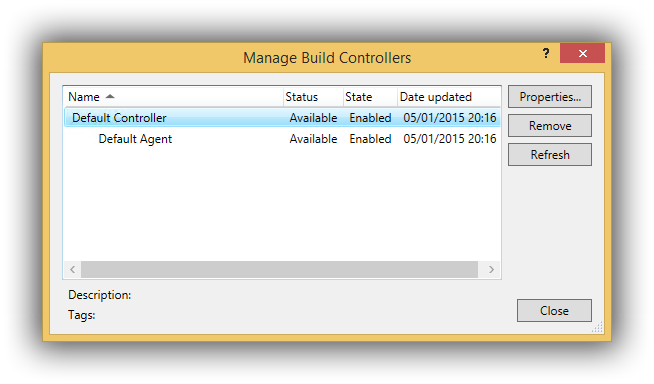
The starting point for implementing CI with TFS is to have a configured and running Build Controller that can communicate with one or more Build Agents. If you followed my guide on setting up an all-in-one TFS server, you should already have the necessary build infrastructure in place. You can check this from within Visual Studio by selecting the Home tab of Team Explorer and choosing Builds. From the Actions dropdown, choose Manage Build Controllers. You should see something similar to this:

(The above assumes that Visual Studio is connected to your Team Collection and that the build infrastructure has been configured for your Team Collection.)
Creating a Build Definition
In order to configure CI, you need to create a build definition which you do by clicking on the New Build Definition link on the Build tab of Team Explorer. Jumping ahead a little bit, you will almost certainly want to devise a naming convention for your build definitions in a production environment since it’s all too easy for them to multiply and get out of hand. As a minimum, you will probably want one definition that is triggered when code is checked in by developers and one that runs on a schedule that starts the nightly run of the continuous delivery pipeline. In our demo pipeline, these will be called ContosoUniversity_Main_Checkin and ContosoUniversity_Main_Nightly. I’m purposefully using underscores as build definition names (at least those that copy output files) get sewn in to filepath names as part of the CI process.
Let’s get started by creating a new build definition and naming it ContosoUniversity_Main_Checkin on the General tab. Now configure tabs as follows (only settings that need changing are listed):
- Trigger = Continuous Integration – Build each check-in
- Source Settings > Working folders:

- Build Defaults > Staging location = This build does not copy output files to a drop folder
- Process > 2. Build > 2. Configurations = Any CPU|Release
In a future post, we’ll look at enhancing this build definition with features such as file and assembly versioning (so all EXEs and DLLs have the same file and assembly version) however for now we’re keeping things simple so go ahead and save and close the Build Definition configuration tab.
Testing the Build Definition
In order to test the new definition, right-click it and choose Queue New Build. Accept the defaults on the Queue Build dialog and click on Queue to start the build. In the My Builds section of Team Explorer’s Builds tab, you should now see the queued build:

If the build succeeds, you should see something like this:

You can double-click a build at any time to open it and see fuller details. If you do that, you should see that there were No Test Results and No Code Coverage Results. Additionally, No tests were impacted. I’ll be addressing this in a future post but meantime we have one more test to carry out: to ensure that the build definition kicks off a build when code is checked in. If required, open the ContosoUniversity solution in Visual Studio and make a change – add a comment to web.config for example. Check the change in and navigate to the Builds tab of Team Explorer. You should see a new queued build has been created for the changeset:

As alluded to the above, there is a lot more we can and should do with this build definition to try and ensure that code meets certain quality requirements before it is checked in to version control (or at least cause the build to fail if those requirements aren’t met). Future posts will provide details of how to layer these quality checks on to the delivery pipeline however the next post is where it gets really interesting as we finally get to installing and configuring Release Management for Visual Studio.
Cheers – Graham
The post Continuous Delivery with TFS: Configuring the Sample Application for Continuous Integration appeared first on Please Release Me.
