Introduction
I want to introduce you to one more framework today. I know, I know - you will be going like "Yet Another Framework" :). But believe me this one will actually excite you. Especially if you are JavaScript Ninja.
Yesterday Telerik introduced a new JavaScript framework called "NativeScript". NativeScript is completely free and is released as a open source framework. Its currently in a beta launch and will hit mainstream during May time frame. So rest of this article will be introduction to nativeScript - its features and usage. So sit tight and read on
About NativeScript
The goal of NativeScript is to let people develop native Android, iOS and Windows Phone Apps from a single code base. And to let people use their JavaScript & CSS skill. Yes you heard it right - JavaScript & CSS. You will use JavaScript for the application logic and CSS to style your UI components. If you are eager to check this out, head over to www.nativescript.org. Thats the home for NativeScript. NativeScript also lets you access native platform API right from your JavaScript code. Entire native platform functionality is available in the javaScript layer of your code.

Sailient Features of NativeScript
- Truly Native UX
Although you code in javaScript, the application package is not based on a hybrid rather its truly native.
- Can use 3rd party JavaScript libraries
Allows you to reuse JS libs that do not have browser or other platfirm dependencies for e.g. moment.js for date formatting
- XML UI Declaration
UI is defined using XML syntax. No learning curve required here for any platform
- Open Source
Source code is available on GitHub repo and is Apache license based. You can contribute too to NativeScript framework.
- Rich Data Binding
Allows handle bars kind of rich data binding in your XML views
How Does NativeScript Work
Lets look at a block diagram which depicts the working of NativeScript framework:

Lets understand the above diagram a little better:
- You write your app using javaScript and use the NativeScript modules. NativeScript modules expose the device's native platform capabilities in a consistent manner. And you use those modules in your non-platform specific code.
- Buld your app. During build NativeScript runtime translates non-platform specific code to native language of the target platform. NativeScript tools use the native platform SDKs & tools to build native app package
- Run your cross-platform native apps in emulator or on real devices
Getting Started with NativeScript
NativeScript has a command line interface or CLI which is also open sourced. With the NativeScript CLI you can develop native apps with IDE of your choice locally and free of charge. Note that on a Windows environment, you can develop only Android apps using the CLI. This is a limitation due to the nature of iOS development & requirements put forth by Apple.
In this article i will be concentrating on Windows OS as the development platform.
Let's see how we set up things on a Windows machine to develop apps with NativeScript CLI.
Pre-Requisites
- Node JS
Install Node JS on your machine. You can go to http://nodejs.org, download and install Node.
- Chocolatey
Chocolatey is a package manager but for your machine. You can install applications/tools using chocolatey. You can go to https://chocolatey.org/ and install chocolatey.
- JDK 7 or a later stake release
You need Java Development Kit to be installed for android apps. In a command prompt run the command "choco install java". Then create JAVA_HOME environment variable (if not present) and point it to the JDK installation folder.
- Apache Ant 1.8 or later
In a command prompt run the command "choco install ant". Then update the PATH environment variable with path to Ant installation folder.
- Android SDK
In a command prompt run the command "choco install android-sdk". Once the SDK is installed, update the PATH environment variable with path to tools & platform-tools folder inside your android SDK installation folder. Close the command prompt, open another command prompt and update android sdk with the following command "android update sdk". Selecth the packages for Android 19 SDK and any other SDKs you want to install
- NativeScript CLI
Open a command prompt and run the following command: "npm i -g nativescript". Restart the command prompt after this.
Hello World with Native Script
Now lets code a sample hellow world app. Since i will be using Windows OS as the develpoment machine, we will be building a native android Hellow World app using NativeScript CLI. Follow the below steps to create the app:
- Creating New Project
To create a new mobile app using NS CLI, open a command prompt and run the following command:
"tns create hello-world"
- Add Android Platform
Above step creates a new folder called hello-world. Next we need to add the platform we want to support in this app. I will add Android since i am on Windows machine. In the command prompt execute the following commands:
"cd hello-world"
"tns platform add android"
This command uses the native SDKs and generates some platforms specific content in your project.
- Run the App
At this moment the NS CLI would have created a simple app which can be readily run on an emulator or on a device. In order to use the emulator, on the command prompt execute the following command:
"tns run android --emulator"
Note: If you have Genymotion configured on your machine, you can execute the following command to use genymotion emulator:
"tns run android --emulator --geny <Genymotion device name>"
If we emit the --emulator switch the app can be deployed to a USB connected Android device
Here is the screenshot of the app we just created:

NativeScript Project Structure
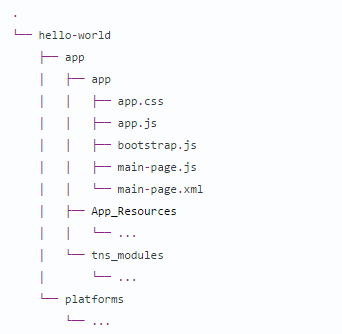
Now that you have seen the app lets take a look at the project structure of a NativeScript based mobile app. Following screenshot shows the structure for you:

Lets go over the project structure in detail now:
- The app/app folder is the folder where you will have your app code. This is your development area. All pages and code logic go into this folder.
- The Platforms folder will contain platform specific resources of the app. When we execute command "tns platform add android|ios" - the platform specific folder is created in front of Platform folder.
- The App_Resources folder contains resources per platform. This includes you icons, splash screens and config files like AndroidManifest.xml or Info.plist files.
- The tns_modules folder contains the NativeScript modules.
The app.js found in app folder is the starting point for the app. The app folder also contain main-page.xml and main-page.js. Here is the code snippet found in in app.js:
var application = require("application");
application.mainModule = "app/main-page";
application.start();
In the first line we create the application. Then we are setting the main module or main page of the app to app/main-page. Lets look at the main-page.xml which is the UI for our app. here is the code snippet:
<Page xmlns="http://www.nativescript.org/tns.xsd" loaded="pageLoaded">
  <StackLayout>
    <Label text="Tap the button" cssClass="title"/>
    <Button text="TAP" tap="{{ tapAction }}" />
    <Label text="{{ message }}" cssClass="message" textWrap="true"/>
  </StackLayout>
</Page>
As stated earlier, the UI in nativeScript is defined using XML syntax. So in our case, we have created a stacked layout which stacks its contents vertically by default. We have placed a label, then a button and then another label which will output a message. Next the logic for main-page is in main-page.js. Here is the code snippet for main-page.js:
var vmModule = require("./main-view-model");
function pageLoaded(args) {
var page = args.object;
page.bindingContext = vmModule.mainViewModel;
}
exports.pageLoaded = pageLoaded;
We first reference a ViewModel. ViewModel is nothing but a business object which is observable in nature. We have the logic placed in the view model and we bind that view model to the main page. We have a pageLoaded event defined and is referenced by main-page.xml. So when the page lods, the binding context is set to view model. Here is the code snippet of main-view-model:
var observable = require("data/observable");
var counter = 42;
var mainViewModel = new observable.Observable();
mainViewModel.set("message", counter + " taps left");
mainViewModel.tapAction = function () {
   counter--;
   if (counter <= 0) {
     mainViewModel.set("message", "Hoorraaay! You unlocked the NativeScript clicker achievement!");
   }
   else {
     mainViewModel.set("message", counter + " taps left");
   }
};
exports.mainViewModel = mainViewModel;
The logic above is self explanatory.
And thats all it takes to make a android app using javaScript. There is one things we did not talk about. What about CSS style sheet for styling. Well if you open app.css, it contains global styles for the whole app. Here is the snippet from app.css file:
.title {
    font-size: 30;
    horizontal-align: center;
    margin:20;
}

button {
    font-size: 42;
    horizontal-align: center;
}

.message {
    font-size: 20;
    color: #284848;
    horizontal-align: center;
}
Summary
What we have seen in this article is just the tip of the iceberg. nativeScript is a free of charge, open source framework for building native - truly native - mobile apps for Android & iOS with just your JavaScript skill & knowledge. So from a web developer you can now become a native app developer in no time. Through this article i just wanted to let you all know about this new framework and hope you are as excited as i am to try this out.
Resources
Some of the resources that will help you go the next mile:
