In this second post in my series about creating a continuous delivery pipeline using TFS, I describe how to create a domain controller in Azure. It’s not mandatory – it’s perfectly possible to use shadow accounts and that’s how I started – however the ability to use domain accounts makes configuring all of the moving parts much simpler. It also turns out that creating a domain controller isn’t that much of a chore.
Create the VM
The first step is to create a Windows Server VM using the foundations configured in the first post in the series. I use a naming convention for groups of VMs so my domain controller is ALMDC, and since this VM won’t be doing a lot of work size A0 is fine. If you have other VMs already created, they should be deallocated so you can specify the first none-reserved IP address in the allocated range as static. For my Virtual Network in the 10.0.0.0/25 address space, this will be 10.0.0.4 – previous slots are reserved. If you create the VM using PowerShell, you can specify which IP should be static when the VM is created. If you use the Portal, you can do that later which is the technique I’ll describe here. See this article for more details.
Configure the VM for DNS
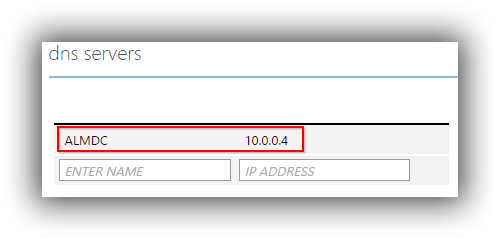
Whilst the VM is being provisioned, head over to your virtual network and select the Configure panel and add your new server and its IP address as a DNS server, as it will be also performing this role. You should end up with something like this:

Once the DC has been provisioned, you use your version of the following PowerShell command to specify a static internal IP for a previously created VM:
Get-AzureVM -ServiceName AlmCloudService -Name ALMDC | Set-AzureStaticVNetIP -IPAddress 10.0.0.4 | Update-AzureVM
This command needs to be run from an admin workstation that has been configured to work with Azure PowerShell and your Azure subscription. You need to install Azure PowerShell (easiest way is via the Microsoft Web Platform Installer) and then work through configuring it to work with your Azure subscription, details here. If all that’s too much right now, you can just make sure that your DC is the first VM in the cloud service to start so it uses the IP specified as DNS.
Install and Configure Active Directory
One you are logged in to the domain controller install the Active Directory Domain Services role via Server Manager > Add roles and features. After rebooting, you will be prompted to install Active Directory and to specify a Fully Qualified Domain Name – I chose ALM.local. Defaults can be chosen for other options. Next, install the DNS Server role. I deleted the Forwarder entries (Server Manager > DNS Manager > Tools and choose Properties from the shortcut menu of the DNS node and select the Forwarders tab) but I’m not sure now if that was absolutely necessary. You can check if everything is working by accessing a well-known website in IE. One point to note is that you shouldn’t manually change the NIC settings of an Azure VM as that can lead to all sorts of trouble.
Although I’ve mentioned previously that you need to shut down your VMs so they show their status as Stopped (Deallocated) in the portal to avoid being charged, I actually leave my DC running all the time as it only costs about £4 per month and I like to know that when I start my other VMs I have a fully functioning DC for them to connect to.
Cheers – Graham
The post Continuous Delivery with TFS: Creating a Domain Controller appeared first on Please Release Me.
