During my last assignment, I needed to submit the content of Repeating Table of InfoPath form to an Access database. The form had to be published on SharePoint Site - so I could not submit directly to the database, but I was forced to use the web service (because web enabled forms do not allow access directly to the database).
So I built a web service method which allowed me to submit one row of the Repeating Table to the database and I thought that I would be able to submit each row in some kind of a loop inside the InfoPath form. Well, it did not work, I was just able to submit the first row all the time and nothing more.
So I decided to submit "the entire form" and than parse it on the web service side. Here is a short example of how to do this.
Preparing the InfoPath Form
First, let's create a simple InfoPath form with one repeating table (e.g., list of products).
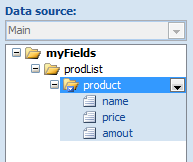
 Now what you have to do is rename the fields in the "Data sources" tab. Later, you will use these names of the fields to get the values stored XML representing the InfoPath form.

Creating the Web Service
In the web service, you will need a method which takes XmlDocument and will parse this XML document representing the InfoPath form and store its values to the database.
[WebMethod]
public void SubmitDocument(XmlDocument doc)
{
  XmlNamespaceManager nsManager = new XmlNamespaceManager(doc.NameTable);
  nsManager .AddNamespace(formNamespace, formURI);
  nsManager .AddNamespace("dfs",
"http://schemas.microsoft.com/office/infopath/2003/dataFormSolution");

  XmlNode root = doc.DocumentElement;
  XmlNodeList list = root.SelectNodes("/dfs:IPDocument/my:myFields/my:prodList/my:product", nsManager);

  foreach (XmlNode node in list)
  {
    string name = node.SelectSingleNode
        ("/dfs:IPDocument/my:myFields/my:prodList/my:product/my:name", nsManager).InnerText;
    string price = node.SelectSingleNode
        ("/dfs:IPDocument/my:myFields/my:prodList/my:product/my:price", nsManager).InnerText;
    string amount = node.SelectSingleNode
        ("/dfs:IPDocument/my:myFields/my:prodList/my:product/my:amount", nsManager).InnerText;

    SubmitToDataBase(name,price, amount);
  }
}
In this method, first we initialize the XMLNamespaceManager. To this manager, we will have to add two namespaces. First one is the namespace of the data source of the InfoPath document. This one, we can find out in InfoPath client by navigating to Properties -> Details.
Now when InfoPath submits the form to the Web Service, it adds another namespace to the document marked as: dfs with the URL http://schemas.microsoft.com/office/infopath/2003/dataFormSolution and you need to add the namespace to your namespace manager.
nsManager .AddNamespace("dfs", "http://schemas.microsoft.com/office/infopath/2003/dataFormSolution");
Then to get value of certain field in the XmlDocument, we need to know the XPath which leads directly to the desired XmlNode. We can get the XPath by the Copy XPath option, which can be found in the context menu of desired field in the "Data Sources" tab.
For example, to get the "amount" XmlNode and later the string representing a number inside this node, we can use the following code:
XmlNode nAmount = node.SelectSingleNode
("/dfs:IPDocument/my:myFields/my:prodList/my:product/my:amount", nsManager);

int amount = Convert.ToInt32(nAmount.InnerText);
Preparing the Accesss Database Connection
To connect to Access database, you can use the OLE DB Provider, exactly the .NET Framework OLE DB provider, in the namespace System.Data.OleDB. First, you need to specify the connection string to your database. Because we are using Web Service, it is a good idea to store it in the Web.config file. Add the following to the Web.config file.
<connectionStrings>
  <add name="myDB" providerName="Microsoft.Jet.OLEDB.4.0"
   connectionString="Provider=Microsoft.ACE.OLEDB.12.0;Data Source=C:\myDB.accdb"/>
</connectionStrings>
Later, already in the code of your Web Service, you can prepare yourself a property, which will provide you this connection string (you may reference this connection string several times, it is good to have a shortcut for the reference in the Web.config).
public String ConStr
{
  get { return ConfigurationManager.ConnectionStrings["myDB"].ConnectionString; }
}
The following is a simple implementation of a method which stores the data in the database. You can make this method part of your Web Service directly or build yourself some data access layer class.
public void SubmitToDataBase(String name, String price, String amount)
{
  OleDbConnection con = new OleDbConnection(ConStr);

  String cmd = "INSERT INTO products(name,price,amount)values(?,?,?)";
  OleDbCommand command = new OleDbCommand(cmd, con);

  OleDbParameter pName = new OleDbParameter();
  pName.Value = name;
  command.Parameters.Add(pName);

  OleDbParameter pPrice = new OleDbParameter();
  pPrice.Value = Convert.ToInt32(price);
  command.Parameters.Add(pName);

  OleDbParameter pAmount = new OleDbParameter();
  pAmount.Value = Convert.ToInt32(amount);
  command.Parameters.Add(pAmount);

  con.Open();
  command.ExecuteNonQuery();
  con.Close();
}
There is nothing too interesting here if you are familiar with some other ADO.NET classes. Just notice that I am using parametrized queries. The SQL command contains question marks, which are later when the actual OleDbCommand is compiled substituted by provided parameters. That is all about the Web Service now you need to go back and configure the InfoPath form to connect to the Web Service.
Connecting the InfoPath form to the Web Service
OK, now let's go back to the InfoPath form design. To submit the document to this web service, you will have to add new data source select submit data -> to Web Service. Then, localize you web service and find the method that you just created and then finally in the Data Connection Wizard, select submit Entire form.

Now just to give you a complete idea, here is the XML which is submitted to the web service. However, if the document is saved as XML later (e.g., in the SharePoint document library), the dfs namespace is not presented.
<dfs:ipdocument xmlns:dfs="http://schemas.microsoft.com/office/infopath/2003/dataFormSolution">
<my:myfields xmlns:my="http://schemas.microsoft.com/office/infopath/2003/myXSD/2010-05-18T07:21:28"
xml:lang="en-us">
 <my:prodlist>
  <my:product>
   <my:name>
   <my:price xsi:nil="true" xmlns:xsi="http://www.w3.org/2001/XMLSchema-instance">
   <my:amout xsi:nil="true" xmlns:xsi="http://www.w3.org/2001/XMLSchema-instance">
  </my:amout></my:price></my:name></my:product>
 </my:prodlist>
</my:myfields>
</dfs:ipdocument>
CodeProject
