Introduction
This article shows a full datapath from Arduino passing by Azure to End-Device to showing sensor data.
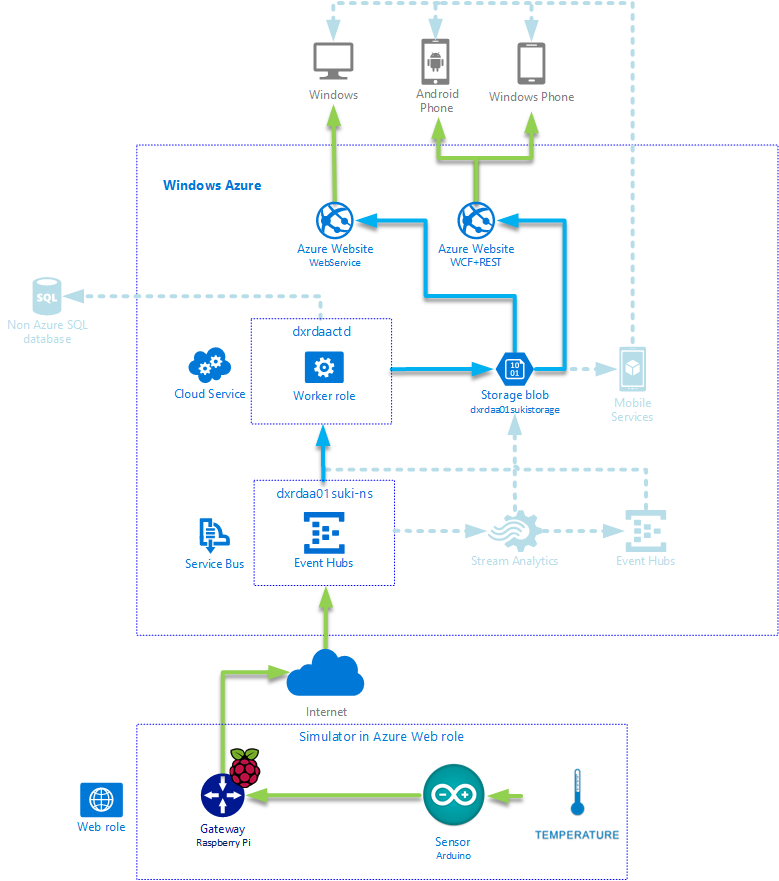
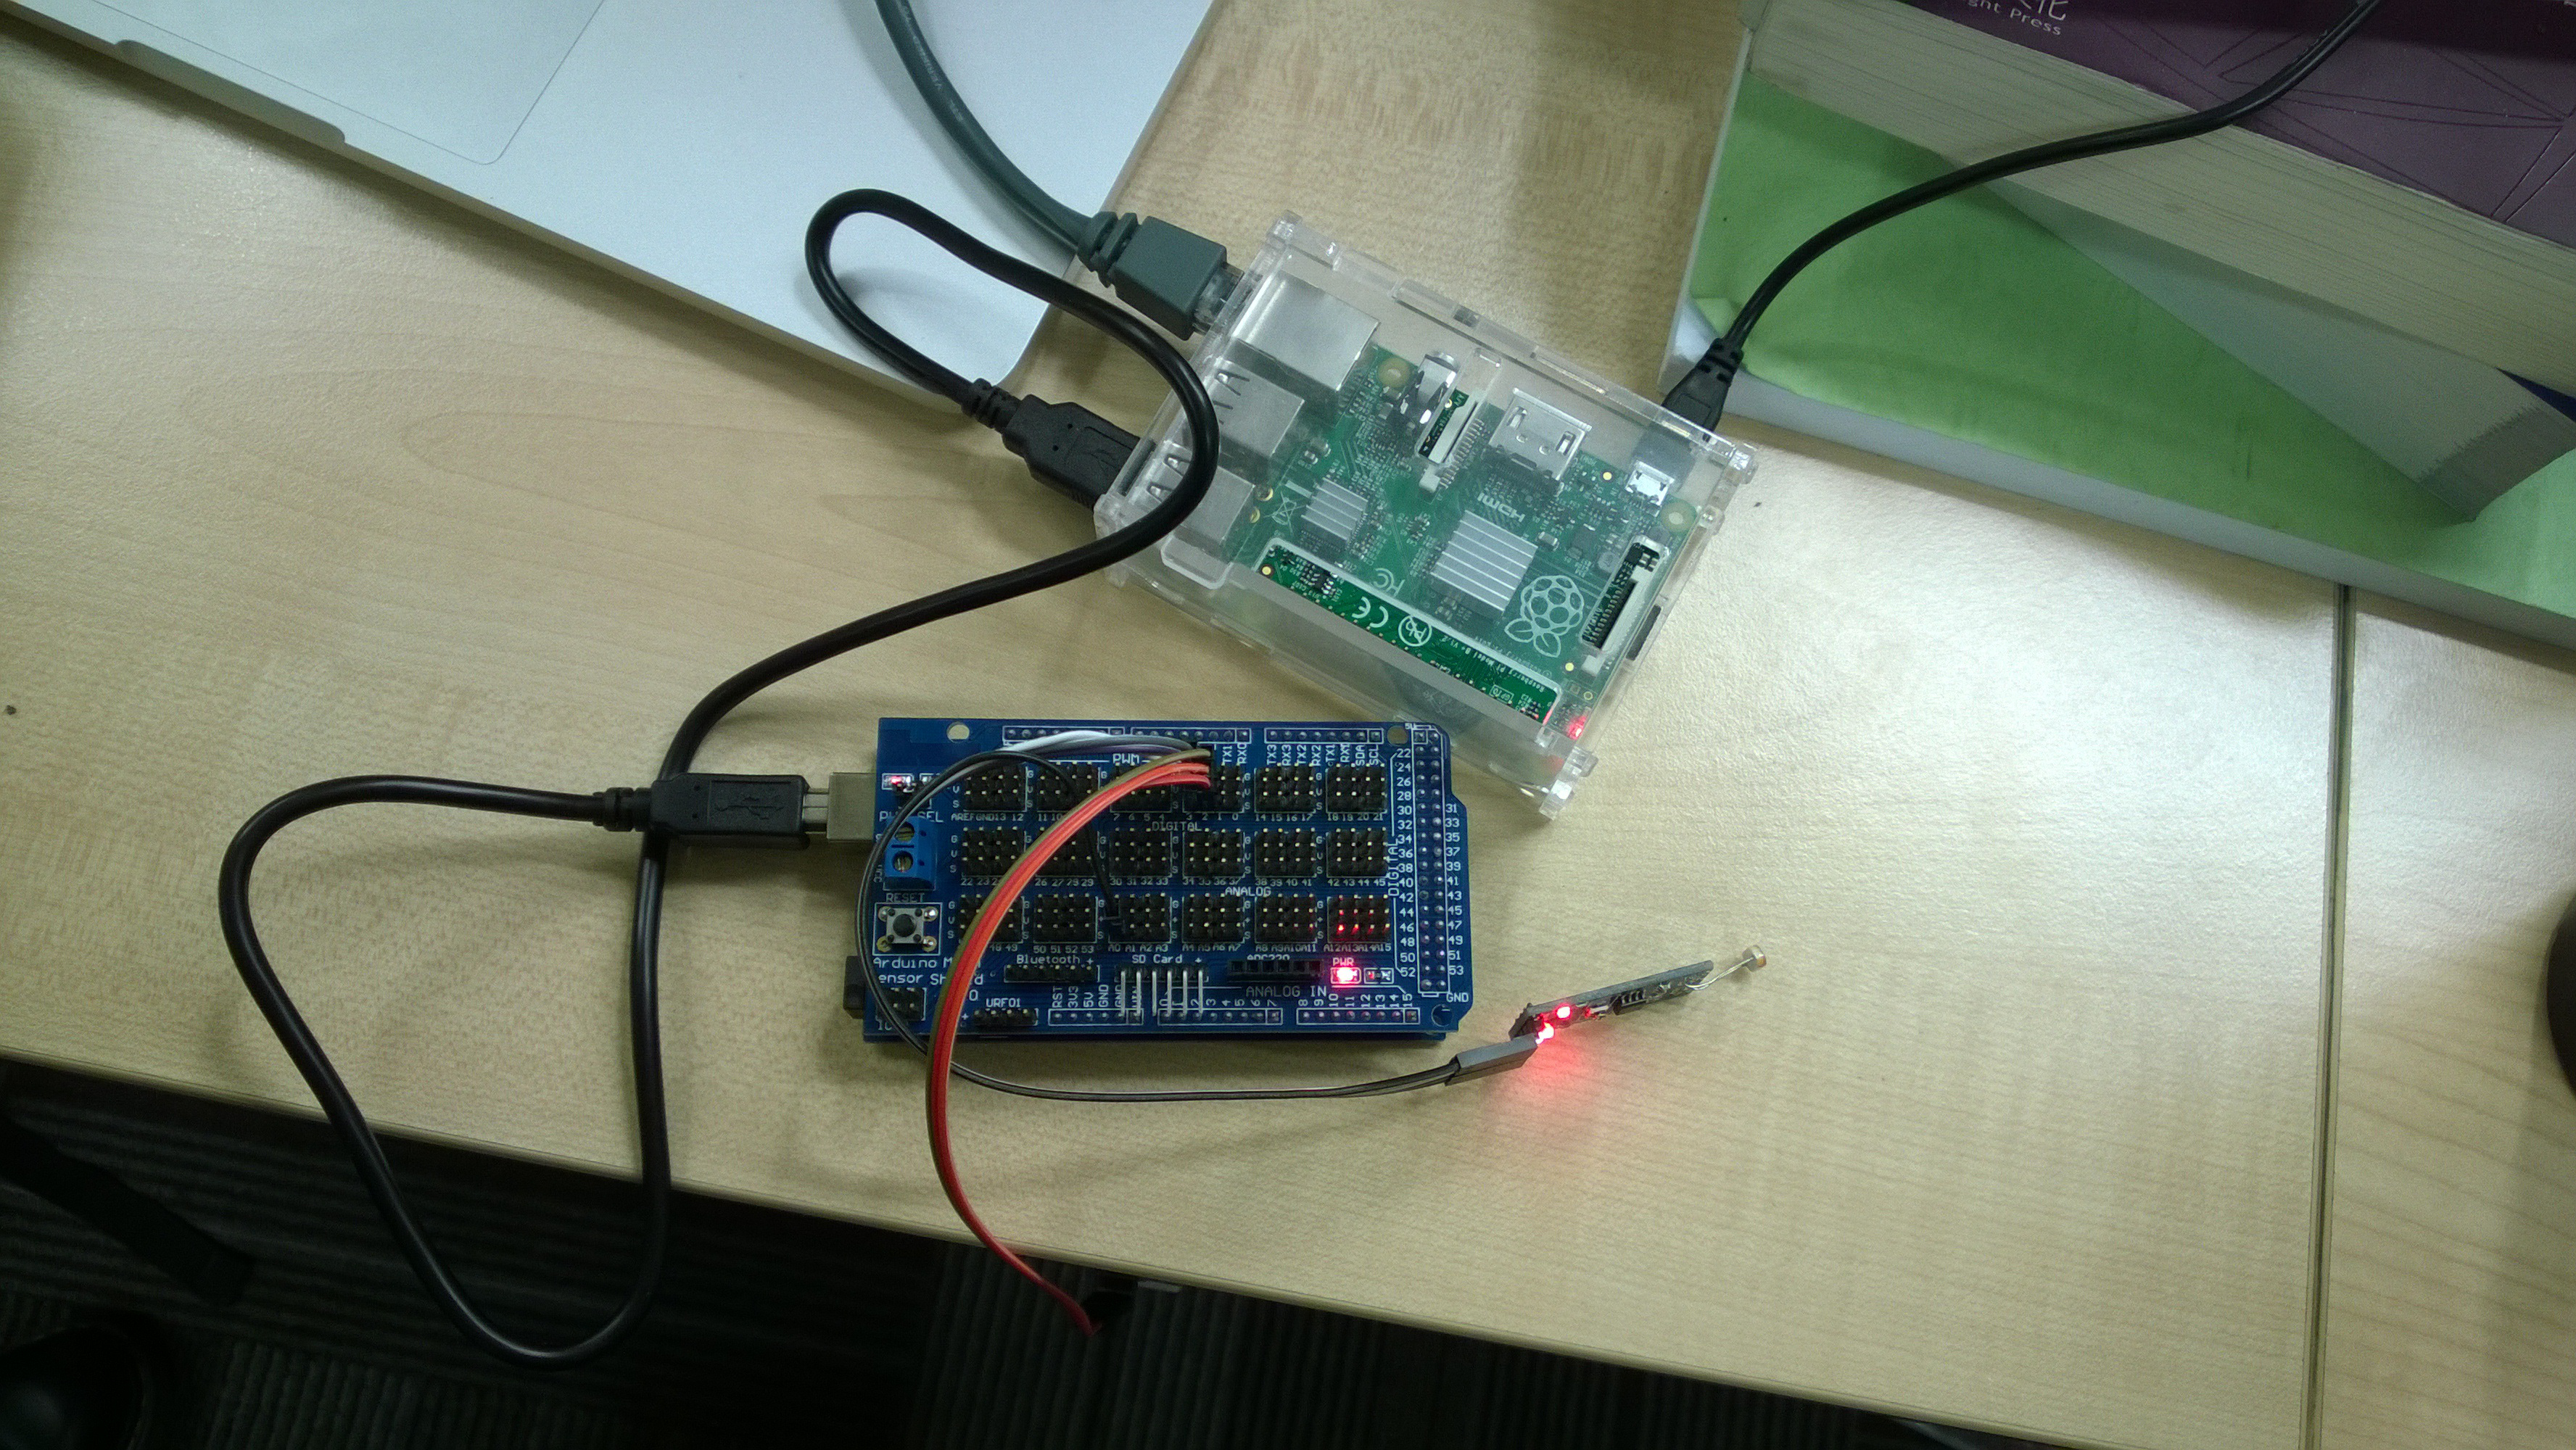
Arduino(As sensor) collects Temperature and will send through RaspberryPi(As gateway) to Azure EventHubs.
In Azure there are 4 important parts:
1. EventHubs collect event data from RaspberryPi.
2. A Azure CloudService Worker Role Will receive those data from EventHubs. And store to Azure blob storage.
3. A Website written by WebService supports SOAP protocol.
4. A Website written by WCF+Enable REST support.
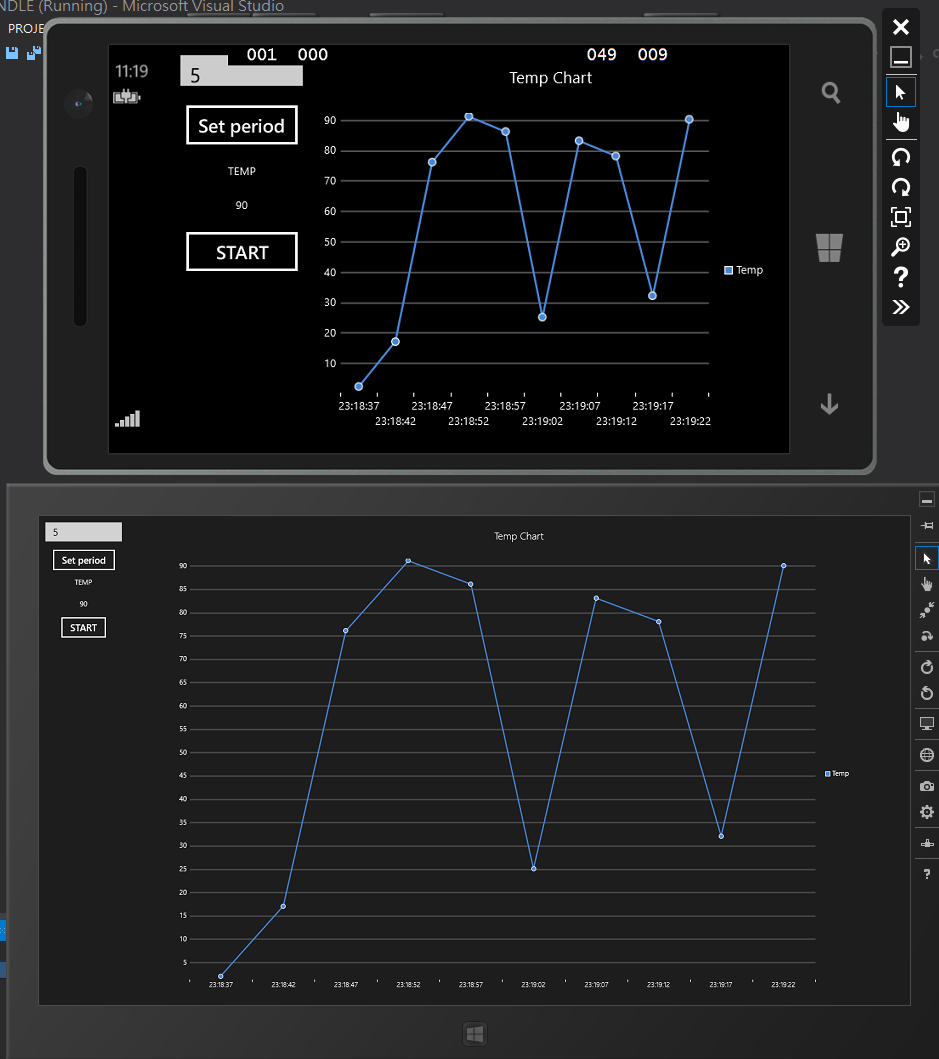
In Client, implement 2 different ways to read data from Azure Website in same Microsoft Universal App in Windows 8.1 and Windows Phone 8.1 as a visual chart viewer.
Background
This project in RaspberryPi and Arduino firmware is modified from MSOpenTech Connect The Dots in GitHub: https://github.com/msopentech/connectthedots
If you are a newbie for Azure EventHubs, strongly suggest to see ConnectTheDots project and try to follow that project to create EventHubs service and somethings you need in Azure.
I learned how to program about receiving data from EventHubs by reading Sandrino Di Mattia article “Getting started Azure Service Bus Event Hubs: building a real-time log stream: http://fabriccontroller.net/blog/posts/getting-started-azure-service-bus-event-hubs-building-a-real-time-log-stream/
You don’t need too much Web Development experience :)
Using WinRT XAML Toolkit for Line chart component: http://winrtxamltoolkit.codeplex.com/
Whole project is uploaded to Bitbucket, you should download before you continue read: https://bitbucket.org/thkaw/eh_uapp_bundle/downloads
I didn’t remove any connection string in project, so you can download and just run Universal App(Windows 8.1, Windows Phone 8.1) to see what app looks like.
But in this project, client is not the really fancy part, Azure is the fancy part :).
Architecture

Hardware application for IoT scenario is enough, but in Azure cloud architecture there aren't many examples and scenario in this time. So I want to build a tradition/modern backend with flexible data storage, which can let you choose cloud data store not only in cloud but also in Non Azure storage architecture.
So here are plains, first according to MSOpenTech project ConnectTheDots, there are nice guys are building a good example by using Arduino to collect temperature and humidity. And pass those data to Azure EventHubs by RaspberryPi. Eventhubs will pass data directly to ASP MVC 5 Website display Live data.
But there are some leak points, so I try to make it a little perfect.
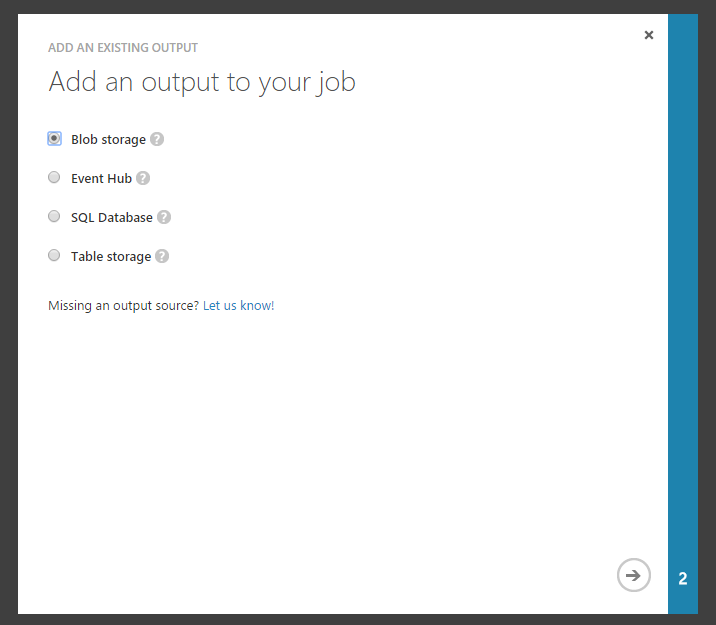
I want an event data processor can helping me process those data from Eventhubs, like storing them, but why don’t I store those data by Stream Analytics feature? Because if those sensor data have privacy concern, you may want store in your own database. Of course not only this reason. You can have more programmable in Worker role to deal event data right?

Ok, second part is Website, for now Windows Phone 8.1 still doesn't support WebService Reference due to Windows Phone leak System.ServiceModel namespace. Ref: https://social.msdn.microsoft.com/forums/windowsapps/en-US/9ab43a4c-499a-4f2e-81e5-c1ab5acbe9bf/wcf-add-service-reference-not-supported-for-windows-phone-81-xaml-applications?forum=wpdevelop
That’s really annoying me. In Universal App I can use WebService in Windows 8.1 App but not in Windows Phone 8.1 App. So I decide to build a Website backend by using WCF+REST to implement.
I want Device App can visualize view some value like temperature(simple and easy to collect).
And another reason to build this architecture is security, which means client won’t directly accesses your azure storage. It access through WebService/WCF.

Also build a Android App to show how to easily access those data by legacy device.
But you will think why not use Mobile Service? Of course you can, But I reiterate again, I use WCF+WebService because it is easy to build and more programmable scenario. So you can try to adjust my architecture by using modern service like Azure Mobile Service, Stream Analytics.
In development stage, I modify a little in ConnectTheDots’s Raspberry Pi gateway program, so it can randomly send temperature data to Azure EventHubs.
Also deploy as Web Role, that can help to make it more simple when you demo this architecture.
Lead construction in Azure
You can see https://github.com/MSOpenTech/connectthedots/blob/master/Azure/AzurePrep/AzurePrep.md to construct some service you need like Eventhubs and Device AMQP connection string.
Advice you implement ConnectToDots to understand how EventHubs works, and it will help you understand to construct following topic.
I will not show how to create Eventhubs in this article.
Code of backend
First, download project package from “Background” section in top.
Unzip it, open “EH_UAPP_BUNDLE.sln”. There are 3 project folders and 2 projects in Solution EH_UAPP_BUNDLE.
If you want to see what client app looks like, you can open Universal App folder and select what platform Universal App wants to run.
Ok, let’s look RaspberryPiGateway first, If you want to use real hardware to send real data, you can just comment SIMULATEDDATA define, and put it to RaspberryPi.
Then use my Arduino code to drive DHT22

#include "DHT.h"
#define DHTPIN 2 // what pin we're connected to
#define DHTTYPE DHT22 // DHT 22 (AM2302)
#define LIGHTDIGIPIN 3 //Digital IO PIN3
#define LIGHTANLPIN 0
#define LEDPIN 13 // The onboard LED
int light_digital;
float light_lvl;
float h;
float t;
char SensorSubject[] = "wthr";
char DeviceDisplayName[] = "DXRDAA_IOTSensor01";
char DeviceGUID[] = "81E79059-A393-0630-1112-526C3EF9D64B";
DHT dht(DHTPIN, DHTTYPE);
void setup() {
Serial.begin(9600);
dht.begin();
}
void loop() {
h = dht.readHumidity();
t = dht.readTemperature();
light_lvl = analogRead(LIGHTANLPIN);
light_digital = digitalRead(LIGHTDIGIPIN);
if (light_digital == LOW)
{
digitalWrite(LEDPIN, HIGH);
}
else
{
digitalWrite(LEDPIN, LOW);
}
if (isnan(t) || isnan(h)) {
Serial.println("Failed to read from DHT");
} else {
printWeather();
delay(3000);
}
}
int sequenceNumber =0;
void printWeather()
{
Serial.print("{");
Serial.print("\"dspl\":");
Serial.print("\"");
Serial.print(DeviceDisplayName);
Serial.print("\"");
Serial.print(",\"Subject\":");
Serial.print("\"");
Serial.print(SensorSubject);
Serial.print("\"");
Serial.print(",\"DeviceGUID\":");
Serial.print("\"");
Serial.print(DeviceGUID);
Serial.print("\"");
Serial.print(",\"millis\":");
Serial.print(millis());
Serial.print(",\"seqno\":");
Serial.print(sequenceNumber++);
Serial.print(",\"hmdt\":");
Serial.print(h, 1);
Serial.print(",\"temp\":");
Serial.print(t, 1);
Serial.print(",\"tempH\":");
Serial.print(t, 1);
Serial.print(",\"lght\":");
Serial.print(light_lvl,2);
Serial.println("}");
}
If you want to use simulate data(without any raspberrypi, Arduino hardware), you need uncomment origin ConnectTheDots RaspberryPiGateway project code. In Programe.cs, uncomment SIMULATEDDATA define
#define SIMULATEDATA
Which effects line 473 code snippet, it will randomly send temperature and humidity to Azure EventHubs.
#if! SIMULATEDATA
try
{
valuesJson = serialPort.ReadLine();
}
catch (Exception e)
{
logger.Error("Error Reading from Serial Portand sending data from serial port {0}: {1}", serialPortName, e.Message);
serialPort.Close();
serialPortAlive = false;
}
#else
Random r = new Random();
valuesJson = String.Format("{{ \"temp\" : {0}, \"hmdt\" : {1}, \"lght\" : {2}, \"DeviceGUID\" : \"{3}\", \"Subject\" : \"{4}\", \"dspl\" : \"{5}\"}}",
(r.NextDouble() * 120) - 10,
(r.NextDouble() * 100),
(r.NextDouble() * 100),
"DXRDAA-SIM01",
"wthr",
"Simulator");
Thread.Sleep(5000);
#endif
Don’t forgot to change AMQPAddress in file “RaspberryPiGateway.exe.config”
<configuration>
  <appSettings>
    <add key ="EdgeGateway" value="R Pi"/>
    <add key="AMQPAddress" value="amqps://D1:R3RT%2FvshJ8ODBj6OIvX91bIzlDZMci01RBMeGfyIx68%3D@dxrdaa01suki-ns.servicebus.windows.net" />
    <add key="EHtarget" value="ehdevices" />
  </appSettings>
</configuration>
If you want to use Simulator instead real hardware when modifying to your connectionstring, right click project, and Deploy as WebRole

In next project, see “EH_CTD_CONSOLE01”
That old project I didn’t remove because it can help you understand how to connect EventHubs by console C# code.
This project connecting to EventHubs is modified from: http://fabriccontroller.net/blog/posts/getting-started-azure-service-bus-event-hubs-building-a-real-time-log-stream/
The important thing is in folder “AzureWebRole”, “WorkerRole1” is twin brother with EH_CTD_CONSOLE01.
I have modified using blob to save temperature value instead of saving to local disk in EH_CTD_CONSOLE01.
And it is modified to fit for deploying to Azure WokerRole Service.
So, let check AzureWebRole/WorkerRole1/WorkerRole.cs
First, this function will register event processor to Azure, let Azure know here is a event processor needing Event Data which is specific in eventHubName.
And will run every 5 seconds to upload real-time temperature data from Class Receiver which will receive data from Eventhubs.
private async Task RunAsync(CancellationToken cancellationToken)
{
Trace.TraceInformation("CTD CONSOLE RECIVER IN WORKERROLE. 2015/03/24");
ParseArgs(new string[] { "ehdevices", "10", "8" });
string connectionString = GetServiceBusConnectionString();
NamespaceManager namespaceManager = NamespaceManager.CreateFromConnectionString(connectionString);
Receiver r = new Receiver(eventHubName, connectionString);
r.MessageProcessingWithPartitionDistribution().Wait();
while (!cancellationToken.IsCancellationRequested)
{
Trace.TraceInformation("Working");
CloudBlockBlob blockBlob = container.GetBlockBlobReference("tempblob.txt");
using (var fileStream = System.IO.File.OpenRead(@"temp.txt"))
{
blockBlob.UploadFromStream(fileStream);
}
await Task.Delay(5000);
}
}
Next check AzureWebRole/WorkerRole1/Receiver.cs
Which file shows how to register a SimpleEventProcessor, and somethings you need to set for getting different time event data.
public async Task MessageProcessingWithPartitionDistribution()
{
EventHubClient eventHubClient = EventHubClient.CreateFromConnectionString(eventHubConnectionString, this.eventHubName);
defaultConsumerGroup = eventHubClient.GetDefaultConsumerGroup();
string blobConnectionString = CloudConfigurationManager.GetSetting("StorageConnectionString");
eventProcessorHost = new EventProcessorHost("singleworker",
eventHubClient.Path,
"App01",
this.eventHubConnectionString,
blobConnectionString,
"ehdevices");
EventProcessorOptions eventProcessorOptions = new EventProcessorOptions();
eventProcessorOptions.InitialOffsetProvider = (partitionId) => DateTime.UtcNow;
Trace.TraceInformation(">>>Registering Event Processor, Please wait.<<<");
await eventProcessorHost.RegisterEventProcessorAsync<SimpleEventProcessor>(eventProcessorOptions);
}
Next check AzureWebRole/WorkerRole1/SimpleEventProcessor.cs
Which contains this Worker role received events from EventHubs. And process, parse data from events, to save worker role local space, then in WokerRole.cs will period upload to Aazure Blob.
So here you can replace by your own logic code, something like analytics data, save to external SQL database etc.
public async Task ProcessEventsAsync(PartitionContext context, IEnumerable<EventData> events)
{
try
{
foreach (EventData eventData in events)
{
int data;
var ReciveData = this.DeserializeEventDataCTD(eventData);
string key = eventData.PartitionKey;
if (!this.map.TryGetValue(key, out data))
{
this.map.Add(key, -1);
}
data = Convert.ToInt32(ReciveData.temp);
this.map[key] = data;
Trace.TraceInformation(string.Format("Data received. Partition: '{0}', Device: '{1}', TEMP: '{2}', HUMI: '{6}', Offset: '{3}', SequenceNumber: '{4}', UTCTime: '{5}'",
this.partitionContext.Lease.PartitionId, key, data, eventData.Offset, eventData.SequenceNumber, eventData.EnqueuedTimeUtc, ReciveData.hmdt));
using (StreamWriter sw = new StreamWriter(@"temp.txt"))
{
sw.Write(data);
}
}
if (this.checkpointStopWatch.Elapsed > TimeSpan.FromMinutes(5))
{
await context.CheckpointAsync();
this.checkpointStopWatch.Restart();
}
}
catch (Exception exp)
{
Trace.TraceInformation("Error in processing: " + exp.Message);
}
}
Last thing in this project to remeber change AzureWebRole/WorkerRole1/app.config settings to yours.
<appSettings>

    <!-- TODO: Change these three key's value to yours!-->

    <!--For local develop test-->
    <!--<add key="StorageConnectionString" value="UseDevelopmentStorage=true" />-->

    <!--Fill your blob connection string-->
    <add key="StorageConnectionString" value="DefaultEndpointsProtocol=https;AccountName=dxrdaa01sukistorage;AccountKey=zNIvaYb2Q1j+Kv3nMyRG3IJOoviw6LKfvD1Rq9y9zeNw5Pey+noAQhdBNEr0kXFrsuvOzeD0WlKA0B0+ccq6eA==" />

    <!--Fill your servicebus connection string(Evnethubs)-->
    <add key="Microsoft.ServiceBus.ConnectionString" value="Endpoint=sb://dxrdaa01suki-ns.servicebus.windows.net/;SharedAccessKeyName=RootManageSharedAccessKey;SharedAccessKey=gMy6B5W6H0VZqLxYzgEXZlvubKJQpvNVDFo3ov5N6aE=" />

</appSettings>
When you done modify everything, Right click project to publish, change upload setting to yours.

Let’s check Web backend.
First is “EH_WCF_BACKEND”
If you have experience in writeing WCF, you will spot this is really easy to understand what I have done in this site.
In EH_WCF_BACKEND\IService1.cs
I add a contract name “GetEHTemp”, and return XML format data, you can change format to json if you want.
[ServiceContract]
public interface IService1
{
[OperationContract, WebGet(UriTemplate = "GetData/{value}"),]
string GetData(string value);
[OperationContract, WebGet(UriTemplate = "GetEHTemp")]
string GetEHTemp();
[OperationContract]
CompositeType GetDataUsingDataContract(CompositeType composite);
}

In EH_WCF_BACKEND\ Service1.svc
Show you how to read string text file by connecting connect to Azure Blob to read string text file, and return to client side.
public string GetEHTemp()
{
try
{
CloudStorageAccount storageAccount = CloudStorageAccount.Parse(
ConfigurationManager.AppSettings["StorageConnectionString"]);
CloudBlobClient blobClient = storageAccount.CreateCloudBlobClient();
CloudBlobContainer container = blobClient.GetContainerReference("eventlogs");
CloudBlockBlob blockBlob = container.GetBlockBlobReference("tempblob.txt");
string temp = blockBlob.DownloadText();
return temp;
}
catch (Exception e)
{
Console.WriteLine("The file could not be read:");
Console.WriteLine(e.Message);
return "Error";
}
}
And don’t forget to change StorageConnectionString to yours in Web.config
<appSettings>
<add key="aspnet:UseTaskFriendlySynchronizationContext" value="true" />

<!--TODO: Change connection blob string to yours-->
<add key="StorageConnectionString" value="DefaultEndpointsProtocol=https;AccountName=dxrdaa01sukistorage;AccountKey=zNIvaYb2Q1j+Kv3nMyRG3IJOoviw6LKfvD1Rq9y9zeNw5Pey+noAQhdBNEr0kXFrsuvOzeD0WlKA0B0+ccq6eA==" />
</appSettings>
All completed, upload website by right click on project name.

Next on “EH_WS_BACKEND” is more simple than WCF project.
In EH_WS_BACKEND \WebService1.asmx
You only deal WebMethod to read data from Blob
[WebMethod]
public string readEVTemp()
{
try
{
CloudStorageAccount storageAccount = CloudStorageAccount.Parse(
ConfigurationManager.AppSettings["StorageConnectionString"]);
CloudBlobClient blobClient = storageAccount.CreateCloudBlobClient();
CloudBlobContainer container = blobClient.GetContainerReference("eventlogs");
CloudBlockBlob blockBlob = container.GetBlockBlobReference("tempblob.txt");
string temp = blockBlob.DownloadText();
return temp;
}
catch (Exception e)
{
Console.WriteLine("The file could not be read:");
Console.WriteLine(e.Message);
return "Error";
}
}
Don’t forget to modify EH_WS_BACKEND/Web.config storageConnectionString to yours!
<appSettings>
    <!-- Service Bus specific app setings for messaging connections -->
    <!--TODO: Change connection blob string to yours-->
    <add key="StorageConnectionString" value="DefaultEndpointsProtocol=https;AccountName=dxrdaa01sukistorage;AccountKey=zNIvaYb2Q1j+Kv3nMyRG3IJOoviw6LKfvD1Rq9y9zeNw5Pey+noAQhdBNEr0kXFrsuvOzeD0WlKA0B0+ccq6eA==" />
</appSettings>
Finally, publish this site to Azure.


Code of App
In App, I write a Universal App project, but using different way to connect my web backend.
First, is Windows Phone 8.1
It doesn’t support WebService, so it need connect to WCF+REST backend which I built previously.
In EH_APP_TEST.WindowsPhone\MainPage.cs
I have a timer ticking every 5 seconds to update line chart. Notice that there must be Radom string added in WCF url to avoid web content cache.
async void timer_Tick(object sender, object e)
{
Random rr = new Random();
int rdn = rr.Next(1, 1000000);
Uri uri = new Uri("http://dxrdaactdwcf.azurewebsites.net/Service1.svc/GetEHTemp?" + rdn);
HttpClient httpClient = new HttpClient();
string result = await httpClient.GetStringAsync(uri);
XDocument doc = XDocument.Parse(result);
tb_temp.Text = doc.Root.Value;
TempList.Add(new NameValueItem { Name = DateTime.Now.ToString("HH:mm:ss"), Value = Convert.ToInt32(tb_temp.Text) });
if (TempList.Count > 10)
{
TempList.RemoveAt(0);
}
UpdateCharts(TempList);
}
Next, is Windows 8.1
It uses Webservice, so it is a little complicate on connection.
You have modified your Webservice backend by updating or removing current ServiceReference1 and create new ServiceReference

There is only a little difference between timer_tick and Windows Phone 8.1
You need use Object to get data back in ServiceReference.
async void timer_Tick(object sender, object e)
{
ServiceReference1.WebService1SoapClient wsc = new ServiceReference1.WebService1SoapClient();
tb_temp.Text = await wsc.readEVTempAsync();
TempList.Add(new NameValueItem { Name = DateTime.Now.ToString("HH:mm:ss"), Value = Convert.ToInt32(tb_temp.Text) });
if (TempList.Count > 10)
{
TempList.RemoveAt(0);
}
UpdateCharts(TempList);
}
Here we go, try to run, press “START” Button, and wait a few seconds. If all things you are doing right. There will be some data showing on screen J
Points of Interest
In this scenario you can learn how to build and deploy WorkerRole, WebRole, Website, and operating Azure storage, Azure EventHubs.
Of course this just a simple architecture that shows you to link these technicals together.
You can base on this article to know more about Azure Cloud with IoT things J
History
2015/03/25 - Init version
2015/03/27 - Adjust grammar
