Introduction
Jenkins offers out of the box build solution for Web application, but it becomes difficult to build an ASP.NET website. This article describes step by step how websites can be built using Jenkins.
Background
I had to offer an auto building solution to one of the clients that I was working for. It was an ASP.NET wesite and had dependant projects also. Jenkins could build web applications seamlessly. But there when it comes to website, it becomes an issue.
Using the Code
Pre-requisites
- Install Visual Studio .NET 4.0
- Install SQL Server management studio 2008 R2
- Install Tortoise SVN
- Download and install Jenkins Windows native package from http://jenkins-ci.org/
Download and Install MSbuild Extension pack from the below mentioned location:
Setting up Jenkins for Source Code
Add Plugin to Jenkins
- Open the URL http://localhost:8080/ in browser.
- Click on Manage Jenkins.
- Navigate to "Manage Plugin" section.
- Click on available tab.
- Install Msbuild plugin(Click on install without restart).
- Restart Jenkins.
Creating a New Project in Jenkins
- Follow all the steps mentioned in "Add plugin to jenkins".
- Click on New job.
- Choose "Build a free-style software project" option. Add job name and click on "OK". It creates a new project to be built.
Configuration of the Project
- Click on the newly created project.
- Click on configure.
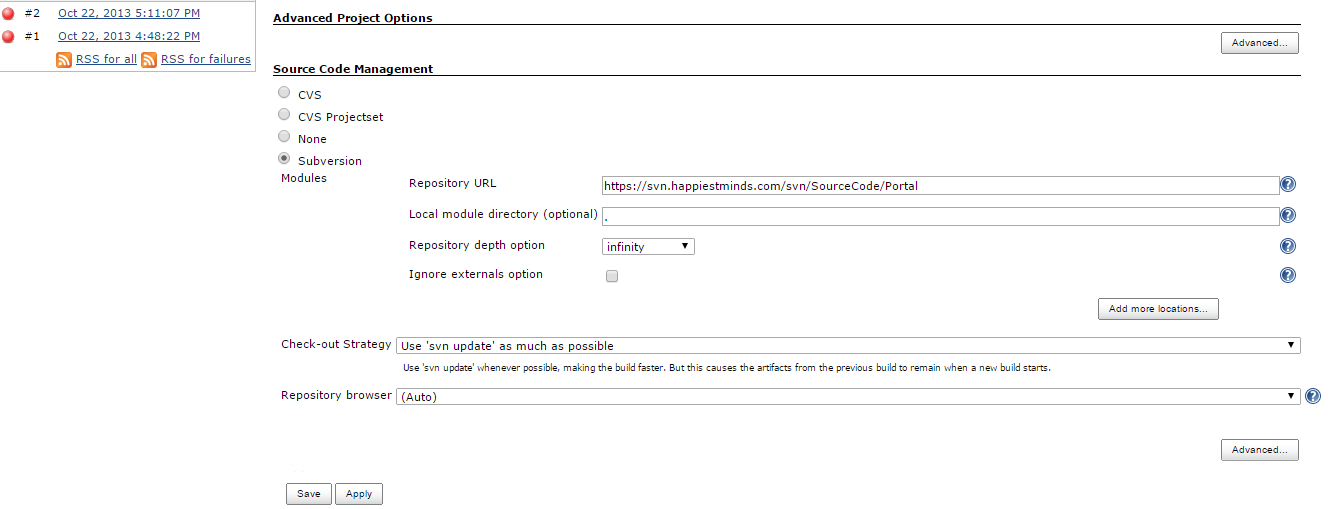
- Under "Source Code Management", choose Subversion module option.
- Fill the 'Repository URL' textbox with the corresponding sourcecode URL of SVN.
Exp- http://svn.xyz.com/svn/admin
Note- It may ask for credentials. Please fill the credentials for SVN (which you use to log in to SVN) so that Jenkins application can access SVN. Refer to the below image.

- Click on 'Add build Step' button and choose 'Build a Visual Studio project or solution using MsBuild' option.
- Fill the details as shown in the below image:

Note - MsBuild file should be the build script file from local directory.
- Click on save.
- Build the project.
- Build details can be seen on the console output section on the left hand navigation panel.
MSbuild script code (The MSbuild script file that was added in the previous step - SourceCodeBuild.msbuild)
<Project ToolsVersion="4.0"
xmlns="http://schemas.microsoft.com/developer/msbuild/2003">
< PropertyGroup>
< ProductVersion>10.0.11107</ProductVersion>
< TargetFrameworkVersion>v4.0</TargetFrameworkVersion>
    </PropertyGroup>
    <Target Name="PrecompileWeb">
        <AspNetCompiler
            VirtualPath="/TestWebSite"
            PhysicalPath="C:\Test-CI\SourceCode\TestWebSite"
            TargetPath="c:\precompiledweb\TestWebSite\"
            Force="true"
            Debug="true" />
    </Target>
< /Project>
Note (Build Script explanation) -
Physical Path - It is the physical path where the code is pulled from SVN. The local working directory.
Target Path - It is the physical location to which your compiled files would be pushed. The user needs to create these paths beforehand.
Points of Interest
It took close to 3 days of effort only to figure out how to write build script for the website to be built.
History
- 24th April, 2015: Initial version
