In my earlier post on “Interactive ToolTip using Visual Studio 2010 Productivity Power Tool”, I discussed about “Interactive ToolTip” feature which comes with the Visual Studio 2010 Productivity Power Tool. In this post, I will share information about the all new “Add Reference” dialog which is fully searchable for assembly reference.

If you haven't install the Visual Studio 2010 Productivity Power Tool yet, you can download it from Visual Studio Gallery. You can also directly download it directly from here. Read the complete post to know more about the new “Add Reference” dialog.
Visual Studio 2010 Productivity Power Tools replace the default “Add Reference” dialog of the IDE. It now has complete searchable UI for assembly reference with more interactive tabbed category. Before going deep to the new searchable UI, let us first see the existing “Add Reference” dialog present in Visual Studio 2010:

The above screenshot represents the existing UI of the “Add Reference” dialog box, which doesn’t have any interactive visual, no searching mechanism. Hence, if you want to search for an assembly name, it was really very difficult when lots of DLLs are registered in your PC. Ohh!!! 
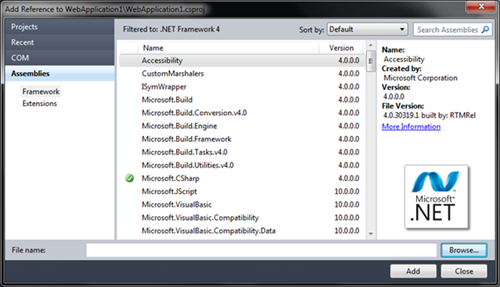
Let’s see the new UI. You will see the below dialog box for Add Reference once you install the Productivity Power Tool. It has a nice user interface and the tabs are categorised in more organized manner (see the screenshot part 1).

Now, you will see a Green tick mark on the assemblies which are already added in your project (see the screenshot part 2). Selecting any unselected assembly will have the “Add” button. Once you clicked on it, the assembly will get added in your project and be marked as Green tick mark in the UI. Clicking on already included assembly will change the “Add” button to a “Remove” button. Clicking on the Remove button will remove the selected assembly reference from the project and remove the tick mark from it.
It now has a Sorting Dropdown at the right top corner (see screenshot part 3). Once clicked, you will see the below dropdown having various order methods like Sorting in Ascending or Descending order by Name, Path and Version.

Hey!!!  What is this? It now has the “Search Assemblies” field (see the screenshot part 4). OMG!!! Great one. It is now easier to search for an assembly in the “Add Reference” dialog. Once you start typing on the
 TextBox, you will see the assembly box has been filtered according to your query. Have a look here. It filters out “PresentationFramework” as I typed “presentationfr” as the key of my query.

It now has more visibility to the DLL we want to add as reference. Clicking on the assembly name will show you details about the DLL like Name, CreatedBy, Version, etc. (see screenshot part 5).
You can now easily add a new assembly reference by clicking the “Browse” button present at the bottom of the screen. Once you browse through the path, you have to click the “Add” button to add it as a DLL reference to your project.
It’s cool, right? Yes, it now has more power to filter and sort the references. But what if you are seeing the existing UI after the installation of the Productivity Power Tool too!!! Yea, you have to restart your Visual Studio 2010 IDE to load the add-in. And if after the restart also you are unable to see the new UI, then it might not be enabled. Go to Tools –> Options which will bring up the “Options” dialog page in your screen. Select the “Productivity Power Tools” from the left pane and find the “Searchable Add Reference Dialog” option in the right pane. It might be “OFF”.

In such a case, click on the option and it will make it enabled (“ON”). Restart your IDE for the changes to take effect. Once you reopen your project and click on the “Add Reference” menu item to add a DLL reference, you will see the new “Searchable Add Reference” dialog in your screen.

There are various features available in the Productivity Power Tools of Visual Studio 2010. Go and download it. Explore more features and be more productive on your daily development work. Keep an eye to my blog for more Tips/Tricks on it in near feature. As and when I explore a new one, I will share with you. Follow My Tweets to be updated of my blog posts.
CodeProject


