Introduction
Welcome to step 3 of my DCOM tutorial. In this series, I will strip the mystique, the headache, and confusion from DCOM by giving you a comprehensive tutorial with a straightforward example. OK, no promises - but I will give it a good try.
If you want to follow along with this tutorial and add code and use the Visual C++ wizards as we go along, that's great. In fact, I highly recommend that, because otherwise this tutorial is a big waste of electronic ink (?). However, I follow along exactly with the tutorial myself, as I write it, and develop the code and use the Visual C++ wizards just as I say you should. The screenshots, in fact, are from my development of the files for each step! To download this already-developed code to compare with your own, simply click the 'Download the step n files - n KB" links at the top of each step. There's also an archive (coming soon) of the files for all the steps at the Questions and Answers page (coming soon) for this tutorial. I still recommend that you follow along with us as we go; this way, you can learn while you code. If you have problems along the way with this tutorial, feel free to:
- Post a message to the message board at the bottom of this page.
- Check out this tutorial's Questions and Answers page - coming soon.
A diagram of how our software will eventually work is shown in Figure 1. The client calls a method on the server, which then fires an event back to the client using a connection point. This connection point's event sink is implemented in the client (using MFC and ClassWizard!!!), and the client shows its user a message telling the user that the server said "Hello!":
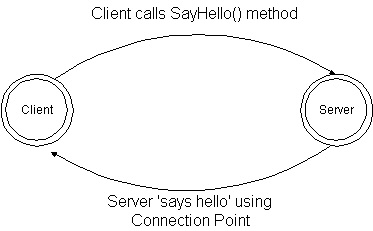
Figure 1: Diagram of our DCOM client/server set-up.
Remember, our steps in developing the software in this tutorial are as follows:
- Step 1: Create the server, HelloWorldServ.NET, using the ATL project wizard.
- Step 2: Modify the starter files provided by the ATL project wizard.
- Step 3: Add a simple ATL object,
HelloWorld, to the server, to expose our functionality.
- Step 4: Add a method,
SayHello(), to the server, which fires the event which the client handles.
- Step 5: We look at the connection points and set up the server's end of one.
- More steps coming soon!
We're currently on step 3 of this tutorial, where we will use the ATL object wizard to add a simple COM object, the HelloWorld object, to the server. This step will go by real fast, so instead of my blathering any further, let's plunge in.
Step 3: Add a Simple HelloWorld COM Object to the Server
To add COM objects to ATL servers, we can either use the ATL Simple Object Wizard provided by Visual C++. NET 2003, or we can add code by hand. I prefer to use the wizards provided by Visual C++ whenever I can, but then again, I'm lazy :).
Let's proceed. Open Class View, right-click on the 'HelloWorldServNET' text - in bold and at the very top - and then point to Add, and then click Add Class. The Add Class dialog box opens, as shown below in Figure 2. As shown, open the Visual C++ folder, open the ATL folder, click on the ATL folder in the left-hand pane, then click ATL Simple Object in the right-hand pane, and then click Open:

Figure 2: Adding an ATL Simple Object to our "Hello, World!" server.
The ATL Simple Object Wizard appears, as shown in Figure 3, below. Click the Name tab, and then type HelloWorld in the Short Name box, as shown below. HelloWorld serves as the name for our COM object that's in charge of exposing the functionality we want the client to see. The whole way in which COM works and how COM does this is outside the scope of this article.
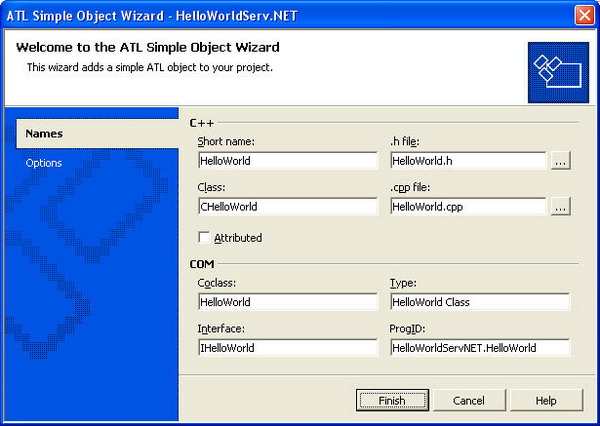
Figure 3: Specifying the name, HelloWorld, for our ATL Simple Object.
Note how, above, we leave the Attributed checkbox unchecked. Again, I want you, dear reader, to minimize what's hidden from you so that you can learn as we go along. Attributes would defeat this purpose. Notice how, as we type in HelloWorld in the Short Name box, the wizard fills in the rest of the fields for us. For more information on what these fields mean, click Help. We'll leave the default settings for these fields alone for this tutorial, but perhaps your specific COM application may need to change their values.
Now we're ready to double-check that the Options tab's settings are correct. So click the Options tab, and then make sure the wizard looks like the following, Figure 4:
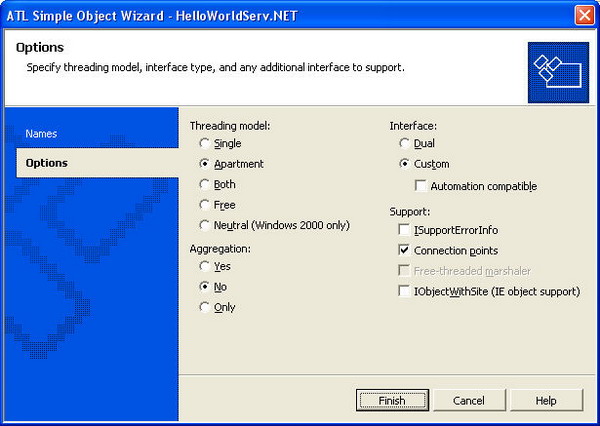
Figure 4: Specifying the correct options for our HelloWorld object in the ATL Simple Object wizard.
You may want to change these settings depending upon your specific application, but for the purposes of this tutorial, these settings are the correct ones to use. Tip: You can get Help on what each setting means very quickly by pausing the mouse pointer over the setting you want to learn more about.
The choices I made that were different from the defaults were:
- Changed aggregation to no: We don't want to support aggregating this object inside of another.
- Changed interface from Dual to Custom, and unchecked Automation Compatible: Again, we just want a simple interface. Creating a Dual or an Automation Compatible interface adds in a whole bunch of extra junk which isn't necessary for a simple, "Hello, World!" example such as ours.
- Under support, checked Connection Points: Again, according to our model in Figure 1, we want this server to fire an event back to the client once we've called its method, and this is done with the Connection Points. So let's have Visual C++ give us code to support these.
Once you're satisfied, click Finish. Visual C++. NET 2003 will then generate the resources and source files which go along with our new object. It will probably open new files in the source code editor too. Let's close all the files which are currently open in the editor, so that we can then start afresh for the next step. So the next action in this step is to click the Window menu on the menu bar, and then click Close All Documents.
For the Sake of Aesthetics
When we're done using the ATL Simple Object wizard, Class View should look like that shown in Figure 5. There is still one more change we need to make, though. Notice that, in Figure 5, the name of the event interface (for the connection point) is not _IHelloWorldEvents but instead DHelloWorldEvents? This is the result of a little change I made to the code.
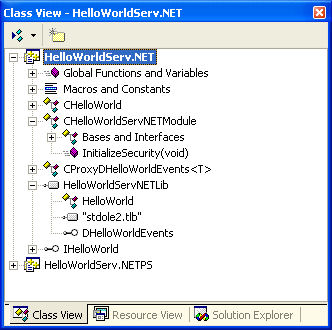
Figure 5: Class View after adding the HelloWorld object and changing the name of the event interface.
The DHelloWorldEvents name for our event interface is a loose convention of Microsoft which I'm following. DHelloWorldEvents is a dispinterface, so a D is added in front of its name. Make sense? This is just my own sense of aesthetics run amok...if you don't like the new name, don't change it. However, everything from here on refers to DHelloWorldEvents, not _IHelloWorldEvents.
Remember 'Find in Files?' Now there's also 'Replace in Files' of a Sort
So this change looks daunting, right? We have to open up each and every file in the entire project and make sure each and every place _IHelloWorldEvents appears, we have a DHelloWorldEvents instead. Actually, there's a great new feature in the Visual C++. NET 2003 editor which will relieve this headache for us. To use the feature, click the Edit menu, and then click Replace. The Replace dialog opens, as shown below, in Figure 6:
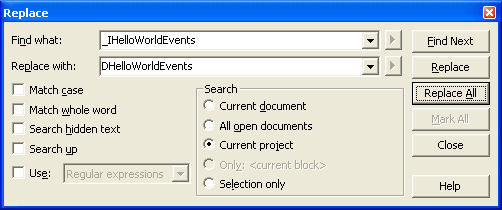
Figure 6: Using the Replace dialog box to change all occurrences of _IHelloWorldEvents to DHelloWorldEvents.
There's really not much to write about here, as this looks just like the Replace dialog box of yore. Aha! Under the Search group box, there are radio buttons which specify where you want the Replace to happen. We want our find and replace operation to span the entire project, so click Current Project, as shown above. Next, click Replace All. Visual C++ then shows us the warning as shown, below, in Figure 7:
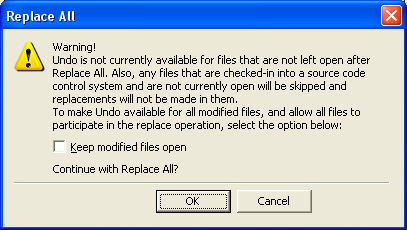
Figure 7: Check the Keep Modified Files Open box if you want to be able to undo this change.
If all goes well, you should see a dialog appear and rapidly disappear; this is normal, as the dialog box in question is just reporting the progress of the Replace operation across the project! Finally, Visual C++ will report it is done, as is shown in Figure 8, below:
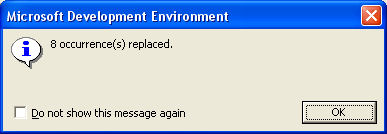
Figure 8: Visual C++ reporting that it has finished the replace operation.
If all went well, Class View should now look exactly like Figure 5. Finally, you need to make sure and save your changes. To do this, click the File menu, and then click Save All. One final thing to do. Apparently the Replace option above replaces the name of a filename in a #include directive in a certain project file, but doesn't change the name of the corresponding .H file. So we need to do it ourselves, in order to avoid a compiler error. Do the following:
- Go to the Solution Explorer, and open the file HelloWorld.H.
- Replace the code shown below, in Listing 1, with the code shown in Listing 2, and then save the file.
#include "DHelloWorldEvents_CP.h"
Listing 1: The line of code we want to replace.
#include "_IHelloWorldEvents_CP.h"
Listing 2: The line of code we are replacing the line above with.
Notes from the Rear
We've now completed step 3 of this tutorial. We added a simple COM object, called HelloWorld, to the project, and then, for the sake of aesthetics, modified the name of its dispinterface with a project-wide replace operation, which is a great new feature in Visual Studio .NET! Sure, I had my aesthetic reasons, but I really wanted to make the name change of the interface so as to highlight the Replace Across Project feature of Visual Studio .NET.
Custom Setup and Cleanup of Objects
Before we finish this step, let me take you on a tour of two nice functions that the wizards override for you, with default implementations. These functions let you provide custom handling of what happens on your server the moment CoCreateInstance() succeeds - sort of like a "constructor for COM". In addition, when the last client has called IUnknown::Release() on your object (see other articles or the docs for more info), there's also a function that is provided by the ATL framework which helps you provide custom cleanup of your server's object.
These two functions are known, respectively, as FinalConstruct() and FinalRelease(), and in our project are implemented for us in HelloWorld.h, as shown in Listing 3, below. The functions themselves are highlighted for you in bold:
class ATL_NO_VTABLE CHelloWorld :
public CComObjectRootEx<CCOMSINGLETHREADMODEL>,
public CComCoClass<CHELLOWORLD, &CLSID_HelloWorld>,
public IConnectionPointContainerImpl<CHELLOWORLD>,
public CProxyDHelloWorldEvents<CHELLOWORLD>,
public IHelloWorld
{
public:
CHelloWorld()
{
}
DECLARE_REGISTRY_RESOURCEID(IDR_HELLOWORLD)
DECLARE_NOT_AGGREGATABLE(CHelloWorld)
BEGIN_COM_MAP(CHelloWorld)
COM_INTERFACE_ENTRY(IHelloWorld)
COM_INTERFACE_ENTRY(IConnectionPointContainer)
END_COM_MAP()
BEGIN_CONNECTION_POINT_MAP(CHelloWorld)
CONNECTION_POINT_ENTRY(__uuidof(DHelloWorldEvents))
END_CONNECTION_POINT_MAP()
DECLARE_PROTECT_FINAL_CONSTRUCT()
HRESULT FinalConstruct()
{
return S_OK;
}
void FinalRelease()
{
}
public:
};
OBJECT_ENTRY_AUTO(__uuidof(HelloWorld), CHelloWorld)
Listing 3: Showing where you can insert your custom initialization and cleanup logic.
Note that the return type of FinalConstruct() is HRESULT. So if nothing else fails during CoCreateInstance(), FinalConstruct() is called last during this process, if the reference count before was zero. So, if your logic fails inside the FinalConstruct() body, you can return whatever HRESULT or DWORD Win32 system error code you wish, and that is what the client will see as the return value of the client's CoCreateInstance() call.
In COM, you never know with certainty when the operating system will call the constructor or destructor. That's right, COM wrests that control away from you. All you can know is when the first client has called CoCreateInstance() (or some flavor thereof) on your object, and when the final client has called IUnknown::Release(). Notice that since COM objects are reference-counted, the two functions above are only called on the first CoCreateInstance() and the last IUnknown::Release(). So be careful which logic you put in these functions.
But When Would I Use FinalConstruct/FinalRelease?
Say, for example, your COM object owns - and keeps track of - a Hashable. So calling FinalConstruct() is the great place to have the object, say, read configuration values in from a file and store them in the hash, for later use when the methods are called. And if your hash maps, e.g., strings to pointers, you're going to want to free the memory associated with those pointers once the reference count on this object drops to zero and Windows wants to destroy the object. So you then override FinalRelease() and supply it with the code to iterate through your hash, looking up and then freeing the memory addressed by each of the pointers.
On to the Next (or Previous) Step!
To proceed to the next step, which is step 4, click the Next >> link below. Click on << Back below to visit step 2 and refresh your memory, or even step 1.
<< Back | Next >>Questions and Answers - coming soon
Tip: If you're having trouble or can't understand something, it's often the case that you just went ahead as far as you could in this tutorial without following thoroughly, and downloaded the code for the latest step that was done. Perhaps if you go back to the previous steps, and work through the tutorial in the places where it wasn't clear, this may help. Also, it could be because there are still more steps yet to be written! Stay tuned!
Tip: Also, if you have a question, go ahead and post it to the message board, below, which is at the bottom of this article page. I will get an email when you do so, and then everyone can see your question and my answer. Don't forget to rate this article either! If you gave it anything less than 5, then post to the message board as to the reason why, so that I can make these articles better for everyone.
