Introduction
Android Binding also supports Model Validation through @Annotation syntax. You may also add custom validation rules in a few easy steps. The following article is based on the sample application on the market.
or search:
- Android Binding in market
Please download the sample app and get a feel of how it works. The source code is also available. Check the source code page -> Demos folder for it.
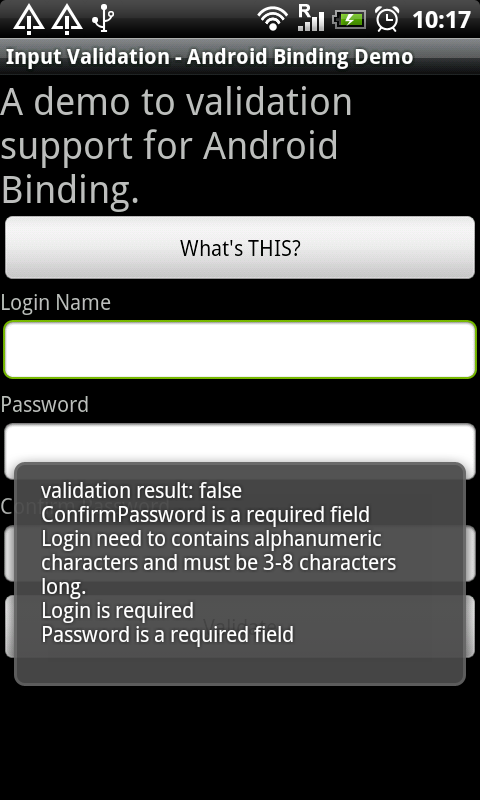
This is how the sample looks like:

The above shows the validation result, with custom error messages. This article will explain about this.
About Android Binding

Android Binding is a framework that supports declarative view model binding. You may read this for more information.
Initial View Model
Let's start with a simple Registration view model:
public class RegistrationViewModel{
    public final Observable<CharSequence> Login;
    public final Observable<CharSequence> Password;
    public final Observable<CharSequence> ConfirmPassword;
    public final Comamnd Submit;
}
Remember, in Android Binding, it is expected the Observables are public fields, it might be a good practice to decorate it as final so no latter remapping will occur.
Add Validation Rules
OK, the login and password are obviously mandatory. It is called *Required* in Android Binding. All the validation classes are sitting in the package:
com.gueei.android.binding.validation.validators;
Remember, if you found the validators are not enough, you can always make a custom one, which we will cover later in the post.
So, here's how we instruct the Android Binding that those fields are Required:
public class RegistrationViewModel{
    @Required
    public final Observable<CharSequence> Login;
    @Required
    public final Observable<CharSequence> Password;
    @Required
    public final Observable<CharSequence> ConfirmPassword;
}
That's it! We just need to put an *@Required* annotation attribute to the required field.
Validate
Validation is done by calling the static method:
ModelValidator.validate(model);
You might want to validate whenever the user 'submits' the form. The above line of code will return an object of class: *ValidationResult* which contains whether the validation is success, if not, the error messages associated with it. If you don't like (yes, you shouldn't) the predefined messages, you may put in your own:
...
@Required(ErrorMessage="You must put the login name!")
public final Observable<CharSequence> Login;
...
More Validation Rules
The Confirm Password is something you want to make sure your user didn't mistype a password. It must be the same as the Password field. Here's how we do it:
@Required
@EqualsTo(Observable="Password")
public final Observable<CharSequence> ConfirmPassword;
Simple! We tell the Framework that confirm password must be equalsto another observable, that is, the Password field. One more thing, the attributes are 'stackable', that means, one Observable property can have multiple validation rules applied on it. Just like the above example, that means:
The ConfirmPassword is required and it must equals to Password
Ok, we are done with password, how about the user name? We only want to accept alphabets, numbers and, underscore; and it must be at least 3 characters to most 8 characters. Simplest way to check everything like this, is using Regular Expression.
@Required(ErrorMessage="You must put the login name!")
@RegexMatch(Pattern="^[A-Za-z0-9_]{3,8}$")
public final Observable<CharSequence> Login;
Custom Validation
Since Java does not support Inheritance on @interface, working with custom validation is a little bit tricky. To simplify the explanation, I'd start with the implementation of @Required annotation:
@Retention(RetentionPolicy.RUNTIME)
public @interface Required{
    public Class<?> Validator() default RequiredValidator.class;
    public String ErrorMessage() default "%fieldname% is a required field";
    public class RequiredValidator extends ValidatorBase<Required> {
        @Override
        public Class getAcceptedAnnotation() {
            return Required.class;
        }
        @Override
        protected String doFormatErrorMessage(Required parameters,
                String fieldName) {
            return parameters.ErrorMessage().replace("%fieldname%", fieldName);
        }
        @Override
        protected boolean doValidate(Object value, Required parameters,
                Object model) {
            if (value==null) return false;
            if (Boolean.FALSE.equals(value)) return false;
            if (value instanceof CharSequence){
               if (((CharSequence) value).length() == 0) return false;
            }
            return true;
        }
    }
}
We MUST declare the interface's retention as @Retention(RetentionPolicy.RUNTIME)or else the attribute will not be available in Runtime.
The field public Class<?> Validator() is a must, the ModelValidator only works with annotation with this field. It needs to return a class, by default, and should not change, that will be the Validator class.
Everything else in the interface is optional, they will then passed to the validator as "parameters" (or options).
public class RequiredValidator extends ValidatorBase<Required>
declares the validator, which must be a subclass of ValidatorBase<?>, where the <?> you should put the @interface you are accepting.
Three methods need to be implemented:
getAcceptedAnnotation() returns the type of @interface this Validator is accepting. doFormatErrorMessage() returns the formatted error message, alternative error message is suggested to define in respective @interface, although it is not a must. doValidate() actually validates the input value. Here, notice the first parameter *Object value* is the value, but not the observable object. The whole model is also passed in as parameter.
About the Author and Project
History
- 14th January, 2011: Initial post
