Introduction
In this article you will learn how to generate WPF forms dynamically from property fields. Suppose we have a requirement to create a WPF form. First, we'll begin with how to create a form in XAML.
Introduction to XAML
XAML stands for Extensible Application Markup Language.
Creating forms in XAML
The below snippet shows how to create a form in XAML:
<Grid Margin="10">
    <Grid.ColumnDefinitions>
        <ColumnDefinition Width="100" />
        <ColumnDefinition Width="*" />
    <Grid.ColumnDefinitions>

    <Grid.RowDefinitions>
        <RowDefinition Height="Auto" />
        <RowDefinition Height="Auto" />
        <RowDefinition Height="Auto" />
        <RowDefinition Height="*" />
    <Grid.RowDefinitions>

    <TextBlock Text="First Name" Height="19"
                Margin="0,7,31,4" />
    <TextBox x:Name="FirstName" Margin="3"
                Grid.Row="0"
                Grid.Column="1" />

    <TextBlock Text="Last Name" Margin="0,7,6,3"
                Grid.Row="1"
                Height="20" />
    <TextBox x:Name="LastName" Margin="3"
                Grid.Row="1"
                Grid.Column="1" />

    <TextBlock Text="EmailId" Grid.Row="2"
                Margin="0,9,0,0"
                Height="21" />
    <TextBox x:Name=" EmailId " Margin="3"
                Grid.Row="1"
                Grid.Column="1" />

    <Button x:Name="Save" Grid.Row="3"
            Grid.Column="3"  HorizontalAlignment="Right"
            VerticalAlignment="Top" Margin="3"
            Width="80" Height="25"
            Content="Save" />
</Grid>
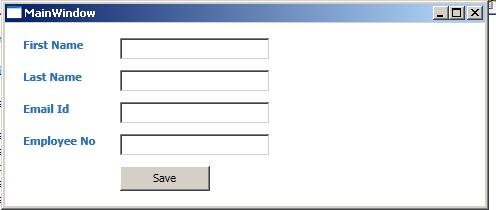
Below diagram shows how the form shows:
Creating forms at runtime using XAML strings
The example below shows how to create a form at runtime by using a property class.
1. Create a person class which has 10 properties
public class Person
{
public string FirstName { get; set; }
public string LastName { get; set; }
public bool isDefault { get; set; }
public string EmailId { get; set; }
public string EmployeeNo { get; set; }
public string Age { get; set; }
public string EmailId2 { get; set; }
public bool isMale { get; set; }
public string MobileNo { get; set; }
public string TelephoneNo { get; set; }
}
2. Creating controls at runtime
We created the following functions for creating a TextBox, TextBlock, row definition, and checkboxes.
The function CreateCheckBox() creates a checkbox at runtime.
private CheckBox CreateCheckBox(int row, int column)
{
    CheckBox cb = new CheckBox();
    cb.Margin = new Thickness(5);
    cb.Height = 22;
    cb.MinWidth = 50;

    Grid.SetColumn(cb, column);
    Grid.SetRow(cb, row);

    return cb;
}

private RowDefinition CreateRowDefinition()
{
    RowDefinition RowDefinition = new RowDefinition();
    RowDefinition.Height = GridLength.Auto;
    return RowDefinition;
}
This will create a TextBlock:
private TextBlock CreateTextBlock(string text, int row, int column)
{
    string[] aa = BreakUpperCB(text);
    string prop = "";
    for (int i = 0; i < aa.Length; i++)
    {
         prop = prop +" "+ aa[i];
    }
    TextBlock tb = new TextBlock() { Text = prop, Margin = new Thickness(5, 8, 0, 5) };
    tb.MinWidth = 90;
    tb.FontWeight = FontWeights.Bold;
    tb.Margin = new Thickness(5);
    var bc = new BrushConverter();
    tb.Foreground = Brush)bc.ConvertFrom("#FF2D72BC");
    Grid.SetColumn(tb, column);
    Grid.SetRow(tb, row);
    return tb;
}
Handling events dynamically
private TextBox CreateTextBox( int row, int column)
{
TextBox tb = new TextBox();
tb.Margin = new Thickness(5);
tb.Height = 22;
tb.Width = 150;
Grid.SetColumn(tb, column);
Grid.SetRow(tb, row);
return tb;
}
public string[] BreakUpperCB(string sInput)
{
StringBuilder[] sReturn = new StringBuilder[1];
sReturn[0] = new StringBuilder(sInput.Length);
const string CUPPER = "ABCDEFGHIJKLMNOPQRSTUVWXYZ";
int iArrayCount = 0;
for (int iIndex = 0; iIndex < sInput.Length; iIndex++)
{
string sChar = sInput.Substring(iIndex, 1);
if ((CUPPER.Contains(sChar)) && (iIndex > 0))
{
iArrayCount++;
System.Text.StringBuilder[] sTemp =
new System.Text.StringBuilder[iArrayCount + 1];
Array.Copy(sReturn, 0, sTemp, 0, iArrayCount);
sTemp[iArrayCount] = new StringBuilder(sInput.Length);
sReturn = sTemp;
}
sReturn[iArrayCount].Append(sChar);
}
string[] sReturnString = new string[iArrayCount + 1];
for (int iIndex = 0; iIndex < sReturn.Length; iIndex++)
{
sReturnString[iIndex] = sReturn[iIndex].ToString();
}
return sReturnString;
}
void button_Click(object sender, RoutedEventArgs e)
{
MessageBox.Show("Saved Successfully");
}
private Button CreateButton(string text, int row, int column )
{
Button tb = new Button() { Content = text, VerticalAlignment =
VerticalAlignment.Top, HorizontalAlignment =
HorizontalAlignment.Left, Margin = new Thickness(5, 8, 0, 5) };
tb.Width = 90;
tb.Height = 25;
tb.Margin = new Thickness(5);
Grid.SetColumn(tb, column);
Grid.SetRow(tb, row);
return tb;
}
public partial class MainWindow : Window
{
public MainWindow()
{
InitializeComponent();
}
private void Grid_Loaded(object sender, RoutedEventArgs e)
{
Person obj = new Person();
obj.FirstName = "sujeet";
CreateControls (obj);
}
}
In the below example, we have created a function CreateControlsUsingObjects(Person obj) which creates a dynamic form based on the XAML.
Create Controls
private void CreateControls(Person obj)
{
    List<Person> objList=new List<Person>();

    objList.Add(obj);
    Grid rootGrid = new Grid();
    rootGrid.Margin = new Thickness(10.0);

    rootGrid.ColumnDefinitions.Add(
       new ColumnDefinition() { Width = new GridLength(100.0) });
    rootGrid.ColumnDefinitions.Add(
         new ColumnDefinition() { Width = new GridLength(1, GridUnitType.Star) });

    rootGrid.ColumnDefinitions.Add(
        new ColumnDefinition() { Width = new GridLength(100.0) });
    rootGrid.ColumnDefinitions.Add(
           new ColumnDefinition() { Width = new GridLength(100.0) });


    PropertyInfo[] propertyInfos;
    propertyInfos = typeof(Person).GetProperties();
    rootGrid.RowDefinitions.Add(CreateRowDefinition());
    int j = 1;

    foreach (PropertyInfo propertyInfo in propertyInfos)
    {
        if (propertyInfo.PropertyType.Name == "String")
        {

            rootGrid.RowDefinitions.Add(CreateRowDefinition());

            var Label = CreateTextBlock(propertyInfo.Name, j, 0);
            rootGrid.Children.Add(Label);

            var Textbox = CreateTextBox(j, 1);
            rootGrid.Children.Add(Textbox);
            j++;
        }
        if (propertyInfo.PropertyType.Name == "Boolean")
        {
            rootGrid.RowDefinitions.Add(CreateRowDefinition());

            var Label = CreateTextBlock(propertyInfo.Name, j, 0);
            rootGrid.Children.Add(Label);

            var Textbox =  CreateCheckBox(j, 1);
            rootGrid.Children.Add(Textbox);
            j++;
        }

        }
        rootGrid.RowDefinitions.Add(CreateRowDefinition());
        var Button = CreateButton("Save",j + 1, 1);
        Button.Click += new RoutedEventHandler(button_Click);

        rootGrid.Children.Add(Button);
        LayoutRoot.Children.Add(rootGrid);
    }
}
In the above example, we can see how to create a WPF form dynamically. The below screen shows the output as we want.
Output screen

Sujit Bhujbal is Senior Software Engineer having over 12 + years of Experience in .NET core , C#, Angular , SQL Server and has worked on various platforms. He worked during various phases of SDLC such as Requirements and Analysis, Design and Construction, development, maintenance, Testing, UAT.
He is
Microsoft Certified Technology Specialist (MCTS) in Asp.net /WCF Applications. He worked at various levels and currently working as a Senior Software Engineer.
His core areas of skill are Web application development using WPF,WCF , C#.Net, ASP.Net 3.5, WCF, SQL Server 2008, CSS, Java script Web design using HTML, AJAX and Crystal Reports
He is proficient in developing applications using SilverLight irrespective of the language, with sound knowledge of Microsoft Expression Blend and exposure to other Microsoft Expression studio tools.
Microsoft Certified Technology Specialist (MCTS): Web Applications Development with Microsoft .NET Framework 4
Microsoft Certified Technology Specialist (MCTS): Accessing Data with Microsoft .NET Framework 4
Microsoft Certified Technology Specialist (MCTS): Windows Communication Foundation Development with Microsoft .NET Framework 4
------------------------------------------------------------------------
Blog: Visit Sujit Bhujbal
CodeProject:- Sujit Bhujbal codeproject
DotNetHeaven:- DotNetHeaven
CsharpCorner:-CsharpCorner
Linkedin :-Linkedin
Stack-Exchange: <a href="http://stackexchange.com/users/469811/sujit-bhu


 General
  News
News  Suggestion
  Question
  Bug
Bug  Answer
  Joke
Joke  Praise
  Rant
Rant  Admin
Admin 


