Introduction
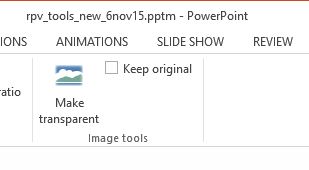
I have often wondered why you cannot simply set the transparency of a picture you paste in PowerPoint. Unless you are prepared to paste the picture into a rectangle shape and use the fill command 'paste from clipboard', there is no way to do it. In this tip, I'll show how to use simple VBA to achieve this. I have the code running from a button in a ribbon to work on a selected picture in a PowerPoint slide:

but the code should work with any shape from the ShapeCollection in any MSOffice app.
Using the Code
The core routine is a sub which acts on a selected object in PowerPoint (working for versions 2010 and 2013) called makeTransp(keepOriginal As Boolean) in a code module. I run the routine from a button from a custom ribbon. The code looks for a current selection of shapes in Powerpoint. In the code snippets following the core routine, I'll show how to set up the trapping of the selection events in PowerPoint.
First, the routine will check if there are any shapes selected and, secondly, if the first selected shape is of type msoPicture. If this isn't the case, the sub exits silently or with a warning.
If the routine finds a usable picture, it will export the shape to a temp image file. The reason for this is the fact that a newly created (rectangle) shape can only be filled using fillmode 'UserPicture'. Once the picture has been exported, I create a new shape on the current slide with AddShape using the dimensions of the original picture. Depending on the switch to keep the original picture or not, I offset the new shape by 10 units. As is the custom with pictures, I lock the AspectRatio by default. Subsequently, I fill the new shape with the image from the file and put the fill's transparency to 50%. The user him/herself can then go to the properties of the new shape and tweak the transparency further. Depending on the switch keepOriginal I delete the original picture. Lastly, I clean up the temp image file.
Core routine in code module1:
Private Sub makeTransp(keepOriginal As Boolean)
If currentApp.SelectedShapes Is Nothing Then Exit Sub
If currentApp.SelectedShapes.Count < 1 Then Exit Sub
Dim s As Shape
Set s = currentApp.SelectedShapes(1)
If s.Type <> msoPicture Then
MsgBox "Selected object is not an image or picture", _
vbExclamation, "Office Tools"
Else
Dim fname As String
fname = Environ("Temp") & "\tmpimagename.jpg"
s.Export fname, ppShapeFormatJPG
Dim sld As Slide
Set sld = Application.ActiveWindow.View.Slide
Dim shp As Shape
Dim offset As Integer
offset = 0
If keepOriginal Then
offset = 10
End If
Set shp = sld.Shapes.AddShape(Type:=msoShapeRectangle, _
Left:=s.Left + offset, Top:=s.Top + offset, _
Width:=s.Width, Height:=s.Height)
shp.LockAspectRatio = msoTrue
shp.Fill.UserPicture (fname)
shp.Fill.Transparency = 0.5
deleteFile fname
If Not keepOriginal Then
s.Delete
End If
End If
End Sub
In the above routine, the currentApp class holds the runtime info on any current selection. This class is called rpvEvents and is declared WithEvents in a class module within the same VBA project:
Public WithEvents App As Application
Public SelectedShapes As ShapeRange
Private Sub App_WindowSelectionChange(ByVal sel As Selection)
With sel
If .Type = ppSelectionShapes Then
Set SelectedShapes = sel.ShapeRange
Else
Set SelectedShapes = Nothing
End If
End With
End Sub
The class is initialized when the code of module1 is loaded:
Option Explicit
Dim currentApp As New rpvEvents
Public Sub rpvOnLoad()
Debug.Print "initialize 6nov2015..."
Set currentApp.App = Application
End Sub
The little routine to delete the tempfile looks like this in module1:
Private Sub deleteFile(path As String)
On Error Resume Next
Kill path
End Sub
An example of an original image copied into a transparent shape is shown here (smart readers will guess my home country... it's a dead give-away):

Points of Interest
VBA isn't my native language (VB.NET is) and it is obviously very much the ugly little sister in the various language families. However, I make use of it once in a while when I need to automate my work with MSOffice. And you can make your colleagues happy with a simple macro they can use every day.
History
My first article on my first topic.
