Introduction
One notable difference between Excel 2010 and Excel 2013 is that the former is a multiple-document interface (MDI) application whereas the latter is a single-document interface (SDI) application. One consequence is that custom task panes (CTP) in Excel 2013 are managed differently than in Excel 2010.
In Excel 2010, CTPs are easier to handle than in Excel 2013 as you have only one instance of a CTP that you have to synchronize with the ribbon (e.g. a toggle button) and the active workbook.
In Excel 2013 however, you must associate one CTP instance to each workbook. In the provided demo project, we manage this by using a dictionary of CTPs where the keys are given by the name of each workbook. Additionally, you must manage the visibility state of the CTP when exiting backstage, taking into account the CTP’s visibility state before entering backstage.
Background
For an introduction and comparison of SDI and MDI programming in Excel, you can start here.
Screenshots
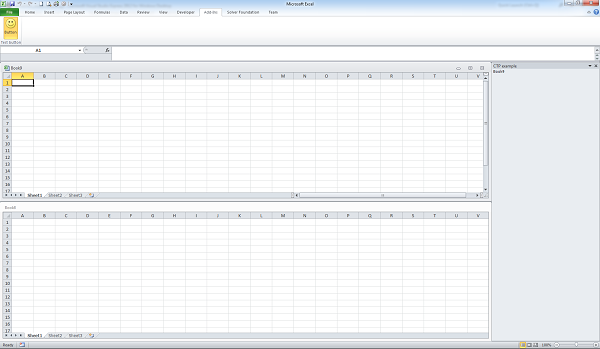
Excel 2010

There is only one CTP shared by all workbooks. The content of the CTP is synchronized with the active workbook.
Excel 2013

Each workbook has its own CTP and each CTP its own toggle button in the ribbon menu. Per workbook, the pressed state of the toggle button is synchronized with the visibility state of the related custom task pane.
Using the Code
The demo project provided herewith has been written in VB.NET (framework 4.5) and uses Excel-DNA (version 0.32) to integrate .NET into Excel. It includes XML code documentation and has been tested with Excel 2010 and Excel 2013 running on Windows 7 SP1.
In particular, you will need to add a reference to the following libraries:
- ExcelDNA.Integration.dll
- Micrsoft.Office.Interop.Excel.14.dll
Step-by-step Implementation
Step 1
Add ClassCTPManager.vb to your project.
Step 2
Create a UserControl that will be associated to the custom task pane (in the example: UserControl1). Notice that your UserControl must contain a method called Initialize where you can add code to synchronize its content with the active workbook.
Step 3
Assign your UserControl to a new CTPManager object (e.g. myCTP). In the provided example, this statement is included in module Globals and goes like this:
Public WithEvents myCTP As New CTPManager(GetType(UserControl1),
	"CTP example", CustomUI.MsoCTPDockPosition.msoCTPDockPositionRight)
Step 4
Your *.DNA file should contain XML code for adding a toggle button to the ribbon. The toggle button will be associated to your CTP and must contain onAction, getPressed and getEnabled callback procedures. In the example, the following XML markup has been used:
<customUI xmlns="http://schemas.microsoft.com/office/2009/07/customui" onLoad="rxcustomUI_onLoad">
   <ribbon>
      <tabs>
         <tab idMso="TabAddIns">
            <group id="groupTest" label="Test button">
               <toggleButton id="myToggleButton"
                             size="large"
                             label="Button"
                             imageMso="HappyFace"
                             onAction="rxToggleButton_onAction"
                             getPressed="rxToggleButton_getPressed"
                             getEnabled="rxToggleButton_getEnabled"/></group>
         </tab>
      </tabs>
   </ribbon>
   <backstage onShow="Backstage_onShow"/>
</customUI>
Notice that we have also defined an onShow callback procedure with respect to the backstage, which will be used to manage the visibility state of the CTP in Excel 2013.
Step 5
Create an event handler to switch the toggle button in the ribbon and assign the StatusChange event of your CTPManager object to it. In the provided example, this statement is included in module Globals and goes like this:
Public Sub CTP_StatusChange() Handles myCTP.StatusChange
   XLRibbon.myRibbon.InvalidateControl("myToggleButton")
End Sub
Step 6
In your ribbon class (cf. example’s XLRibbon.vb), add or update the onAction, getPressed and getEnabled callback procedures linked to the toggle button.
- The
onAction procedure must contain the following statement, where you replace myCTP by the name of your own CTPManager object:
With myCTP
   If .Visible Then .HideCTP() Else .DisplayCTP()
End With
- The
getPressed procedure must contain the following statement, where you replace myCTP by the name of your own CTPManager object:
Return myCTP.Visible
- The
getEnabled procedure must contain the following statement:
If ExcelDnaUtil.Application.ActiveWorkbook Is Nothing Then
   Return False
Else
   Return True
End If
Step 7
Additionally, your ribbon class must contain the Backstage onShow callback procedure. Again, in the code below, replace myCTP by the name of your own CTPManager object.
Sub Backstage_onShow(contextObject As Object)
   myCTP.EnterBackStage()
End Sub
Step 8
Finally, you must ensure that the specific CTPManager methods are run when the following Excel events are raised (in the enclosed example, you will find this part in Auto.vb).
| Event
| CTPManager method
| Arguments
|
| WindowActivate
| OnEnterWorkbook
| Name of workbook
|
| WorkbookBeforeClose (*)
| OnCloseWorkbook
| None
|
| WorkbookAfterSave
| OnSaveWorkbook
| Name of workbook
|
(*) Theoretically, we should use an event WorkbookAfterClose, which however does not exist. That’s why we have to add some code in the event handler to be sure to run CTPManager.OnCloseWorkbook only when workbook gets actually closed.
History
- December 2015: First version
