Introduction
This is a small tutorial about how to interface the Arduino with basic I/O devices.
For this, we present a small project of a game to teach "multiplication tables" where the information is typed on a keypad and displayed on a LCD.
Background
For this project, we'll need the following elements:
- An Arduino board UNO compatible
- Protoboard
- 4x4 Keypad
- 2x16 LCD
- 1k Potentiometer
- 100 Ohms resistor
- 5v Piezzo Buzzer
- Jumper wires
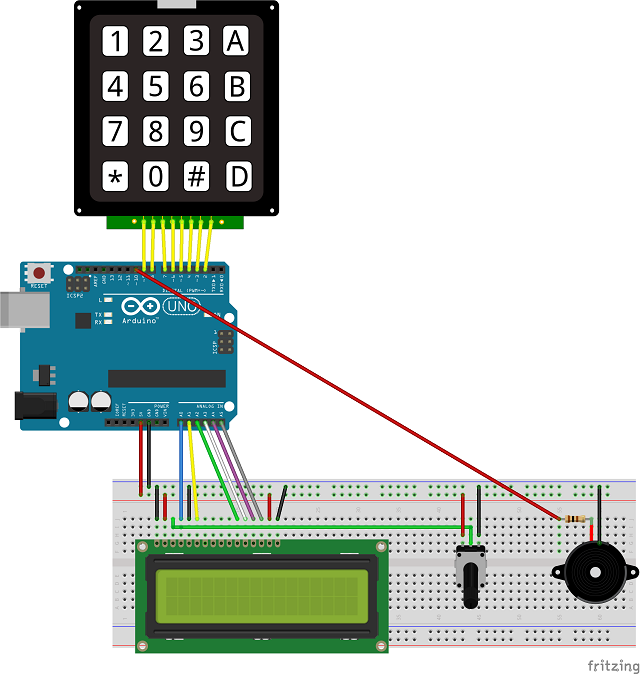
In the picture below, we see how these components will be mounted:

Points of Interest
- The 100 ohms resistor is needed to prevent sound distortion.
- The pot is required to adjust the LCD visibility.
- The analog pins are used as digital pins.
- Regarding the keypad, you will not need external resistors because the library uses the internal pullup resistors (activated via software).
Using the Code
The game of "multiplication table" works as follows:
- The system randomly chooses two numbers to be multiplied and displays them on the LCD.
- The system waits for user response.
- The user types your response on the keyboard and press the "
#" key. - The system checks whether the answer is correct or not, and displays the result on the second line of the LCD through emoticons and sounds.
- The user presses the "
#" key. - The system returns to the step 1.
Click here for a video demonstration.
Go to the sketch:
#include <Keypad.h>
#include <LiquidCrystal.h>
#include "pitches.h" // Musical Notes
const byte numRows= 4; const byte numCols= 4; char keyMap[numRows][numCols]=
{
{'1', '2', '3', 'A'},
{'4', '5', '6', 'B'},
{'7', '8', '9', 'C'},
{'*', '0', '#', 'D'}
};
byte rowPins[numRows] = {9,8,7,6}; byte colPins[numCols]= {5,4,3,2}; Keypad keyPad= Keypad(makeKeymap(keyMap), rowPins, colPins, numRows, numCols);
LiquidCrystal lcd(A0, A1, A2, A3, A4, A5);
int buzzPin = 10;
void setup() {
lcd.begin(16, 2);
pinMode(buzzPin,OUTPUT); randomSeed(analogRead(7));}
void loop() {
lcd.clear();
lcd.setCursor(0, 0);
int num1 = random(2, 11);
int num2 = random(2, 11);
int result = num1 * num2;
String mult = String(num1) + " x " + String(num2) + " = ";
lcd.print(mult);
int hit = readVal().toInt();
lcd.setCursor(0, 1);
if (result == hit){
lcd.print(":-)");
playHappy();
}
else {
lcd.print(":-( " + String(result));
playAlarm();
}
hit = readVal().toInt(); }
String readVal(){
String myString = "";
char keyPressed = keyPad.getKey();
while (keyPressed != '#'){
keyPressed = keyPad.getKey();
if ((keyPressed != NO_KEY) && (keyPressed != '#')) {
myString.concat(keyPressed);
lcd.print(keyPressed);
playTone();
}
}
return(myString);
}
void playHappy(){
int melody[] = {NC4,NC4,ND4,NC4,NF4,NE4,
NC4,NC4,ND4,NC4,NG4,NF4,
NC4,NC4,NC5,NA4,NF4,NE4,ND4,
NAS4,NAS4,NA4,NF4,NG4,NF4
};
int noteDurations[] = {6,12,4,4,4,2,
6,12,4,4,4,2,
6,12,4,4,4,4,2,
6,12,4,4,4,2,
};
for (int thisNote = 0; thisNote < 12; thisNote++) {
int noteDuration = 1000/noteDurations[thisNote];
tone(buzzPin, melody[thisNote],noteDuration);
int pauseBetweenNotes = noteDuration * 1.30;
delay(pauseBetweenNotes);
noTone(buzzPin);
}
}
void playAlarm(){
for (int thisNote = 150; thisNote < 1000; thisNote += 1)
{
tone(buzzPin, thisNote, 10);
delay(1);
}
for (int thisNote = 1000; thisNote > 150; thisNote -= 1)
{
tone(buzzPin, thisNote, 10);
delay(1);
}
}
void playTone(){
tone(buzzPin, 150, 10);
}
Points of Interest
- The libraries (keypad.h and LiquidCrystal.h) are available via the Arduino IDE library manager.
- The pitches.h file contains definitions of musical notes used in the song "Happy Birthday to You" and is available for download above at the top of the tip.
- The
KeyMap array defined the keyboard characters. - The
randomSeed function initializes the random number generator via the analog pin A7.
History
- 03/01/2015 - First version
- 04/01/2015 - Minor fixes
References
Conclusion
I hope that with the project presented here, the beginner in Arduino (like me) can evolve his/her learning.
See you soon.
