Introduction
In this tip, we show how to create a Spinner widget whose items are defined in an XML file.
A spinner widget enables a user to select an item from a list of options. Clicking on the spinner widget shows a dropdown menu with all available items. The user can choose a new one from the list.
Using the Code
The code example consists of the following four files: AndroidManifest.xml, main.xml, strings.xml, and MainActivity.java.
="1.0"="utf-8"
<manifest xmlns:android="http://schemas.android.com/apk/res/android"
package="com.zetcode.finish"
android:versionCode="1"
android:versionName="1.0">
<application android:label="@string/app_name" android:icon="@drawable/ic_launcher">
<activity android:name="MainActivity"
android:label="@string/app_name">
<intent-filter>
<action android:name="android.intent.action.MAIN" />
<category android:name="android.intent.category.LAUNCHER" />
</intent-filter>
</activity>
</application>
</manifest>
This is the AndroidManifest.xml file.
="1.0"="utf-8"
<LinearLayout xmlns:android="http://schemas.android.com/apk/res/android"
android:orientation="vertical"
android:layout_width="fill_parent"
android:layout_height="fill_parent"
>
<Spinner
android:id="@+id/spn"
android:layout_width="wrap_content"
android:layout_height="wrap_content"
android:entries="@array/dlangs"
android:layout_marginTop="10dip"
android:prompt="@string/spn_title" />
<TextView
android:id="@+id/tvId"
android:layout_width="fill_parent"
android:layout_height="wrap_content"
android:layout_marginTop="10dip"
/>
</LinearLayout>
The main.xml layout file contains a Spinner and a TextView. The android:entries="@array/dlangs" attribute defines an XML resource that provides an array of strings. The strings are written in the strings.xml file.
="1.0"="utf-8"
<resources>
<string name="app_name">Spinner</string>
<string name="spn_title">Choose a language</string>
<string-array name="dlangs">
<item>Python</item>
<item>PHP</item>
<item>Perl</item>
<item>Tcl</item>
<item>Ruby</item>
</string-array>
</resources>
In the strings.xml file, we have the elements of the string array. These are displayed when we click on the Spinner widget.
package com.zetcode.spinner;

import android.app.Activity;
import android.os.Bundle;
import android.view.View;
import android.widget.TextView;
import android.widget.Spinner;
import android.widget.AdapterView;
import android.widget.AdapterView.OnItemSelectedListener;

public class MainActivity extends Activity implements OnItemSelectedListener
{
    private TextView tv;

    @Override
    public void onCreate(Bundle savedInstanceState)
    {
        super.onCreate(savedInstanceState);
        setContentView(R.layout.main);

        tv = (TextView) findViewById(R.id.tvId);

        Spinner spn = (Spinner) findViewById(R.id.spn);
        spn.setOnItemSelectedListener(this);
    }

    @Override
    public void onItemSelected(AdapterView<?> parent, View v, int pos, long id)
    {
      String item = parent.getItemAtPosition(pos).toString();
      tv.setText(item);
    }

    @Override
    public void onNothingSelected(AdapterView<?> arg0)
    {
      tv.setText("");
    }
}
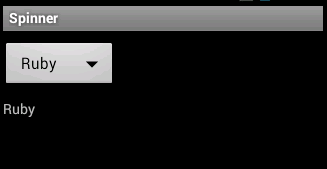
The selected item from the Spinner widget is displayed in the TextView widget.
Spinner spn = (Spinner) findViewById(R.id.spn);
spn.setOnItemSelectedListener(this);
These two lines get the reference to the Spinner widget and set the OnItemSelectedListener for it.
@Override
public void onItemSelected(AdapterView<?> parent, View v, int pos, long id)
{
    String item = parent.getItemAtPosition(pos).toString();
    tv.setText(item);
}
In the onItemSelected() method, we get the currently selected Spinner item with the getItemAtPosition(). The item is transformed to a string and set to the TextView.
This is the screenshot from the Android Virtual Device.

