Introduction
Recently, I have been busy developing an intranet GIS application and found myself needing the old faithful .NET panels and splitcontainers. I thought of sharing the code here. Note: I'm not an expert writing HTML, CSS and JS and there are raging discussions on HTML5, CSS3 and JS on the internet. Please don't start a new discussion with me. If you can use my templates, good! If not, too bad. I presume you have some experience with HTML5, CSS and JS (JavaScript), otherwise this may be not a good starting point for learning those topics. This trick/tip was inspired by GitHub repository of Nathan Cahill: nathancahill/Split.js.
How It Works...
Just download the zip file and load the HTML files in your browser. The veetpanels.html is pure HTML5/CSS3, no JavaScript (JS) involved. It makes use of the CSS3 FlexBox. In the HTML file, just create divs with classes panelcontainer and vertical or horizontal to set the direction of the flexbox. Within the panelcontainer, define your panels and how they should dock.
<!DOCTYPE html>
<html lang="en">
<head>
<meta charset="UTF-8">
<title>veet panels</title>
<!--
<link rel="stylesheet" href="./veetbase.css">
<link rel="stylesheet" href="./veetpanels.css">
</head>
<!--
<body class="application">
<header>Header</header>
<nav class="veetcolormenu">Navigation</nav>
<div class="panelcontainer vertical ">
<div class="panel docktop " style="background:rgba(200,200,0,0.2);">p1 docktop</div>
<div class="panel dockfill " style="background:rgba(0,200,200,0.2);">
<div class="panelcontainer horizontal ">
<div class="panel dockleft" style="background:rgba(200,200,0,0.2);">p3 dockleft</div>
<div class="panel dockfill " style="background:rgba(0,200,200,0.2);">last dockfill</div>
<div class="panel dockright " style="background:rgba(200,0,200,0.2);">p4 dockright</div>
</div>
</div>
<div class="panel dockbottom " style="background:rgba(200,0,200,0.2);">p2 dockbottom</div>
</div>
<footer>Footer</footer>
</body>
<!--
<script>
</script>
</html>
Points of interest in the veetpanels.css (below) are:
- To make the panel either float to the right or bottom, use the
margin-left or top: auto; - If the panels are to remain flexible, never use anything but
min-width or min-height. As soon you put in height: 100px; or width: 100%;, you will break the flexbox logic and behaviour becomes erratic (found out the hard way). - To make a panel completely flexible to its neighbours, use the
flex: 1 1 auto; option.
.panel.dockleft {
    min-width: 100px;
}

.panel.docktop {
    min-height: 100px;
}

.panel.dockright {
    min-width: 100px;
    margin-left: auto;
}

.panel.dockbottom {
    min-height: 100px;
    margin-top: auto;
}

.panel.dockfill {
    -webkit-box-flex: 1;
    -ms-flex: 1 1 auto;
    flex: 1 1 auto;
}
The veetsplit.html builds on the CSS classes of the veetpanels. It's <head> section loads two more files: veetsplit.css and veetsplit.js:
<!DOCTYPE html>
<html lang="en">
<head>
<meta charset="UTF-8">
<title>veet split</title>
<!--
<link rel="stylesheet" href="./veetbase.css">
<link rel="stylesheet" href="./veetpanels.css">
<link rel="stylesheet" href="./veetsplit.css">
<script src="./veetsplit.js"></script>
</head>
<!--
<body class="application">
<header>Header</header>
<nav class="veetcolormenu">Navigation</nav>
<div class="panelcontainer horizontal ">
<div class="panel dockleft" style="background:rgba(255,0,0,0.2);">normal panel</div>
<div id="mapcontainer" class="panelcontainer horizontal ">
<div id="tools" class="splitpanel leftpanel ">
<div id="toolcontainer" class="panelcontainer vertical ">
<div id="layers" class="splitpanel toppanel "
style="background:rgba(100,20,0,0.2);">layers</div>
<div id="splitterTool" class="splitter row"></div>
<div id="info" class="splitpanel bottompanel "
style="background:rgba(20,100,0,0.2);">info</div>
</div>
</div>
<div id="splitterMap" class="splitter column"></div>
<div id="map" class="splitpanel rightpanel "
style="background:rgba(0,20,200,0.2);">map</div>
</div>
<div class="panel dockright" style="background:rgba(255,0,0,0.2);">2nd normal panel</div>
</div>
<footer>Footer</footer>
</body>
<!--
<script>
veet.split.setSplit('splitterMap',{splitterSize:'10',startPosition:'75',
minSizePanel1:'10',minSizePanel2:'5',fixedPanel2:true});
veet.split.setSplit('splitterTool',{splitterSize:'10',startPosition:'80',
minSizePanel1:'5',minSizePanel2:'10',isFixed:true,fixedPanel2:true});
veet.split.logOptions('splitterMap');
</script>
</html>
If you want to create a splitterpanel, just create divs with classes splitpanel and one of the leftpanel, toppanel, rightpanel or bottompanel. And of course, add the splitter with the classes splitter and either row or column. Do not forget to give the splitter an id! It's the link with the js code.
Just initialize the split container with the js function veet.split.setSplit(splitterId,{options});. You can review the options for the current split container with the function veet.split.logOptions(splitterId);. Options you can use with the split container are: splitterSize, startPosition, isFixed, minSize, minSizePanel1, minSizePanel2, fixedPanel2. I tried to keep these as close as possible to the .NET split container options.
How It Looks
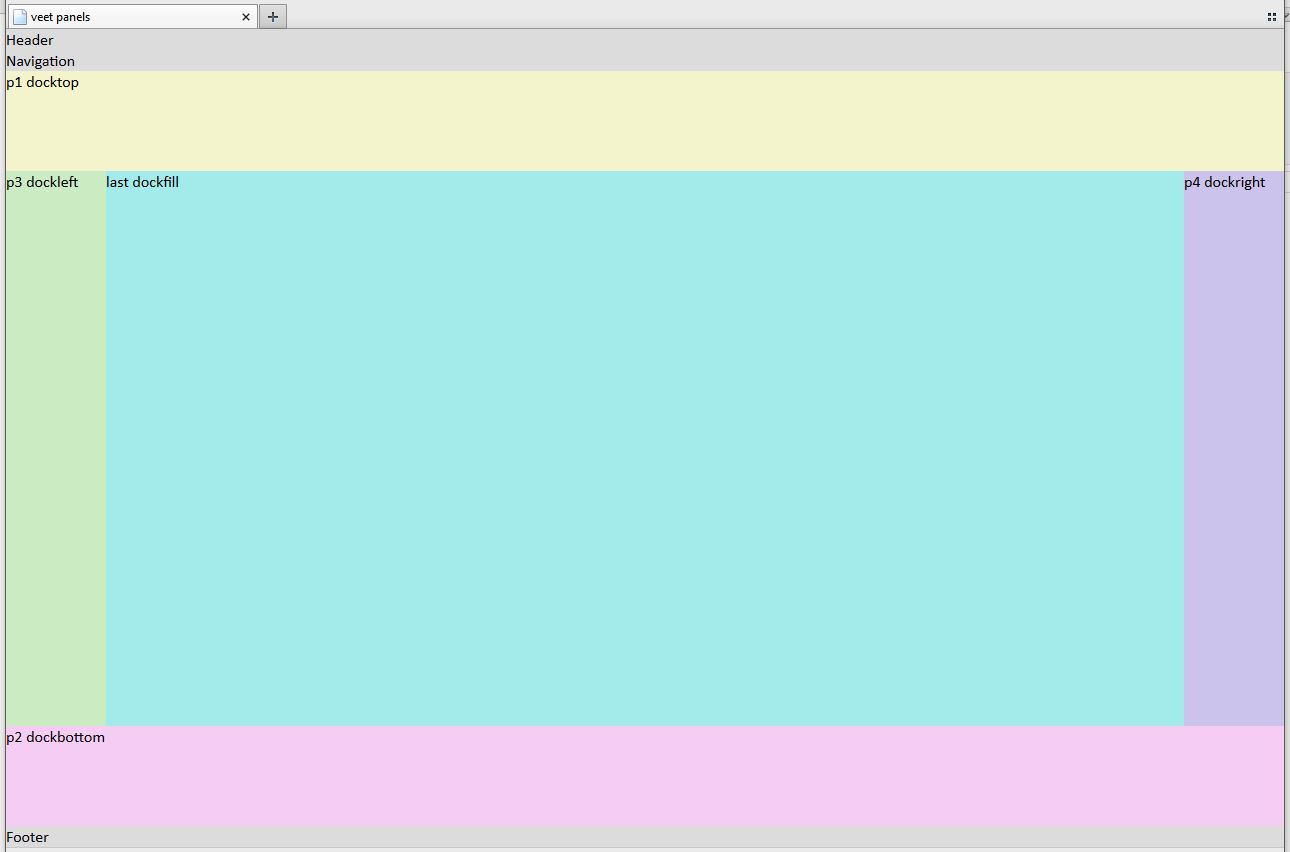
Some pictures below show the results.
HTML5/CSS3 panels using docking classes (no JavaScript needed):

HTML5/CSS3/JS splitcontainers using docking classes (small JS module included):

Splitcontainers used with a webgis application:

Finally...
Let me know if it works for you!
