Introduction

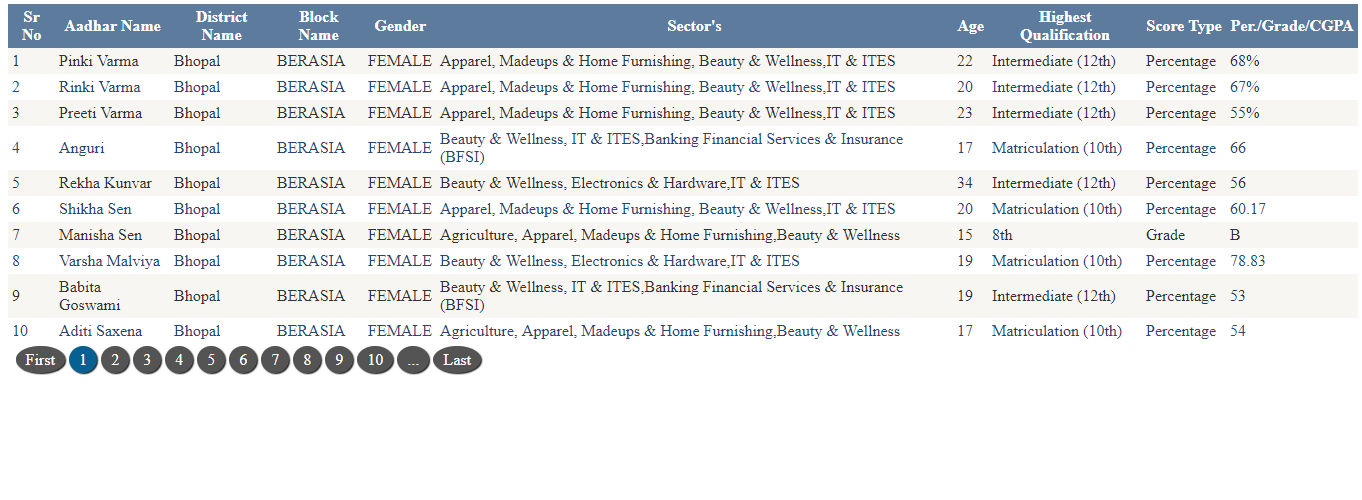
In this post, I will explain the gridview paging technique that has numeric paging as default along with custom first and last page.
For the numeric paging, I use a simple gridview paging and for first and last button, I create using jquery.
By using this technique, you do not need to write any custom code in databound event.
If you need to achieve the functionality of gridview that has numeric paging with first and last button, then you need to use gridview property AllowCustomPaging=true and custom code for creating numeric and first and last button at rowdatabound event of gridview.
So I use the AllowPaging property of gridview and generate the custom first and last button with jquery, and there is no need to write any custom code paging and first and last button. In this paging work as default because we use allowpaging and for the first and last button done with the help of __doPostback event.
What You Need to Run the Code
I use sample the candidate data displaying into the grid for better look and feel. I use bootstap table CSS and for pager view, use custom CSS "gridviewPager" used by gridview.
Create the aspx page and take 1 gridview into that page.
<div>
            <asp:GridView ID="gvReport" runat="server"
            DataKeyNames="ID"  AllowPaging="True" Width="100%"
            AutoGenerateColumns="False" CellPadding="4" GridLines="None">
                <EditRowStyle BackColor="#999999" />
                <FooterStyle BackColor="#5D7B9D"
                Font-Bold="True" ForeColor="White" />
                <HeaderStyle BackColor="#5D7B9D"
                Font-Bold="True" ForeColor="White" />
                <PagerStyle CssClass="gridviewPager"/>

                <AlternatingRowStyle BackColor="White" ForeColor="#284775" />

                <Columns>
                    <asp:TemplateField HeaderText="Sr No">
                        <ItemTemplate>
                            <asp:Label ID="lblSrNo"
                            runat="server"
                            Text='<%#Container.DataItemIndex+1 %>'></asp:Label>
                        </ItemTemplate>
                    </asp:TemplateField>
                    <asp:BoundField DataField="ID"
                    HeaderText="Id" Visible="false"></asp:BoundField>
                    <asp:BoundField DataField="NameE"
                    HeaderText="Aadhar Name"></asp:BoundField>
                    <asp:BoundField DataField="District"
                    HeaderText="District Name"></asp:BoundField>
                    <asp:BoundField DataField="Block"
                    HeaderText="Block Name"></asp:BoundField>
                    <asp:BoundField DataField="Gender"
                    HeaderText="Gender"></asp:BoundField>
                    <asp:BoundField DataField="Sector"
                    HeaderText="Sector's"></asp:BoundField>
                    <asp:BoundField DataField="Age"
                    HeaderText="Age"></asp:BoundField>
                    <asp:BoundField DataField="Qualification"
                    HeaderText="Highest Qualification"></asp:BoundField>
                    <asp:BoundField DataField="GREDTYPE"
                    HeaderText="Score Type"></asp:BoundField>
                    <asp:BoundField DataField="PGC"
                    HeaderText="Per./Grade/CGPA"></asp:BoundField>
                </Columns>
                <RowStyle BackColor="#F7F6F3" ForeColor="#333333" />
                <SelectedRowStyle BackColor="#E2DED6"
                Font-Bold="True" ForeColor="#333333" />
                <SortedAscendingCellStyle BackColor="#E9E7E2" />
                <SortedAscendingHeaderStyle BackColor="#506C8C" />
                <SortedDescendingCellStyle BackColor="#FFFDF8" />
                <SortedDescendingHeaderStyle BackColor="#6F8DAE" />
            </asp:GridView>
        </div>
For data access, use the help of sqlhelper class with 3-tier using BAL and DAL in App_code folder.
Using the Code
- Create a page in the solution, I named as default.aspx.
- Drag and drop gridview control inside the page.
- Autoformat the gridview as needed. I have used profession skin of gridview that we can choose from Task button of gridview which we can find at design view of grid at upper right side.
- Inside the app_code folder, add 2 files named as BAl.cs and DAL.cs contain the code for accessing the data from the databases
- Also add the
sqlhelper class which contains code for communication with database using ADO.NET. - After that, bind the
gridview to the datasource. I have used method bindGrid which binds data to gridview.
private void bindGrid()
        {
            BAL bobj = new BAL();
            try
            {
                ds.Reset();
                ds = bobj.getRCandidateByDistrict_Bal();
                using (ds)
                {
                    if (ds != null && ds.Tables.Count > 0)
                    {
                        if (ds.Tables[0].Rows.Count > 0)
                        {
                            gvReport.DataSource = ds;
                            gvReport.DataBind();
                        }
                    }
                }
            }
            catch (Exception ex)
            {
                throw ex;
            }
        }
- At Page load, call the
bindGrid method:
protected void Page_Load(object sender, EventArgs e)
{
   gvReport.PageIndexChanging += gvReport_PageIndexChanging;
    if (!IsPostBack)
    {
      bindGrid();
    }
}
- Also write code for the page index changing event like this:
void gvReport_PageIndexChanging(object sender, GridViewPageEventArgs e)
      {
          try
          {
               gvReport.PageIndex = e.NewPageIndex;
               bindGrid();
          }
          catch (Exception ex)
          {

              throw ex;
          }
      }
Jquery code is the main part on the page. In this, we find element having class gridviewPager and inside, we traverse the tr and find tr of table with tbody element. Prepend that with td inside the a tag with attaching the __dopostback event which creates the button at first position of pager.
Similar to that, we create the last button using append method of jquery which creates the button at that last position of pager.
   <script type="text/javascript">
    $(document).ready(function () {

        $('.gridviewPager').closest('tr').find('table tbody tr').
        prepend('<td><a href="javascript:__doPostBack(' +
        "'gvReport'" + ',' + "'Page$First'" +
        ')">First</a></td>');
        $('.gridviewPager').closest("tr").find("table tbody tr")
        .append('<td><a href="javascript:__doPostBack
        (' + "'gvReport'" + ',' + "'Page$Last'" +
        ')">Last</a></td>');
    })
</script>
    <script type="text/javascript">
    $(document).ready(function () {

        $('.gridviewPager').closest('tr').find('table tbody tr').
        prepend('<td><a href="javascript:__doPostBack(' +
        "'gvReport'" + ',' + "'Page$First'" +
        ')">First</a></td>');
        $('.gridviewPager').closest("tr").find("table tbody tr").
        append('<td><a href="javascript:__doPostBack(' + "'
        gvReport'" + ',' + "'Page$Last'" +
        ')">Last</a></td>');
    })
</script>
CSS used is as follows:
<style>
       .gridviewPager {
           background-color: #fff;
           padding: 2px;
           margin: 2% auto;
       }

           .gridviewPager a {
               margin: auto 1%;
               border-radius: 50%;
               background-color: #545454;
               padding: 5px 10px 5px 10px;
               color: #fff;
               text-decoration: none;
               -o-box-shadow: 1px 1px 1px #111;
               -moz-box-shadow: 1px 1px 1px #111;
               -webkit-box-shadow: 1px 1px 1px #111;
               box-shadow: 1px 1px 1px #111;
           }

               .gridviewPager a:hover {
                   background-color: #337ab7;
                   color: #fff;
               }

           .gridviewPager span {
               background-color: #066091;
               color: #fff;
               -o-box-shadow: 1px 1px 1px #111;
               -moz-box-shadow: 1px 1px 1px #111;
               -webkit-box-shadow: 1px 1px 1px #111;
               box-shadow: 1px 1px 1px #111;
               border-radius: 50%;
               padding: 5px 10px 5px 10px;
           }
   </style>
Points of Interest
Jquery code creates the custom button and we use the inbuilt JavaScript function of gridview to solve our problem with minimum efforts.
__doPostBack attaches the gridview id and parameter as Page$First for displaying the first page record.__doPostBack attach the gridview id and parameter as Page$Last for displaying the Last page record.
History
- 11th August, 2017: Initial version
