Introduction
The ListView is one of the most important and commonly used components in the Android platform. It is easy to find lots of information, samples and forum posts on how to set it up, customize it and populate it with data.
Nevertheless, there seems to be no information or official documentation on how to properly use the notification methods of the ListViewAdapter to make the ListView aware of data changes such as a deletion or insertion of an item.
On the contrary, there are more than enough forum and blog posts demonstrating the wrong usage of the ListViewAdapter's NotifyDataSetChanged method leading to both ListView and App unpredictable behavior.
In this article, I build a very simple Xamarin native Android App to demonstrate how to properly use the NotifyDataSetChanged method of the ListViewAdapter to remove items from a ListView. The same recipe applies to adding new items to the list, as well.
Background
Even though the code is very simple and straightforward, familiarity with the Xamarin native Android for Visual Studio 2015 tool is assumed. Also, any previous experience with the Android.Widget.ListView component is a plus.
You can download the article's full source code but if you want to start from scratch, open Visual Studio 2015 and select File -> New Project -> Android -> Blank App (Android).
Note that the C#/.NET (Xamarin) cross platform mobile development feature should be already installed in Visual Studio as described here.
Using the Code
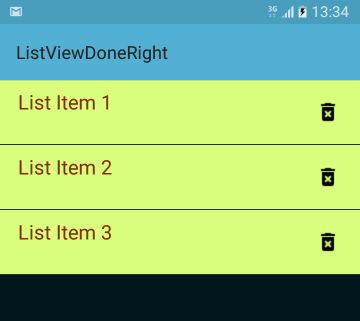
The App consists of a single Activity (MainActivity) for the ListView (with a custom item layout defined in XAML (ListViewItemLayout.axml). Each list item contains a line of text and an ImageButton showing a dustbin icon that can be clicked to remove the item from the list. Since the list is populated in the OnCreate method, you may rotate the screen to get the original three list items back.

The IDeleteButtonListener Interface
The ListViewAdapter.cs file contains the definition of the IDeleteButtonListener interface which allows us to call code outside the adapter when the delete ImageButton is clicked. This is crucial because the data change and the call to NotifyDataSetChanged method are (and should be) both performed by the MainActivity.
public interface IDeleteButtonListener
{
    void OnButtonClickListener(int position, string value);
}
The ListViewAdapter Class
Also found in the ListViewAdapter.cs file is the ListViewAdapter class. Apart from the typical implementation of the BaseAdapter, it has a IDeleteButtonListene property and a method (SetDeleteButtonListener) to assign a value to it.
public void SetDeleteButtonListener(IDeleteButtonListener listener)
{
    this.deleteButtonListener = listener;
}
The GetView Method
public override View GetView(int position, View convertView, ViewGroup parent)
{
View row = convertView;
ImageButton buttonDelete;
if (row == null)
{
row = context.LayoutInflater.Inflate(Resource.Layout.ListViewItemLayout, null);
buttonDelete = row.FindViewById<ImageButton>(Resource.Id.ButtonDelete);
buttonDelete.Focusable = false;
buttonDelete.FocusableInTouchMode = false;
buttonDelete.Clickable = true;
buttonDelete.Click += (object sender, EventArgs e) =>
{
if (this.deleteButtonListener != null)
{
this.deleteButtonListener.OnButtonClickListener(position, items[position]);
}
};
}
row.FindViewById<TextView>(Resource.Id.Text1).Text = items[position];
return row;
}
Pay special attention to the adapter's GetView method. This is where the view of each list item (row) is created (or re-used) and the delete button event handler is set and the click listener is used. The key points are the following:
- The delete button event handler should be set only when the item view is created (i.e., inside the
if statement). If a click listener is set, then it is called. - Each list item contains a line of text. The
TextView.Text should be assigned every time the GetView method is called (i.e., outside the if statement). - It is very important to note what is NOT happening when the delete button is clicked. The
items collection is not modified. This is not where the data change should happen. So, please, do not write code like items.RemoveAt(position); inside the GetView method.
By the way, the delete button should lose focus but still remain clickable to allow the item view (row) to receive click events as well.
The Main Activity
The ListView is created and populated with data in the OnCreate method.
listView = FindViewById<ListView>(Resource.Id.List);
adapter = new ListViewAdapter(this, data);
adapter.SetDeleteButtonListener(this);
listView.Adapter = adapter;
The data is a very simple list of strings.
List<string> data = new List<string>() { "List Item 1", "List Item 2", "List Item 3" };
Note that the MainActivity implements the IDeleteButtonListener interface and provides the OnButtonClickListener callback method.
public void OnButtonClickListener(int position, string value)
{
data.Remove(value);
adapter.NotifyDataSetChanged();
}
Again, pay close attention to the code. This is where two important things happen:
- The data is modified. The selected list item value is removed from the collection.
- The adapter's
NotifyDataSetChanged is called. As a result, the ListView will update itself by removing the correct list item.
This is the one and only way to properly notify the attached observers that the underlying data has been changed and any View reflecting the data set should refresh itself.
Hope it helps!
History
- 5th September, 2017: Original article
