Introduction
This article is for the developers who are developing IoT hub applications and are looking for authenticating the Communication Channel between the Device and IoT hub. With Azure IoT hub SDK with the latest releases, the feature of implementing a secured channel is available out of the box, and can be consumed in the solution with an ease.
Background & Issue
In an IoT solution, the Azure IoT hub is registering the devices, to further manage the identities and making the secured communication between the devices and the IoT hub.
In the real world, we are supposed to implement the Authorization on top of this channel as we don’t want a fake device to communicate with the IoT hub and using some other device's identities.
Resolution
To solve this, Azure IoT hub is now added with a supported X.509 certificates. Which means that the communication between device and IoT hub can be injected with a certificate and the necessary authorization can be checked before establishing the connection.
In the Latest version (version 1.0.8+) of Azure IoT service SDK, the capability of creating the device identity with the x.509 certificate is available, also the same can be used to create a secured Communication channel.
Creating the Identity
For creating an identity with Azure IoT hub, we would need a certificate which can be embedded in the device.
Generally the device sends this certificate in the form of bytes in Header (X-ARR-ClientCert) to the Endpoint, where the actual part of creating an identity is done using Device Client SDK.
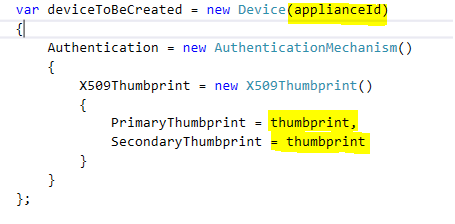
Once the certificate is extracted, the thumbprint is to be passed on so that the same can be used for creating a Microsoft.Azure.Devices.Device Object.
Code snippet follows -

Once we have the Device object, we are supposed to pass the same in the AddDeviceAsync method like the below code -
await this.registryManager.AddDeviceAsync(deviceToBeCreated);
The registryManager is an instance of the RegistryManager class created from the IoT hub Connection string likewise –
this.registryManager = RegistryManager.CreateFromConnectionString(iotHubConnectionString);
Once this is done. The device identity is created in the Azure IoT Hub.
The same can be verified in the Device Explorer which is a utility to manage the IoT hub without going to the Portal.azure.com.

Once the identity is created, we are supposed to communicate with the IoT hub with the help of the certificate with which the identity was created. Which means the Device Communicate channel shall be initialized with the certificate. If this is not done, then the Cloud to Device method as well as Device to Cloud method communication will break with an Authorization exception.
Working with the communication channel
When we are writing the code for communicating with the IoT hub we are supposed to have the certificate available in the local memory. Or the certificate shall be available in a place where the device can access the Certificate bytes from. Once that is available in the process, the following method shall be used to create a device client so that the communicate is authorized and IoT hub gets to know the Device trying to connect is having right authority.

In the above example I have created a wrapper with a name of DirectMethodChannel, but the items highlighted in the screenshot are to be noticed.
Conclusion
With this approach and a cool feature of IoT Hub SDK we can prevent the impersonation of the device as the Certificate’s thumbprint creates a unique key on IoT hub and accessing the same for any one becomes somewhat difficult.
Also, once the device channel is created with the help of the Certificate the channel is established till the connection is disconnected.
Points of Interest
Microsoft Azure IoT hub is evolving at a very fast pace, to find more interestring things on device access please go through the MSDN link provided - https://docs.microsoft.com/en-us/azure/iot-hub/iot-hub-devguide-security
