Introduction
Make auto updater for UWP applications, because UWP does not have auto update functionality (like WPF ClickOnce).
Background
Set privileges to network folder. Develop C# Console Application.
Using the Code
By Panagiotis D. Satos, Arta - Greece
- Create a C# Console Application (Project Name:
Updater).
Inside the Main method, write the following code block:
Console.Write("Update Applications...");
Excel();
This is the method, from which the application (Updater.exe) reads the new version paths for installed UWP applications.
private static void Excel()
        {
            string l_strFileName = "\\\\192.168.1.3\\update\\Updater\\Updater.xls";
            String l_strCon = "provider=Microsoft.ACE.OLEDB.12.0;Data Source='" + l_strFileName + "';Extended Properties='Excel 12.0;HDR=No'";
            OleDbConnection l_oleDBcon = new OleDbConnection(l_strCon);
            l_oleDBcon.Open();
            DataTable dt = l_oleDBcon.GetOleDbSchemaTable(OleDbSchemaGuid.Tables, null);
            String[] l_strExcelSheetsNames = new String[dt.Rows.Count];
            int i = 0;
            foreach (DataRow row in dt.Rows)
            {
                l_strExcelSheetsNames[i] = row["TABLE_NAME"].ToString();
                i++;
            }
            OleDbCommand l_oleDBcommand = new OleDbCommand("SELECT * FROM [" + l_strExcelSheetsNames[0] + "]", l_oleDBcon);
            OleDbDataAdapter l_loeDBadapter = new OleDbDataAdapter();
            l_loeDBadapter.SelectCommand = l_oleDBcommand;
            DataSet l_ds = new DataSet();
            l_loeDBadapter.Fill(l_ds);
            ArrayList l_listPaths = new ArrayList();
            string l_strPath;
            for (i = 0; i <= l_ds.Tables[0].Rows.Count - 1; i++)
            {
                l_strPath = l_ds.Tables[0].Rows[i].ItemArray[0].ToString();
                if (l_strPath.Equals(""))
                {
                    continue;
                }
                else
                {
                    l_listPaths.Add(l_strPath);
                }
            }
            l_oleDBcon.Close();
            if (l_listPaths.Count > 0)
            {
                for (i = 0; i < l_listPaths.Count; i++)
                {
                    System.Diagnostics.Process.Start(l_listPaths[i].ToString());
                }
            }
        }
- Add the Console Application (Updater.exe) at network path (folder), which is the same path from which our Applications were installed to our LAN computers. For example:
\\192.168.1.3\update\Updater\
- At the same path, also add an Excel file (Updater.xls). There, you can add the paths of new versions of your applications. For example, these are the paths of new versions of two applications:
- \\192.168.1.3\update\Updater\UWP\AppPackages\UWP_1.0.8.0_Debug_Test\UWP_1.0.8.0_x86_x64_arm_Debug.appxbundle
- \\192.168.1.3\update\Updater\AppUpdate\AppPackages\AppUpdate_1.0.3.0_Debug_Test\AppUpdate_1.0.3.0_x86_x64_arm_Debug.appxbundle
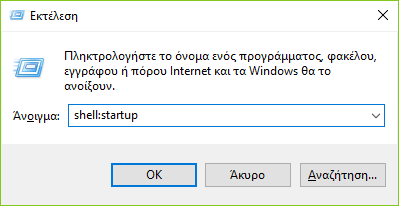
- Create a shortcup of Updater.exe (\\192.168.1.3\update\Updater\Updater.exe) in startup folder (Open folder: press WinKey + R (Run...), write: shell:startup, press Enter key) of each LAN computer.

- Add server path \\192.168.1.3 at Intranet Settings:

