Introduction
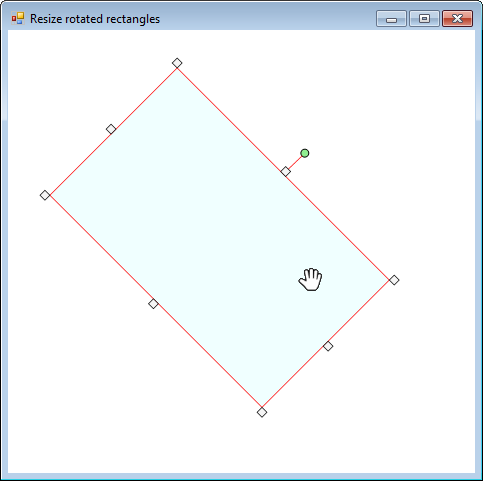
The code implements a mouse-driven shape editor that supports moving, resizing and rotating a selection rectangle via anchors, which may be used to outline any type of contents, such as images, shapes, text and so on.

Background
Drawing rotated elements in GDI+ is a fairly simple task. Creating a resizing mechanism via mouse movements is also rather simple. A few problems may arise when you try to resize a rotated element, due to the way GDI+ enables you to rotate a shape around a given point (usually the center).
After many days of frustrated Googling, I came up with this solution that I'm sharing here in the hope that it might help you save time.
Using the Code
The forms's mouse_ events show how to handle mouse movements and how to detect the type of operation being executed (move, resize, rotate).
All drawing takes place in the Render method which is also responsible for storing regions used in mouse events to detect where and how the mouse is being used.
When dealing with rotated object, mouse hit testing needs to be done via regions (or paths) so that the cursor location can be properly linked to the elements on screen.
During the rendering of a rotated element being resized, the key is to select the proper center origin to rotate around, which is the center of the rectangle as it was the last time it was rendered before resizing started.
Dim ptCenter As PointF = _
New PointF(_rcRect.Left + (_rcRect.Width / 2), _rcRect.Top + (_rcRect.Height / 2))
Select Case _eMouseOperation
Case MouseOperation.Nwse To MouseOperation.We
ptCenter = _ptCenter
Case Else
_ptCenter = ptCenter
End Select
Also, right after rendering a rotated element, you need to compute the position of the rectangle as it would be if it were flat, calculated around the new center origin. This will be the new rectangle to be used after the resize operation is over.
If (_rgRect IsNot Nothing) AndAlso (_snAngle <> 0.0) Then
Dim rfNewBounds As RectangleF = _rgRect.GetBounds(oGfx)
If (_eMouseOperation >= MouseOperation.Nwse) AndAlso _eMouseOperation <= MouseOperation.We Then
Dim ptNewScreenCenterOrigin As New PointF_
(rfNewBounds.Left + (rfNewBounds.Width / 2), rfNewBounds.Top + (rfNewBounds.Height / 2))
Dim rcNewRenderRect As New RectangleF((ptNewScreenCenterOrigin.X - (_rcRect.Width / 2)), _
(ptNewScreenCenterOrigin.Y - (_rcRect.Height / 2)), _
_rcRect.Width, _
_rcRect.Height)
_rcResizeMouseUpRenderRect = rcNewRenderRect
End If
End If
Points of Interest
The method AnchorToCursor returns the most suitable cursor when the mouse is hovering over one of the anchors. The selection is processed taking into account the anchor type (cardinal point) and the current rotation angle. As it turns out, rendering a custom rotated arrow cursor can lead to bad results, so it's best to always use one of the factory arrows, even if the angle doesn't precisely match that of the rotation/cardinal point.
Microsoft Office shape editor uses the same approach.
History
- First version submitted on December 30th, 2017
- Bug fixed submitted on December 9th, 2021
