Introduction
Notifications or emails shared to inform the end user about various information is a common feature requirement in any of the business application development. Sometimes, we may need to trigger the emails based on activities done in database. If we are using a IaaS or on-premise datacentre based database deployment, then we will be able to trigger the same using SMTP server configurations.
How can we trigger emails from Azure SQL or a PaaS service? We came across the requirement to trigger emails based on data updates in our Azure SQL and addressed the same using a combination of Logic apps and SendGrid. The procedure followed has been explained in this post.
SendGrid
The Azure Marketplace has the SendGrid email delivery service that can be utilized from Azure to send emails. It can be used from various web applications and services deployed in Azure PaaS.
Configuration Steps
There are four steps to accomplish this simple task:
- Configure the
SendGrid - Validate
SendGrid settings - Create table in Azure SQL Database
- Create Logic Apps
Configure the SendGrid
- Click on New from left upper corner in Azure Portal and type “
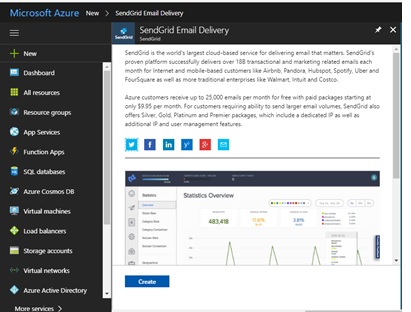
SendGrid Email Delivery” in search box. It will show SendGrid Email Delivery resource as below:

- Click on Create button and it will open the below window.

- Provide the required details like name, password, subscription, resource group, etc. and click on Create button. For demo purposes, select Free tier in Pricing tier. It will allow you to send 25000 email/month.
- After confirming your purchase, you will see a Deployment Succeeded pop-up and you will see your account listed in the All resources section.
-
You can find your SendGrid Email Delivery Service on your Azure subscription as below:

Validate SendGrid Settings
- Once you have created
SendGrid Delivery Service, then clicked the Manage button from top menu to initiate the email verification process, you will receive an email from SendGrid asking you to verify your account.
You can only send up to 100 emails/day until you have verified your account.
To send an email using SendGrid, you must supply your API Key.
- Click on Manage button. It will open
SendGrid dashboard site in new window as below:

- In your
SendGrid dashboard, select Settings and then API Keys in the menu on the left.

- At a minimum, provide the Name of this key and provide full access to Mail Send and select Save.
Your API will be displayed at this point one time only. Please be sure to save it safely.
Create Sample Table in Azure SQL
Create one sample table in SQL Azure database. I am not going to explain this since it is a very straight forward step.
When we will create new record in this table, it will trigger Logic Apps which will eventually send email through SendGrid Email Delivery service that we will see in the next step.
Create Logic Apps
- Click on New on left upper corner on Azure Portal and enter text “Logic App” in Market place. It will show you Azure Logic App resource as below:

- Click on Create button. Then provide name, subscription, resource group, etc. required details and click on Create button in the below screen. It will create a new Logic App and will be available under your Resource Group.

- Newly created Logic App will display as below. Click on Edit:

- Now scroll down right side and select Logic App template from available different templates. For this example, we will select blank template of Logic App. It will show you as below:

- Now type “SQL Server” in connections and triggers textbox. It will show you SQL Server trigger as below. Select “SQL Server – when item is created” trigger.

- After select trigger, it will ask you to create SQL database connection, in which you just need to provide your SQL Azure credential and create SQL Connection with Logic Apps.
- Once SQL Connection has been established, it will populate the available SQL database tables in dropdown. You just select table name from drop down. Then specify time interval to check data insert in table. We have specified here default 3-minute time interval as below:

- Now click on “+ New step” box. It will show dialog box. Select Add an action from this dialog.

- Then type “
SendGrid” in textbox. It will show you SendGrid Action list. Select “SendGrid – Send email(V2)“ option from window as below:

- It will provide you below window that provides details like from, To, Subject, Email body, etc. You need to create
SendGrid connection from the below window:

- To create
SendGrid connection, click on Connection. Provide connection name and SendGrid API Key which we stored in the earlier step.

- After creating connection, it will be ready to send email through
SendGrid Email Delivery Service when new record is inserted in SQL Azure Table.
To test create new record in SQL Azure table, it will trigger Logic Apps and eventually send email through SendGrid email delivery service.
Conclusion
Orchestration of logic apps with integrations of existing apps like SendGrid will address lot of common integration issues with PaaS.
Points of Interest
Learn new concepts of Azure PaaS service while exploring new features of Azure.
History
- 24th January, 2018: Initial version
