Introduction
This article explains why a well organized pattern is required to develop a robust software application.
To develop a software program in an organized way, you need to use a pattern. Developers may customize a pattern to their needs. A pattern is used to develop
a robust software application to maintain a standard that is helpful to update/modify/enhance a software application in a convenient way in future.
In this article I will develop and describe a switch board app. I think this is one ways that can be used to develop a robust software application in a convenient way.
Background
Many of us who do software application development want to access a software application’s methods from a single point for simplicity. To accomplish this,
developers/technical leads/architects/developers use a single interface which is a convenient way to provide all the methods of an application.
So if we create a single interface for underlying 100 tables and there are four methods for each table then the equation is 100*4=400. We have to traverse 400 methods to get to our desired
method. It can be more or less depending on our requirement. When I was developing a software application with many developers in a team, I heard about long listings for a single interface.
Some of them were not happy with the long listing. In this article I have tried to create a program or a switch board for a hierarchical short list.
Let’s Get Started
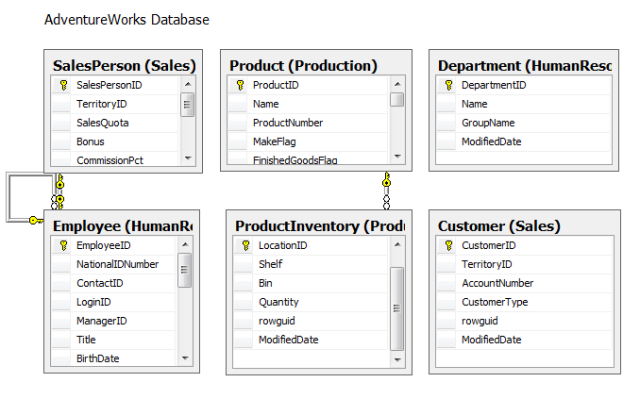
Here is the underlying database to complete this article:

Create a public interface for each table which contains methods as required, in my case Add, Update, Get, GetById. Below is the code for the Customer interface:
public interface ICustomer
{
   bool Add(DataTable dt);
   bool Update(DataTable dt);
   DataTable Get();
   DataTable GetById(int Id);
}
Now create another interface which contains a property for the underlying table interface. In my case IInteract. Below is the code for the interface:
public interface IInteract
{
IDepartment Department
{
get;
}
IEmployee Employee
{
get;
}
ICustomer Customer
{
get;
}
IProduct Product
{
get;
}
IProductInventory ProductInventory
{
get;
}
ISalesPerson SalesPerson
{
get;
}
}
Now create another class library project which implements the entire interface. In my case Implement.
Add a class named Implement. And get a reference of the Interact interface. Below is the code:
public class Implement : IDepartment, IEmployee, ICustomer, IProduct, IProductInventory, ISalesPerson
{
bool IDepartment.Add(DataTable dt)
{
bool blnSucceed=true;
return blnSucceed;
}
bool IDepartment.Update(DataTable dt)
{
bool blnSucceed = true;
return blnSucceed;
}
DataTable IDepartment.Get()
{
DataTable dt = new DataTable();
return dt;
}
DataTable IDepartment.GetById(int Id)
{
DataTable dt = new DataTable();
return dt;
}
bool IEmployee.Add(DataTable dt)
{
bool blnSucceed = true;
return blnSucceed;
}
bool IEmployee.Update(DataTable dt)
{
bool blnSucceed = true;
return blnSucceed;
}
DataTable IEmployee.Get()
{
DataTable dt = new DataTable();
return dt;
}
DataTable IEmployee.GetById(int Id)
{
DataTable dt = new DataTable();
return dt;
}
bool ICustomer.Add(DataTable dt)
{
bool blnSucceed = true;
return blnSucceed;
}
bool ICustomer.Update(DataTable dt)
{
bool blnSucceed = true;
return blnSucceed;
}
DataTable ICustomer.Get()
{
DataTable dt = new DataTable();
return dt;
}
DataTable ICustomer.GetById(int Id)
{
DataTable dt = new DataTable();
return dt;
}
bool ISalesPerson.Add(DataTable dt)
{
bool blnSucceed = true;
return blnSucceed;
}
bool ISalesPerson.Update(DataTable dt)
{
bool blnSucceed = true;
return blnSucceed;
}
DataTable ISalesPerson.Get()
{
DataTable dt = new DataTable();
return dt;
}
DataTable ISalesPerson.GetById(int Id)
{
DataTable dt = new DataTable();
return dt;
}
bool IProduct.Add(DataTable dt)
{
bool blnSucceed = true;
return blnSucceed;
}
bool IProduct.Update(DataTable dt)
{
bool blnSucceed = true;
return blnSucceed;
}
DataTable IProduct.Get()
{
DataTable dt = new DataTable();
return dt;
}
DataTable IProduct.GetById(int Id)
{
DataTable dt = new DataTable();
return dt;
}
bool IProductInventory.Add(DataTable dt)
{
bool blnSucceed = true;
return blnSucceed;
}
bool IProductInventory.Update(DataTable dt)
{
bool blnSucceed = true;
return blnSucceed;
}
DataTable IProductInventory.Get()
{
DataTable dt = new DataTable();
return dt;
}
DataTable IProductInventory.GetById(int Id)
{
DataTable dt = new DataTable();
return dt;
}
}
Now create another class in the Implement project namely MainImplement which will implement the IInteract interface.
Below is the code for the MainImplement class. This class contains a read only property for one of the interface types regarding
the underlying table that returns an instance of the Implement type.
public class MainImplement : IInteract
{
public IDepartment Department
{
get
{
return new Implement();
}
}
public IEmployee Employee
{
get
{
return new Implement();
}
}
public ICustomer Customer
{
get
{
return new Implement();
}
}
public ISalesPerson SalesPerson
{
get
{
return new Implement();
}
}
public IProduct Product
{
get
{
return new Implement();
}
}
public IProductInventory ProductInventory
{
get
{
return new Implement();
}
}
}
Finally create an application project which is the website project. Get a reference of the Interact and Implement projects.
Create a base class which inherits from System.Web.UI.Page. And create a read only property named Interact which is the type of IInteract.
Here is the code for the class:
public class BaseWebForm : System.Web.UI.Page
{
    IInteract _interact;

    protected IInteract Interact
    {
        get
        {
            return new MainImplement();
        }
    }
}
Now take a Web Form in the application project and inherit the Web Form from
the BaseWebForm class. Below is the code:
public partial class Default : BaseWebForm
{
    protected void Page_Load(object sender, EventArgs e)
    {
        bool blnSucceed = true;

        DataTable dt=new DataTable();
        blnSucceed = Interact.Customer.Add(dt);
    }
}
Outcome

First you get 100 instances for 100 underlying tables as children of Interact. Not 400 methods at
a time.

Here you get four methods for each table.
Conclusion
Organized coding is essential for robust software applications. We can maintain/update/enhance more easily by creating a well designed pattern.
Thank you!
