Introduction
Updated version of this library is available here : http://www.codeproject.com/Tips/514396/Keyboard-Handling-in-iPhone-Applications-Part-2-2
Keyboard handling is a tedious task in iOS applications. As you know we have to write code to move cursor from one text field to next text field. If there are many text fields in the form than it increases the complexity.
I have developed a static library for iOS named KeyboardHandler. Using the KeyboardHandler lib you can handle keyboard in form by writing only one line of code.
I am not explaining basics of Objective c , iOS development and XCode. This tutorial is very useful for those who are familiar with iOS development.
How KeyboardHandler is useful
Handling without KeyboardHandler is difficult due to following reasons:
- You have to create delegate connections for each TextField or TextView in the form.
- You have to set ReturnKey for each TextField or TextView in the form.
- If there are some TextFields has keyboard type number pad than you need to add number validations.
- You have to override the UITextFieldDelegate and UITextViewDelegate methods.
- You might need to set tags.
- You have to done button toolbar.
- Then most tedious task is the following code:
- (void)textFieldDidBeginEditing:(UITextField *)textField
{
activeField = textField;
[scrollView setContentOffset:CGPointMake(0,textField.center.y-60) animated:YES];
}
- (BOOL)textFieldShouldReturn:(UITextField *)textField
{
NSInteger nextTag = textField.tag + 1;
UIResponder *nextResponder = [textField.superview viewWithTag:nextTag];
if (nextResponder) {
[scrollview setContentOffset:CGPointMake(0,textField.center.y-60) animated:YES];
[nextResponder becomeFirstResponder];
} else {
[scrollview setContentOffset:CGPointMake(0,0) animated:YES];
[textField resignFirstResponder];
return YES;
}
return NO;
} Note: Above code is just sample code it may very according to developers.
KeyboardHandler completes all above 7 steps in one line of code:
[AutoScroller addAutoScrollTo:scrollView];
How to use KeyboardHandling lib in your project
Here are the example project:
- Run XCode.
- Click file menu and select new->project option.
- Select Single View Application from the templates and click next button.
- Name the project "KeyboardHandler Demo" and click next.
- Choose the location where you want to save the project and click create button.
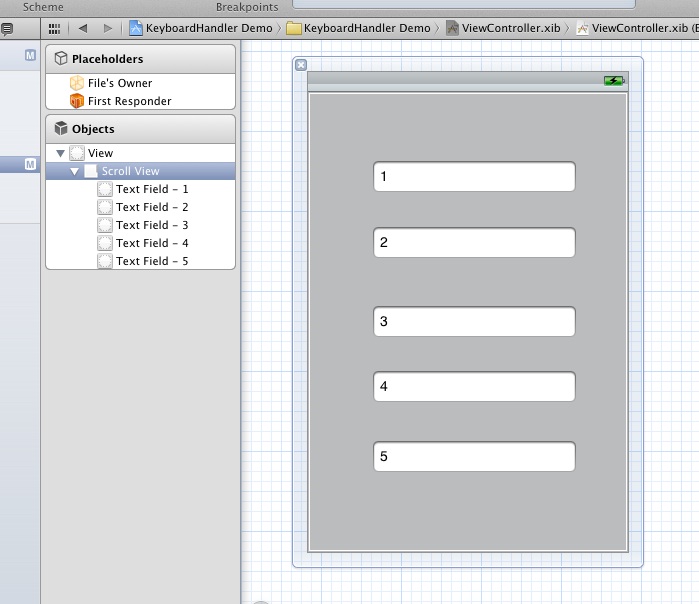
- Open ViewController.xib file and add a UIScrollView in it. Now add some UITextFields as shown in snapshot.
- The order of textfields must match with the order with textfiellds under scrollView in objects window as shown in snapshot. I have given a number to each textfield to explain. Please see the snapshot.

- Create an IBOutlet of UIScrollView named scrollView in your ViewController.h file . Now ViewController.h will look like as follow:
#import <UIKit/UIKit.h>

@interface ViewController : UIViewController
{
    IBOutlet UIScrollView *scrollView;

}
@end - Open ViewController.xib and connect the UIScrollView to the IBoutlet scrollView created in above step.
- Now Download KeyboardHandler_Lib.zip and extract it.
- Add all three files from KeyboardHandler Lib to your project.
- Open ViewController.m file in your project and import the header file "AutoScroller.h" .
- Write following line of code in viewDidLoad method of ViewController.m
  - (void)viewDidLoad
{
    [super viewDidLoad];
    [AutoScroller addAutoScrollTo:scrollView];
} - Run the application and you will see the magic of this one line of code. Whole forms handling is done by this one line.
- Download KeyboardHandler Demo project's source code.
Here are the full code of ViewController.h and ViewController.m files
#import <UIKit/UIKit.h>
@interface ViewController : UIViewController
{
IBOutlet UIScrollView *scrollView;
}
@end
#import "ViewController.h"
#import "AutoScroller.h"
@interface ViewController ()
@end
@implementation ViewController
- (void)viewDidLoad
{
[super viewDidLoad];
[AutoScroller addAutoScrollTo:scrollView];
}
- (void)viewDidUnload
{
[scrollView release];
scrollView = nil;
[super viewDidUnload];
}
- (BOOL)shouldAutorotateToInterfaceOrientation:(UIInterfaceOrientation)interfaceOrientation
{
return (interfaceOrientation != UIInterfaceOrientationPortraitUpsideDown);
}
- (void)dealloc {
[scrollView release];
[super dealloc];
}
@end Points of Interest
KeyboardHandler reduces the development time. It is very important for the apps having many forms. It reduces the development time and increase the readability of code.
History
Currently I have tested for portrait mode only. And soon I will test for landscape and will provide updated one.
