Update
As there were some bugs with the previous library, I have updated the lib and attached a sample project. You may find the latest lib in the attached sample project. The fixes are:
- Fixed the SIGABRT while launch on XCode 4.5 and XCode 5.
- New library is universal. It works on both simulator and device.
- Fixed the SIGABRT unable to load nib "doneToolbar.xib" .
- I have placed doneToolbar.xib in KeyboardHandlerLib/include/AutoScroller folder, please check in the attached sample project.
Introduction
I have posted a tutorial about keyboard handling here. As I mentioned, there were some limitations of the KeyboardHandler library. Here, I am updating and providing you with a new sample project and lib files.
What is Added to this New Version
As I mentioned above, I already posted a tutorial here. That's why I am not explaining here how to use it. You have to read the previous tutorial. Here, I am explaining what is extra in this version.
In the previous version, there were some limitations:
- All form fields must be added directly to the
UIScrollView. So in case you have a UIView containing some TextFields and this UIView is added to the UIScrollView, then the previous version of lib will not work properly. - That was compatible only with portrait mode.
- If there are some hidden fields in the form, then the previous version will not work perfectly.
- Was not tested for iPad applications.
What is in the new version:
- Works for each type of forms whether there are subviews in scrollview. Please see the sample application.
- Works for both landscape and portrait.
- Hidden fields are skipped.
- Compatible with iPhone and iPad applications.
How to Use It in Your Project
Here is the example project:
- Run XCode.
- Click file menu and select new->project option.
- Select Single View Application from the templates and click next button.
- Choose the "universal" type.
- Name the project "
LibTest" and click next. - Choose the location where you want to save the project and click create button.
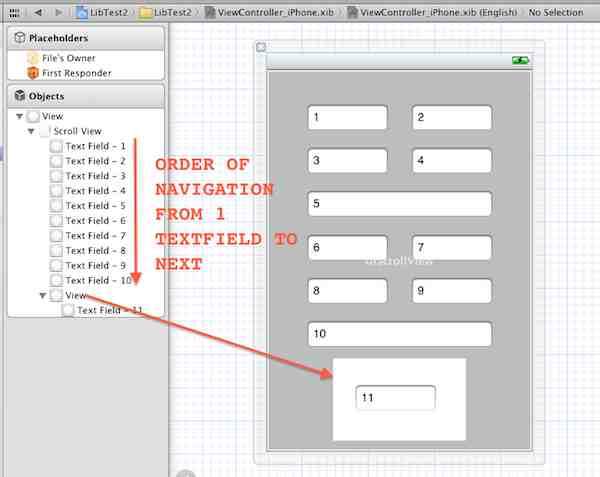
- Open ViewController.xib file and add a
UIScrollView in it. Now add some UITextFields as shown in snapshot. - The
order of
textfields must match with the order with textfields under
scrollView in objects window as shown in the snapshot. I have given a
number to each textfield to explain. Please see the snapshot.

- Open ViewController.xib and connect the
UIScrollView to the IBoutlet scrollView created in the above step. - Now download KeyboardHandler_Lib_v1.0.1___.zip and extract it.
- Add all three files from
KeyboardHandler Lib to your project. - Open ViewController.m file in your project and import the header file "AutoScroller.h" .
- Write the following line of code in
viewDidLoad method of ViewController.m.
- (void)viewDidLoad
{
    [super viewDidLoad];
    [AutoScroller addAutoScrollTo:scrollView];
}- Run the application and you will see the magic of this one line of code. Whole forms handling is done by this one line.
- Portrait will look like follows:
-

- And Landscape snapshot will look like:

- Download LibTest_iPhone_and_iPad_1.zip project's source code.
Here is the full code of ViewController.h and ViewController.m files.
#import <UIKit/UIKit.h>
@interface ViewController : UIViewController
{
IBOutlet UIScrollView *scrollView;
}
@end
#import "ViewController.h"
#import "AutoScroller.h"
@interface ViewController ()
@end
@implementation ViewController
- (void)viewDidLoad
{
[super viewDidLoad];
[AutoScroller addAutoScrollTo:scrollView];
}
- (void)viewDidUnload
{
[scrollView release];
scrollView = nil;
[super viewDidUnload];
}
- (BOOL)shouldAutorotateToInterfaceOrientation:(UIInterfaceOrientation)interfaceOrientation
{
return (interfaceOrientation != UIInterfaceOrientationPortraitUpsideDown);
}
- (void)dealloc {
[scrollView release];
[super dealloc];
}
@end
Other Important Methods of AutoScroller Class
-
+(AutoScroller*) addAutoScrollTo:(UIScrollView*)scroll;
@pararmeters
- scroll: Instance of
UIScrollView containing form fields. You should use this method in case you don't want to use delegate methods of UITextFields and UITextViews.
It will show Done Toolbar on the keyboard for each form field.
-
+(AutoScroller*) addAutoScrollTo:(UIScrollView*)scroll:(BOOL)showDoneButtonToolbar:(id<UITextFieldDelegate>)textFieldsDelegate;
@parameters:
showDoneToolbar: If passed NO then Done Toolbar only will be added to the UITextView type fields. Otherwise on all fields.textFieldsDelegate: Pass a common UITextFieldDelegate for all UITextFields in the form. You must not set delegates explicitly (such as textField.delegate=self) and must not make delegate connections through interface builder.
This method is useful when you want to use delegates of the UITextFields.
-
+(AutoScroller*) addAutoScrollTo:(UIScrollView*)scroll:(BOOL)showDoneButtonToolbar:(
  id<UITextFieldDelegate>)textFieldsDelegate:(id<UITextViewDelegate>)textViewsDelegate;
@parameters:
showDoneToolbar: If passed NO then Done Toolbar only will be added to the UITextView type fields. Otherwise on all fields.textFieldsDelegate: Pass a common UITextFieldDelegate for all UITextFields in the form. You must not set delegates explicitly (such as textField.delegate=self)
and must not make delegate connections through interface builder.textFieldsDelegate: UITextViewDelegate
This method is useful when you want to use delegates of the UITextFields and UITextViewDelegate.
-
+(AutoScroller*) addAutoScrollTo:(UIScrollView*)scroll:(BOOL)showDoneButtonToolbar;
This method is used when you want to show or hide done toolbar.
History
Your feedback is very important for us. I will try to implement your suggestions. Thanks.
