This article will describe the process of multiple pipeline in logstash, although logstash can have multiple input library but in case of filebeat get difficult to separate pipelines, so let's see how we do that.
Introduction
Consider you have multiple filebeats installed on different - 2 servers and you want to create separate pipelines for every filebeat and want the output on elasticsearch or any file.
Background
So let's go with an example where we have multiple servers like:
- Database Server
- API Server
- Webserver
- Elasticsearch Server (this server will have elasticsearch I will consider as sink, kibana for visual representation of logs and data & logstash)
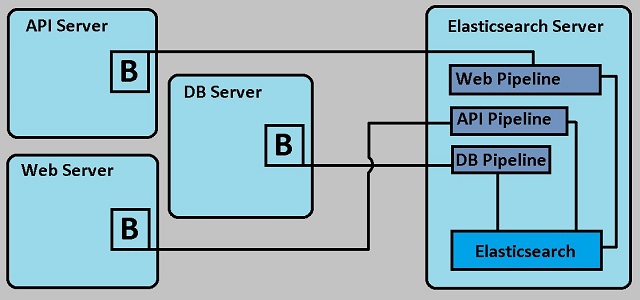
Now we want all our logs in elasticsearch but with some filtering and data manipulations - So let's understand the process with the below diagram.

Now see the above picture, there are three servers where the filebeats are installed and they collect log data and once the configuration will be done, logdata will send to elasticsearch. Now the question is where is the problem?
Let's understand the problem with sample logstash input:
input {
    beats {
        p => 5044
    }
}
So the above code shows that we can have multiple source but for beats, we would have only one so how are we going to divide our pipeline? Now let's play with Beats.
Configure filebeat.yml for (DB, API & WEB) Servers
Open filebeats.yml file in Notepad and configure your server name for all logs goes to logstash:
filebeat.inputs:
- type: log
  fields:
    source: 'DB Server Name'
  fields_under_root: true
filebeat.inputs:
- type: log
  fields:
    source: 'API Server Name'
  fields_under_root: true
filebeat.inputs:
- type: log
  fields:
    source: 'WEB Server Name'
  fields_under_root: true</code>
Now that we are done with filebeat changes, let's go ahead and create logstash pipeline conf file.
Create Pipeline Conf File
There are multiple ways in which we can configure multiple piepline in our logstash, one approach is to setup everything in pipeline.yml file and run the logstash all input and output configuration will be on the same file like the below code, but that is not ideal:
pipeline.id: dblog-process
config.string: input { pipeline { address => dblog } }
The second approach is to create separate conf for beats, before you create file, let's create a folder name pipeline inside the config folder.
- dblogpipeline.conf
- apilogpipeline.conf
- weblogpipeline.conf
Now let's put our code in our conf file.
dblogpipeline.conf
input {
    pipeline {
        address => dblog
    }
}
output {
    file {
        path => ["C:/Logs/dblog_%{+yyyy_MM_dd}.log"]
    }
}
apilogpipeline.conf
input {
    pipeline {
        address => apilog
    }
}
output {
    file {
        path => ["C:/Logs/apilog_%{+yyyy_MM_dd}.log"]
    }
}
weblogpipeline.conf
input {
    pipeline {
        address => weblog
    }
}
output {
    file {
        path => ["C:/Logs/weblog_%{+yyyy_MM_dd}.log"]
    }
}
Now our conf files are ready and we are only left with pipeline.yml file configuration.
pipeline.yml
- pipeline.id: beats-server
  config.string: |
    input { beats { port => 5044 } }
    output {
        if [source] == 'dbservername' {
          pipeline { send_to => dblog }
        } else if [source] == 'apiservername' {
          pipeline { send_to => apilog }
        } else if [source] == 'webservername' {
          pipeline { send_to => weblog }
        }
    }

- pipeline.id: dblog-processing
  path.config: "/Logstash/config/pipelines/dblogpipeline.conf"

- pipeline.id: apilog-processing
  path.config: "/Logstash/config/pipelines/apilogpipeline.conf"

- pipeline.id: weblog-processing
  path.config: "/Logstash/config/pipelines/weblogpipeline.conf"
And go and run the logstash. :)
History
- 19th June, 2020: Initial version
