A very basic flask web app, step by step.
Introduction
Before going through the coding section in Flask, we should understand a few general terms which belong to it and are necessary to understand.
WSGI Web Server Gateway Interface (WSGI)
WSGI is a specification which is standard for Python web development.
Werkzeug is a WSGI toolkit that implements requests, response objects, and other functions in the application.
The Flask architecture makes use of Werkzeug as one of its foundations or base you can say.
Jinja2 is a popular Python Templating Engine in which you can render your dynamic data across web pages.
So in simple words, we can say Flask is a web application framework written in Python which is based on the Werkzeug WSGI toolkit and Jinja2 template engine.
Installation and Setting
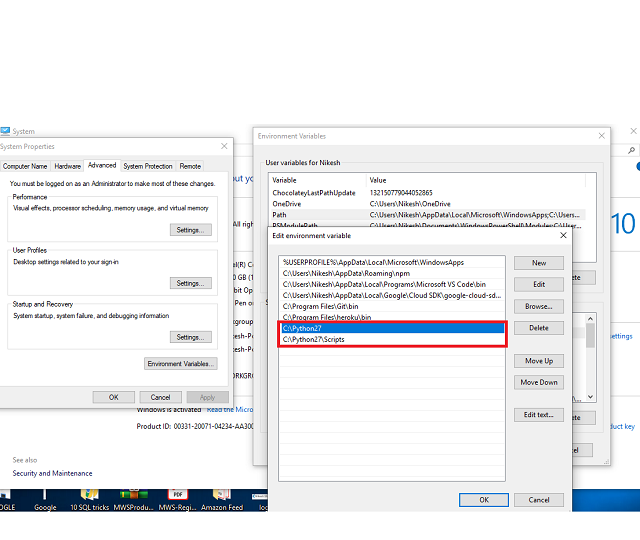
To make this work, you have to first install Python and add it to the environment variables as below so we can use it in command line:

After this, just start your command prompt and type "pip" and it will show all their commands and options.

Installing Flask normally requires Python 2.6 or higher. While Python 3 works well with Flask.
Installing virtualenv for Development Environment
Virtualenv is virtual Python environment builder. With this, we can create many python environments for applications. That means it can avoid problems of compatibility between the different versions of library.
To install virtualenv, use the below commands:
pip install virtualenv
Once virtualenv has been installed, create folder with your project name, go inside and type virtualenv venv to activate.
mkdir projectFolderName
cd projectFolderName
virtualenv venv
and in case if you have Python 3 or more, you may get some error, then you can again reactivate it using 2.7.
The below screen will show how I resolve this issue in case of version compatibility for virtualenv.
virtualenv --python python_location\env\bin\python.exe venv
Then, after this, you have to initialize environment from your root folder using command.
To activate environment, on Linux/OS X, use the following:
venv/bin/activate
On Windows, the following can be used:
venv\scripts\activate

If you get issue i have also snippet it how to do with lower version. Now, we are ready to install Flask. To install, use the command below:
pip install Flask

To test or check if Flask installed, we have to create a file named as script.py in the same root folder:

It's necessary to import flask module into the project. Our WSGI program is an entity of the Flask.
The route() function of the Flask tells the application which URL should call their related methods.
Flask constructor takes the name of the current module (__name__) as argument.
In the above example, ‘/’ URL is bound with hello_world() function. Hence, when the home page is opened in browser, the output of this function will be rendered. Finally, the run() method of Flask class runs the application on the local development server.
Now we have to load your script to flask app as below. I have gone through several attempts, so if you feel there is any error, may be the below screen will help.

Now, it's the end for basic. You can browse hello world on the browser at location http://127.0.0.1:5000/.
History
- 4th August, 2020: Initial version
