Introduction
Populating data in dimension table is commonly known as upsert—in other words, update if exist, insert if not exist. It is a basic operation in data warehousing, and you will
come across this operation many times when building a data warehouse ETL system. There are two other methods that are commonly used in practice to do upsert using SSIS. The first
one is using a SQL statement, second one is using lookup or merge join, and third one is using SCD (Slowly changing Dimension).
In this tutorial I will show how to load data in a Dimension table by using a SQL statement.
What you Need
This script was tested in SQL Server 2008.
Create Project
First create a database and table from script.
create database Test
go
use Test
go
if exists (select * from sys.tables where name = 'Customer')
drop table Customer
go
create table Customer
(
CustomerId int not null primary key,
CustomerName varchar(30), DateOfBirth date, Town varchar(50),
TelephoneNo varchar(30), DrivingLicenceNo varchar(30), Occupation varchar(30)
)
go
declare @i int, @si varchar(10), @startdate date
set @i = 1
while @i <= 10
begin
set @si = right('0'+CONVERT(varchar(10), @i),2)
insert into Customer
( CustomerId, CustomerName, DateOfBirth, Town, TelephoneNo, DrivingLicenceNo, Occupation)
values
( @i, 'Customer'+@si, DATEADD(d,@i-1,'2000-01-01'), 'Town'+@si,
'Phone'+@si, 'Licence'+@si, 'Occupation'+@si)
set @i = @i + 1
end
go
if exists (select * from sys.tables where name = 'CustomerUpdate')
drop table CustomerUpdate
go
create table CustomerUpdate
(
CustomerId int not null primary key,
CustomerName varchar(30), DateOfBirth date, Town varchar(50),
TelephoneNo varchar(30), DrivingLicenceNo varchar(30), Occupation varchar(30)
)
go
declare @i int, @si varchar(10), @startdate date
set @i = 1
while @i <= 5
begin
set @si = right('0'+CONVERT(varchar(10), @i),2)
insert into CustomerUpdate
( CustomerId, CustomerName, DateOfBirth, Town, TelephoneNo, DrivingLicenceNo, Occupation)
values
( @i, 'Customer'+@si, DATEADD(d,@i-1,'2000-01-01'), 'Town'+@si, 'Phone'+@si, 'Licence'+@si, 'Occupation'+@si)
set @i = @i + 1
end
go
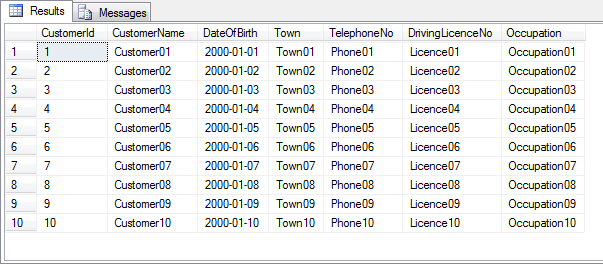
This script will create two tables: Customer and CustomerUpdate.
Customer is our source table which contains 10 record and CustomerUpdate is our dimension table which contains 5 record and
need to update if Customer table is update and insert if new record found in Customer table.
Customer
CustomerUpdate

Then open SQL Server Business Intelligence Development Studio.
Then go to File->New->Project and select Integration Service Project.
Select "Execute Task" from "Control Flow Items" and Drag it on "Control Flow" tab. Then double click it.
Click Connection for new connection or select from existing connection.
Click New button to create new Data Connection or select from left tab.
Select "Server Name", "Authentication", and "Database" which will be "Test" for this example. Click Test Connection for checking then
click OK and then again click OK.
Now click SQLStatement for writing SQL.
Write SQL:
delete CustomerUpdate
from
(
select * from Customer
EXCEPT
select * from CustomerUpdate
)
src INNER JOIN CustomerUpdate dest ON src.CustomerId = dest.CustomerId
Click Ok and rename the "Execute SQL Task" to "For Update".
Select "Execute Task" from "Control Flow Items" and Drag it on "Control Flow" tab. Rename it "To Insert" and then double click it.
Select Previously created connection.
Now click SQLStatement for writing SQL.
Write SQL:
insert into CustomerUpdate
select a.*
from
(
select * from Customer
EXCEPT
select * from CustomerUpdate
) a
Click OK. Now we are ready to execute the SSIS. If you execute the package with debugging (press F5), the package should succeed and appear as shown here:
To check what is happening here:
select * from CustomerUpdate
Our destination table CustomerUpdate have got all the new record which was not available previously.
Now update some data in Customer table.
UPDATE [Test].[dbo].[Customer]
   SET [CustomerName] = 'aaa'
      ,[DateOfBirth] = '2012-01-01'
      ,[Town] = 'aaaaaa'
 WHERE [CustomerId] =1
GO

UPDATE [Test].[dbo].[Customer]
   SET [CustomerName] = 'bbb'
      ,[DateOfBirth] = '2012-01-01'
      ,[Town] = 'bbbbbb'
 WHERE [CustomerId] =2
Customer
CustomerUpdate
If you execute the package with debugging (press F5), the package should succeed and appear as shown here:
To check what is happening here:
select * from CustomerUpdate
Now our destination table CustomerUpdate have got all the update record which was not available previously.
Conclusion
Please check my other tips on loading data in a dimension table. I hope this might be helpful to you!

