Introduction
This application demonstrates how to develop a full chat application from scratch using the .NET Framework and Windows Azure. It's a client/server application.
The server runs in the cloud as a WCF 4.5 application.
Download the code
You can get the code from this link to MSDN.
Background
If you are not yet familiar with Windows RT apps, please chek my article Start developing
Windows Store apps.
It's better also to have some knowldge about C#, XAML, WCF and Windows Azure.
The architecture
1- Server side
The server is a WCF app written in C# and hosted on Windows Azure on this link http://houssemdellai.cloudapp.net .
The service contract is provided by the following interface:
[ServiceContract]
public interface IService1
{

    [OperationContract]
    bool SignUp(string userName, string password);

    [OperationContract]
    bool IsUserNameExist(string userName);

    [OperationContract]
    List<string> GetAllUsers();

    [OperationContract]
    bool Login(string userName, string password);

    [OperationContract]
    bool SendMessage(string from, string password, string to,
        string message, DateTime dateTime);

    [OperationContract]
    List<String> GetMyMessages(string userName, string password);
}
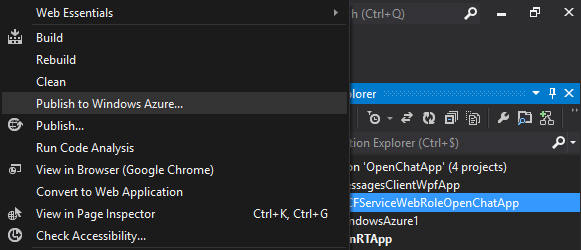
Assuming you have a Windows Azure account, you can publish your service through the Publish option in the menu as shown in the following picture:

2- Client side
Two type of clients for this app: a Windows Store App and a WPF app. Both of them are running nearly the same code logic. It consists of a simple window for signing up or signing in. Then, a second window for chatting where you can see registered users, receive your new messages and send messages to any users.

The window to log in.

The home page for chatting.

The home page in the Windows RT.
How does it work?
These clients uses the exposed methods from the service to exchange messages. They use the service reference provided from http://houssemdellai.cloudapp.net/Service1.svc?wsdl. First of all, the user must have a username and password to login, unless, he will have to signup. After that, a list of all users is gotten and bound to a ListView at the left of the window. in addition all the received messages will appear in the middle and will be updated every 5 seconds. To send a message, just write it in the right textbox, choose a destination from the list of users and click Send. Unless an alert message appear to tell you there's an error, then your message is successfully sent.
