Introduction
In this tutorial I will show how to normalize a table by using lookup transformation.
Background

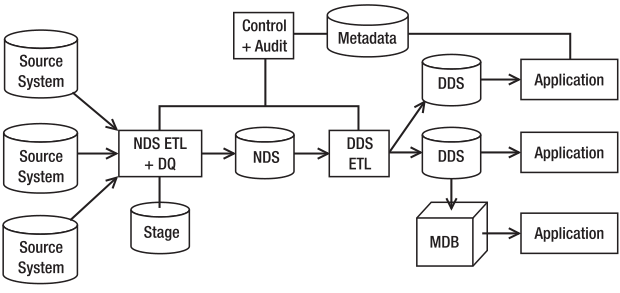
- A stage is an internal data store used for transforming and preparing the data
obtained from the source systems, before the data is loaded to other data stores in
a data warehouse.
- A normalized data store (NDS) is an internal master data store in the form of one or
more normalized relational databases for the purpose of integrating data from various
source systems captured in a stage, before the data is loaded to a user-facing data store.
- A dimensional data store (DDS) is a user-facing data store, in the form of one or more
relational databases, where the data is arranged in dimensional format for the purpose
of supporting analytical queries.

The NDS is a master data store containing the complete data sets, including all historical transaction data and all historical versions of master data.
The NDS contains master tables and transaction tables. A transaction table is a table that contains a business transaction or business event. A master table is a table that contains
the persons or objects involved in the business event.
When either importing data or ETL (Extract, Transform & Load) for a data warehouse,
specially in data transfer from Stage to NDS where all data should be normalize.
You assign a Surrogate key for referrance table and you are replacing the original text/ID with
reference Surrogate key.
This is my sample denormalize Customer table which i need to normalize with:

and this is my partial "Country" referrance table:

and this is my partial "City" reference table:

What you need
- Download script and execute in SSMS.
create database Test
go
use Test
go
USE [Test]
GO
if exists (select * from sys.tables where name = 'customer_source')
drop table customer_source
go
CREATE TABLE [dbo].[customer_source](
[customer_number] [varchar](10) NOT NULL,
[gender] [char](1) NULL,
[date_of_birth] [datetime] NULL,
[address1] [varchar](50) NULL,
[address2] [varchar](50) NULL,
[city] [varchar](50) NULL,
[zipcode] [varchar](10) NULL,
[country] [varchar](50) NULL
)
if exists
( select * from sys.tables
where name = 'DimCity')
drop table DimCity
go
create table DimCity
(
city_id int identity(1,1),
city_name varchar(50)
)
go
if exists
( select * from sys.tables
where name = 'DimCountry')
drop table DimCountry
go
create table DimCountry
(
country_id int identity(1,1),
country_code char(2),
country_name varchar(50)
)
go
if exists (select * from sys.tables where name = 'DimCustomer')
drop table DimCustomer
go
CREATE TABLE [dbo].DimCustomer(
[customer_number] [varchar](10) NOT NULL,
[gender] [char](1) NULL,
[date_of_birth] [datetime] NULL,
[address1] [varchar](50) NULL,
[address2] [varchar](50) NULL,
[zipcode] [varchar](10) NULL,
[city_id] int,
[country_id] int
)
Download Customer.xls and import data into customer_source table.Download Country.dat and import data into DimCountry table.Download City.txt and import data into DimCity table.
This script was tested in SQL Server 2008.
Create Project
Open SQL Server Business Intelligence Development Studio.

Then go to File->New->Project and select Integration Service Project.

Select "Data Flow Task" from "Control Flow Items" and Drag it on "Control Flow" tab. Then double click it.

Select "OLE DB Source" from "Data Flow Source" and Drag it on "Data Flow" tab. Double click on “OLE DB Source” task to configure it.

Click Connection for new connection or select from existing connection.

Click New button to create new Data Connection or select from left tab.

Select "Server Name", "Authentication" and "Database" which will be "Test" for this example.
Click Test Connection for checking then Click Ok and then again click OK.

Select "customer_source" table then again click OK.

Select "Multicast" from "Data Flow Transformation" and Drag it on "Data Flow" tab and connect extended green arrow from “OLE DB Source” to your "Multicast".

Select "Lookup" from "Data Flow Transformation" and Drag it on "Data Flow" tab and rename it "Lookup - Country"
and connect extended green arrow from “Multicast” to your "Lookup". Double click on “Lookup” task to configure it.

Select "Ignore failure" value from "General" tab.

Select "DimCountry" value from "Connection" tab.

Map source field with lookup field and select id from "Column" tab.

Select another "Lookup" from "Data Flow Transformation" and Drag it on "Data Flow" tab and rename it "Lookup - City"
and connect extended green arrow from “Multicast” to your "Lookup". Double click on “Lookup” task to configure it.

Select "Ignore failure" value from "General" tab.

Select "DimCity" value from "Connection" tab.

Map source field with lookup field and select id from "Column" tab.

Select "Sort" from "Data Flow Transformation" and Drag it on "Data Flow" tab and rename it "Sort - Country"
and connect extended green arrow from "Lookup - Country" to your "Sort". Double click on "Sort" task to configure it.

Assign value for sort.

Select another "Sort" from "Data Flow Transformation" and Drag it on "Data Flow" tab and rename it "Sort"
and connect extended green arrow from "Lookup" to your "Sort". Double click on "Sort" task to configure it.

Select another "Merge Join" from "Data Flow Transformation" and Drag it on "Data Flow" tab and connect extended green arrow from "Sort - Country" and "Sort" to your "Merge Join".
Double click on "Merge Join" task to configure it.

Assign value.

Select another "OLE DB Destination" from "Data Flow Destination" and Drag it on "Data Flow" tab and connect extended green arrow from "Merge Join" to your "OLE DB Destination".
Double click on "OLE DB Destination" task to configure it.

Assign value.


If you execute the package with debugging (press F5), the package should succeed and appear as shown here:

To check what is happining here:
select * from [Test].[dbo].[DimCustomer]

Now our destination table is normalized.
Conclusion
You can see there are some NULL value in city_id and country_id column which means no value was matched
with reference value. It's also possible to collect all the unmatched value, store then in another table
and merge then with lookup and again execute the process so all value is matched.
I hope this might be helpful to you!
References
- Carla Sabotta
- Vincent Rainardi
History
None so far.
