In this article, you will learn about the overall principles and ready-to-use code snippets to deal with light source features and related material properties for OpenGL applications.
Introduction
I want to write a simple X3DOM viewer, based on OpenGL, and searched the web for information on how to apply light sources and material properties. What I found were a lot of good forum posts, but very few "overall principle" descriptions - one of the better ones is the OpenGL Wiki article, How lighting works. In this tip, I would like to share my findings with all those, who are also looking for an introduction to the lighting and material topic. So please don't expect "rocket science" in the following, but just "overall principle" descriptions and some "ready-to-use" code snippets, that take into account the relationship between light sources and material properties.
There is another tip about "Geometric Primitives for OpenGL" that I also wrote in connection with the simple X3DOM viewer. This tip here uses the algorithms presented there to create geometric primitives.
Background
The X3DOM specification supports the Material object, so I need to set up lighting in a way, that the majority of the Material properties can be applied to objects successfully.
I am not yet very confident with OpenGL, so it is important to me that the "overall principle" and "ready-to-use" code snippets are easy to understand and to follow. (One of my sources was the OpenGL Wiki article, How lighting works, the second was the OpenGL Programming Guide.)
One of my most important requirements for the subject of lighting features and material properties was the unconditional traceability of the results. So I decided
- to include a spot, representing the light source in the scene (I use a directional light source, which emulates perfectly parallel light beams),
- to circulate the light source non-axis-parallel around the scene (which illuminates all objects once brightly with reflections and once darkly),
- to make the spatial axes visible (which greatly facilitates the correction of errors) and
- to take a non-axis-parallel viewing position (which enhances the spatial impression of the scene).
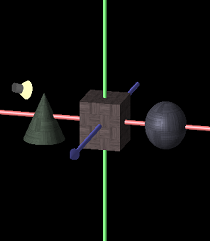
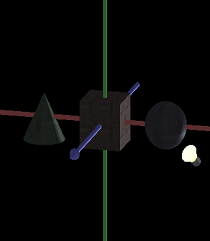
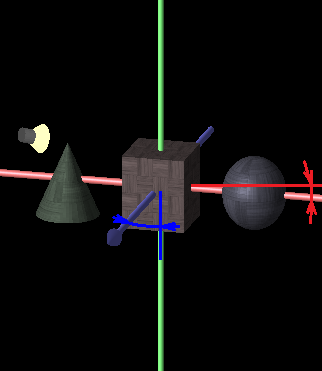
The following pictures show the non-axis-parallel circulating light source including the associated variation in the illumination of the objects. If you compare the first image with the second, you can clearly see the reflections introduced by the spatial light in the second image - especially at the cone. If you compare the first image with the third, you can clearly see the difference between an illuminated surface and a surface in the shadow.


Images 1, 2 and 3
For the non-axis-parallel viewing position, the GL_PROJECTION matrix was tilted 15 degrees about each of the X and Y axes, causing the spatial axes in X (red) and Z (blue) to be non-parallel to the screen coordinates.

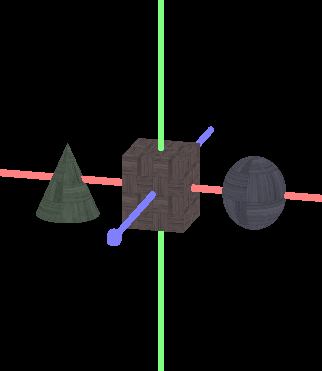
Image 4
Using the Code
World Preparation
The circulating light source, realized by fLightSourceRotationAngle, requires some sort of scene animation, which I implemented as an on-idle process, WindowProcOnIdle():
void X3DomLightMainFrame::WindowProcOnIdle(const HWND hWnd)
{
static float fLightSourceRotationAngle = 0.0F;
static Vector3f oSceneRotationVector = { 1.0F, 1.0F, 0.0F };
RECT rc = _pweakMainContent->GetClientRect();
LONG width = rc.right - rc.left;
LONG height = rc.bottom - rc.top;
if (_viewportSize.cx != width ||
_viewportSize.cy != height ||
_oWorld.GetProjectionDirty() == true)
{
OpenGL::ResetViewport((GLsizei)width, (GLsizei)height,
_oWorld.GetOrthographicProjection(), 10.0F / _oWorld.GetZoom(),
10.0F / _oWorld.GetZoom(), -100.0F, 100.0F);
_viewportSize.cx = width;
_viewportSize.cy = height;
_oWorld.SetProjectionDirty(false);
OpenGL::ShadeModel(GL_SMOOTH); OpenGL::Enable(GL_CULL_FACE); OpenGL::Enable(GL_DEPTH_TEST); OpenGL::DepthMask(GL_TRUE); }
OpenGL::ClearColor(0.0F, 0.0F, 0.0F, 0.0F);
OpenGL::Clear(GL_COLOR_BUFFER_BIT | GL_DEPTH_BUFFER_BIT);
OpenGL::PushMatrix();
...
A little bit of magic is hidden in ResetViewport() - for details, see the last code snippet in this tip. This method provides a unified call to create an orthographic projection and a perspective projection (determined by _oWorld.GetOrthographicProjection()), as well as the ability to zoom (determined by _oWorld.GetZoom()).
Lighting
My simple X3DOM viewer shall be able to switch between individual lighting (application of ligth sources), as it can be seen in the four pictures above, and basic/default lighting, as shown in the following picture:

Image 5
The determination of the lighting model is realized by _oWorld.GetUseIndividualLighting(). Now we can introduce the light sources, stored in _oWorld.CountLightSources(). OpenGL supports eight light sources by default:
---
if (_oWorld.GetUseIndividualLighting() == true)
{
OpenGL::Enable(GL_LIGHTING);
for (int iLigthSourceCnt = 0;
iLigthSourceCnt < _oWorld.CountLightSources() && iLigthSourceCnt < 8;
iLigthSourceCnt++)
{
switch (iLigthSourceCnt)
{
case 0:
OpenGL::Enable(GL_LIGHT0);
break;
case 1:
OpenGL::Enable(GL_LIGHT1);
break;
case 2:
OpenGL::Enable(GL_LIGHT2);
break;
case 3:
OpenGL::Enable(GL_LIGHT3);
break;
case 4:
OpenGL::Enable(GL_LIGHT4);
break;
case 5:
OpenGL::Enable(GL_LIGHT5);
break;
case 6:
OpenGL::Enable(GL_LIGHT6);
break;
case 7:
OpenGL::Enable(GL_LIGHT7);
break;
default:
break;
}
LightSource* pLightSource = _oWorld.GetLightSource(iLigthSourceCnt);
OpenGL::PushMatrix();
OpenGL::Rotatef(+fLightSourceRotationAngle, oSceneRotationVector.x,
oSceneRotationVector.y, oSceneRotationVector.z);
Vector4f oLightVector = Vector4f{ pLightSource->GetLightSourcePosition(), 0.001F };
OpenGL::Lightfv(GL_LIGHT0, GL_POSITION, oLightVector.Get());
OpenGL::PopMatrix();
SFColor oAmbientLightColor = pLightSource->GetAmbientLightColor();
GLfloat pfAmbientLightColor[] = { oAmbientLightColor.r, oAmbientLightColor.g,
oAmbientLightColor.b, 1.0F };
OpenGL::Lightfv(GL_LIGHT0, GL_AMBIENT, pfAmbientLightColor);
SFColor oDiffuseLightColor = pLightSource->GetDiffuseLightColor();
GLfloat pfDiffuseLightColor[] = { oDiffuseLightColor.r, oDiffuseLightColor.g,
oDiffuseLightColor.b, 1.0F };
OpenGL::Lightfv(GL_LIGHT0, GL_DIFFUSE, pfDiffuseLightColor);
SFColor oSpecularLightColor = pLightSource->GetSpecularLightColor();
GLfloat pfSpecularLightColor[] = { oSpecularLightColor.r, oSpecularLightColor.g,
oSpecularLightColor.b, 1.0F };
OpenGL::Lightfv(GL_LIGHT0, GL_SPECULAR, pfSpecularLightColor);
}
OpenGL::ColorMaterial(GL_FRONT_AND_BACK, GL_AMBIENT_AND_DIFFUSE);
OpenGL::Enable(GL_COLOR_MATERIAL);
}
else
{
OpenGL::Disable(GL_LIGHT0);
OpenGL::Disable(GL_LIGHT1);
OpenGL::Disable(GL_LIGHT2);
OpenGL::Disable(GL_LIGHT3);
OpenGL::Disable(GL_LIGHT4);
OpenGL::Disable(GL_LIGHT5);
OpenGL::Disable(GL_LIGHT6);
OpenGL::Disable(GL_LIGHT7);
OpenGL::Disable(GL_LIGHTING);
}
...
Visualize the Coordinate System
Next is the visualization of the coordinate system. For easy differentiation, the color assignment of the coordinates (x = red, y = green, z = blue) is done according to the sequences of color vector and coordinate vector. I already introduced the OpenGL::DrawCylinder() and OpenGL::DrawCone() methods in my tip about "Geometric Primitives for OpenGL" - the rest is OpenGL standard:
...
OpenGL::PushMatrix();
OpenGL::Color3f(1.0F, 0.5F, 0.5F);
OpenGL::Rotatef(-90, 0.0F, 0.0F, 1.0F);
OpenGL::DrawCylinder(0.1F, 6.0F, 0.1F, M_PI / 90.0);
OpenGL::Translatef(0.0F, 6.0F, 0.0F);
OpenGL::DrawCone(0.25F, 0.4F, 0.25F, M_PI / 90);
OpenGL::PopMatrix();
OpenGL::PushMatrix();
OpenGL::Color3f(0.5F, 1.0F, 0.5F);
OpenGL::DrawCylinder(0.1F, 6.0F, 0.1F, M_PI / 90.0);
OpenGL::Translatef(0.0F, 6.0F, 0.0F);
OpenGL::DrawCone(0.25F, 0.4F, 0.25F, M_PI / 90);
OpenGL::PopMatrix();
OpenGL::PushMatrix();
OpenGL::Color3f(0.5F, 0.5F, 1.0F);
OpenGL::Rotatef(90, 1.0F, 0.0F, 0.0F);
OpenGL::DrawCylinder(0.1F, 6.0F, 0.1F, M_PI / 90.0);
OpenGL::Translatef(0.0F, 6.0F, 0.0F);
OpenGL::DrawCone(0.25F, 0.4F, 0.25F, M_PI / 90);
OpenGL::PopMatrix();
...
Visualize the Circulating Light Source
The light source is represented by an abstracted spotlight, composed of a cylinder and a cone. The cylinder uses different colors for top, cover and bottom COLORREF oCylinderColors[] = { 0xFF444444, 0xFFAAAAAA, 0xFF444444 };. To make the cone appear like a cone of light, it must emit light itself. To do this, the material property of the cone is set to self-luminous GLfloat oEmissionColors1[] = { 0.8F, 0.8F, 0.6F, 1.0F }; and then reset afterwards GLfloat oEmissionColors2[] = { 0.0F, 0.0F, 0.0F, 1.0F };. For a realistic light cone effect, different colors are used for cover and bottom COLORREF oConeColors[] = { 0xFF668888, 0xFFEEFFFF };.
...
if (_oWorld.GetUseIndividualLighting() == true)
{
for (int iLigthSourceCnt = 0;
iLigthSourceCnt < _oWorld.CountLightSources() && iLigthSourceCnt < 8;
iLigthSourceCnt++)
{
LightSource* pLightSource = _oWorld.GetLightSource(iLigthSourceCnt);
OpenGL::PushMatrix();
OpenGL::Rotatef(+fLightSourceRotationAngle, oSceneRotationVector.x,
oSceneRotationVector.y, oSceneRotationVector.z);
OpenGL::Translatef(pLightSource->GetLightSourcePosition());
OpenGL::Rotatef(+45.0F, 0.0F, 0.0F, 1.0F);
OpenGL::Rotatef(-45.0F, 1.0F, 0.0F, 0.0F);
COLORREF oCylinderColors[] = { 0xFF444444, 0xFFAAAAAA, 0xFF444444 };
OpenGL::DrawCylinder(0.2F, 0.3F, 0.2F, M_2PI / 20.0, oCylinderColors, false);
OpenGL::Translatef(0.0F, -0.1F, 0.0F);
OpenGL::Color3f(0.9F, 0.9F, 0.8F);
GLfloat oEmissionColors1[] = { 0.8F, 0.8F, 0.6F, 1.0F };
OpenGL::Materialfv(GL_FRONT_AND_BACK, GL_EMISSION, oEmissionColors1);
COLORREF oConeColors[] = { 0xFF668888, 0xFFEEFFFF };
OpenGL::DrawCone(0.4F, 0.4F, 0.4F, M_PI / 20.0, oConeColors);
GLfloat oEmissionColors2[] = { 0.0F, 0.0F, 0.0F, 1.0F };
OpenGL::Materialfv(GL_FRONT_AND_BACK, GL_EMISSION, oEmissionColors2);
OpenGL::PopMatrix();
}
}
Render the Scene
The displayed objects, cone, box and sphere, are in the scene and are rendered by a call to _pScene->RenderToOpenGL(). There is no magic behind this - any scene can be rendered at this point. The animation is completed by incrementing fLightSourceRotationAngle and a small pause MainFrame::Sleep(30), which is chosen a bit shorter for ReactOS.
...
_pScene->RenderToOpenGL(NULL, _pweakMainContent->GetOpenGlHDC());
OpenGL::PopMatrix();
::SwapBuffers(_pweakMainContent->GetOpenGlHDC());
fLightSourceRotationAngle += 1.0F;
#if defined(__GNUC__) || defined(__MINGW32__)
MainFrame::Sleep(30);
#else
MainFrame::Sleep(15);
#endif
::PostMessage(GetHWnd(), WM_NULL, (WPARAM)0, (LPARAM)0);
}
Preparation of the Viewport
From the first code snippet, I still owe the source code of the OpenGL::ResetViewport() method - here it is:
static inline void ResetViewport(GLsizei nWidth, GLsizei nHeight, bool bInitOrthoProjection,
GLdouble dHorzClip, GLdouble dVertClip, GLdouble dNearZClip,
GLdouble dFarZClip)
{
GLdouble fAspect = ((GLdouble)nWidth) / (nHeight != 0 ? nHeight : 1);
::glViewport(0, 0, nWidth, nHeight);
if (bInitOrthoProjection)
{
::glMatrixMode(GL_PROJECTION);
::glLoadIdentity();
::glOrtho(-dHorzClip, dHorzClip, -dVertClip, dVertClip, dNearZClip, dFarZClip);
::glRotatef(+15.0F, 1.0F, 0.0F, 0.0F);
::glRotatef(-15.0F, 0.0F, 1.0F, 0.0F);
::glMatrixMode(GL_MODELVIEW);
}
else
{
::glMatrixMode(GL_PROJECTION);
::glLoadIdentity();
::glFrustum(-dHorzClip * 0.01, dHorzClip * 0.01, -dVertClip * 0.01, dVertClip * 0.01,
1.0F, 1.0 + dFarZClip);
::glTranslatef(0.0F, 0.0F, (float)dNearZClip);
::glRotatef(+15.0F, 1.0F, 0.0F, 0.0F);
::glRotatef(-15.0F, 0.0F, 1.0F, 0.0F);
::glMatrixMode(GL_MODELVIEW);
}
}
That's it. Have fun with OpenGL!
Points of Interest
Even though the individual OpenGL functions for lighting and material are well described - organizing their correct interaction took some trial and error.
History
- 16th April, 2021: Initial tip
