In this article, I will show you how to convert any MS SQL database to Amazon RDS, I will show you how to create a database in the cloud, connect it to MS SQL, deploy from a database backup. Immediately, I note that this article was created for training and I will use a bus-planned AWS account and a free database from Microsoft.
Introduction
Nowadays, almost all applications use databases to store and process information. Sometimes, there are problems with database maintenance. It may come sooner or later, it doesn't matter, but this moment will come, and it may happen that the database will become unavailable. I have more than 5 years of experience in the development of program software and all the companies where I worked this moment when the database became unavailable came. Another problem that I encountered was the lack of capacity of the server that hosts the database, or the excessive capacity and high cost of the server. More recently, I began to think about whether it is better to transfer data to a cloud provider and pay for its storage. I was especially bribed by the fact that I do not need to maintain the operating system on which it all works. In this article, I will show you how to convert any MS SQL database to Amazon RDS, I will show you how to create a database in the cloud, connect it to MS SQL, deploy from a database backup. Immediately, I note that this article was created for training and I will use a bus-planned AWS account and a free database from Microsoft.
Creating a RDS Database
The first thing to do is create a database in Amazon RDS and configure it. Let's go to the RDS tab and choose to create a new MS SQL Server database (Image 1). For our example, using the RDS Free Usage Tier is fine, but for real projects, if you have a large database, you need to think carefully about the correct instance size for the database.
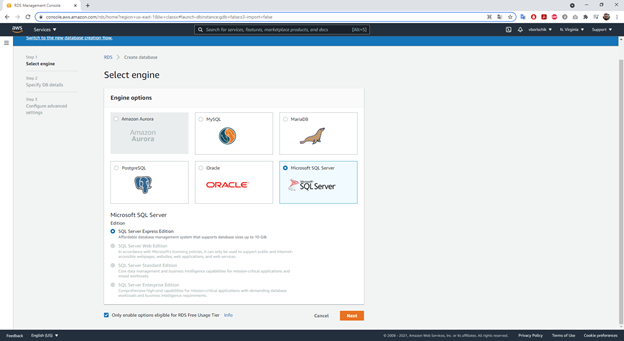
Image 1 - Creating a RDS database
Next, click the Next button and set the RDS parameters such as the version of SQL Server DB instance type and ect. In the DB instance identifier section, select a name for the database and enter the login and password (Image 2).

Image 2 - Specify DB details
Next, go to the Configure advanced settings section and be sure to check the port 1433 for MS SQL and specify the VPC, if not, then create a new one and set Public acceescability to true. As you can see in image 3, we have created a database.
Image 3 - list of databases
Next, let's check the connection to the database. To do this, go to MS Server Management Studio and specify the parameters for connecting to the database, Endpoint and the login and password specified earlier. If the connection is successful, you should see a list of databases from RDS. Since we do not have any database yet, we will only display rdsadmin (Image 4).
Image 4 - List of databases in MS Server Management Studio
This completes the first stage.
Creating a S3 Bucket for Backup
The second step for successful completion is creating an S3 bucket in the same region as rds. To do this, let's create an S3 bucket in the same region, and this is important, and load the file into the .bak extension. For our example, I used Microsoft Adventure works, which is fine for our example, but for a real project, you should use your database .bak file (Image 5).
Image 5 - Creating a S3 bucket and uploading .bak file
This completes the second stage.
Creating a New Option Group
The third step is to create a new option group, because by default, you cannot create any changes in it.
To do this, go to Option Group in Amazon RDS (Image 6) and click to Create Group.
Image 6 - Creating a new Option Group
Next, we will give a name to our group and indicate the engine and its version (Image 7).
Image 7 - Choosing Name and Engine for Option Group
Next, add a new option to the option we just created and add SQLSERVER_BACKUP_RESTORE (Image 8).
Image 8 - Creating a new option
This step is complete.
Connecting the New Option Group
Fourth, we connect our option group instead of the default.
To do this, change the mind in the settings of our RDS and change the OptionGroup in the settings (Image 9).
Image 9 - Attaching the new Option Group to RDS database
Next, tap to agree with the modification of the DB instance (Image 10).
Image 10 - Modifying Amazon RDS database
This step is complete.
Restore the Database
Fifth - connect and run the database recovery script.
Now we just have to put in a script to restore the database. To do this, let's create a new request.
exec msdb.dbo.rds_restore_database

@restore_db_name='CodeProjectDatabase',

@s3_arn_to_restore_from='arn:aws:s3:::s3bucketrestore/AdventureWorks2016.bak'
Where:
restore_db_name is the DB names3bucketrestore - S3 bucket name- AdventureWorks2016.bak is the name of the .bak file
The result is shown in Image 11.
Image 11 - Running the script
You can check the status with the command:
exec msdb.dbo.rds_task_status
The result should be successful, then your database is exactly restored.
Conclusion
As shown in this article, the transition to cloud storage is not a difficult process if you follow all the suggested steps.
History
- 19th July, 2021: Initial version

