Introduction
In the previous tutorial, we learnt how to write to an Excel file from Matlab. This tutorial is a follow-up article on how to read from an Excel file from Matlab.
In this tutorial, we will learn how to read the data from an Excel file and use the data in Matlab. At the end of this tutorial, you will learn how to open an Microsoft Excel file,
read data from a particular column into Matlab and save it in the workspace. Finally, we will plot the data and insert this plot into the same excel file.
Steps
Step 1 : The first step is to create a COM server which runs the Excel Application.
Excel = actxserver('Excel.Application');
This assumes that the Excel Application is installed in your system. If Excel is not installed, this statement will give an error. You can put the above statement within a try-catch block:
try
    Excel = actxserver('Excel.Application');
catch
    Excel = [];
end
Step 2: In this step, we will check the version of Excel.
ExcelVersion = str2num(Excel.Version);
If the Microsoft Excel is 2007, 2010 or above, you would get ExcelVersion would be 12 or above. In such a case, you can handle all the Excel workbook files
with extensions *.xls, *.xlsx and *.xlsm. If the version is less than 12, only *.xls file would be supported.
Step 3: In this step, we will open an Excel file “ResultFile.xls” in the current directory.
ResultFile = [pwd '\ResultFile.xls'];
Workbook = invoke(Excel.Workbooks,'Open', ResultFile);
Step 4: By default, the visibility of the Excel file is set to
FALSE. You can make the Excel file visible using the command:
set(Excel,'Visible',1);
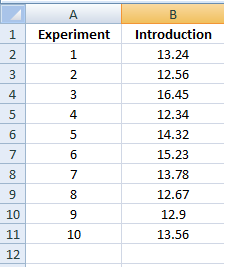
Let us assume, that the Excel file looks something like this as shown in the figure. Let us develop the code to read the data from Column A and Column B in to 2 variables
iter and expResults. We will plot this data and insert this plot into the same excel file.

ResultFile = [pwd '\ResultFile.xls'];
Workbook = invoke(Excel.Workbooks,'Open', ResultFile);
resultsheet = 'ExperimentSheet';
try
    sheet = get(Excel.Worksheets,'Item', resultsheet);
    invoke(sheet, 'Activate');
catch
    % If the Excel Sheet ‘ExperimentSheet’ is not found, throw an error message
    errordlg([resultsheet 'not found']);
end
Read Experiment Column
As seen from the Excel sheet, we need to first read Column A from row 2 to row 11. First we need to select the range from A2 till A11. We use the
xlcolumn() function to convert between column
name and number for Excel representation. The xlcolumn() module can be downloaded from
here.
%% Read the Experiment Column
Location = [xlcolumn(1) '2:' xlcolumn(1) int2str(11)];
ExpIteration = get(Excel.Activesheet, 'Range',Location);
ExpIteration.Select;
if(iscell(Excel.Selection.Value))
    iter = cell2mat(Excel.Selection.Value)';
else
    iter = Excel.Selection.Value;
end
% The iter variable will now contain the data from the column A.
Read Result Column
As seen from the Excel sheet, we need to first read Column B from row 2 to row 11. Here again, we need to select the range from B2 till B11.
%% Read the Results Column
Location = [xlcolumn(2) '2:' xlcolumn(2) int2str(11)];
ResultValue  = get(Excel.Activesheet, 'Range',Location);
ResultValue.Select;
if(iscell(Excel.Selection.Value))
    expResults = cell2mat(Excel.Selection.Value)';
else
    expResults = Excel.Selection.Value;
end
% The expResults variable will now contain the data from the column A.
Plot the Data
Since we already have the data in the workspace, we can simply use the plot command in Matlab.
%% Plot the Data
plot(iter, expResults);
legend('Results');
xlabel('Experiment');
ylabel('Results');
Insert the image into Excel Sheet
In order to insert the plot into an excel sheet, we need to convert the figure object into an image.
% Convert the figure object to an image
ResultImage = 'Results.png';
print('-dpng', ResultImage);
To place the image in the Excel sheet, we look for coordinates of the particular cell which is empty and place the image in that cell.
Let’s say, we will place the image starting from column D.
Location = [ xlcolumn(4)  int2str(2) ];
ImageRange= get(Excel.ActiveSheet,'Range',  Location);
Shapes =ExAct.Shapes;
%% Size of theimage.
imgWidth=400;
imgHeight=250;
Shapes.AddPicture([pwd'\' ResultImage] ,0,1, ImageRange.Left, ImageRange.Top, imgWidth, imgHeight);
The last step is to save the Excel file and close the Excel application:
%Save and Close the Excel File
delete(Excel);
invoke(Excel,'Quit');
invoke(Workbook,'Save');
Download Download ReadData.zip
