An FFmpeg script that online video publishers can use to eliminate excessively bright video and unintentional low-volume audio.
Introduction
From a purely usability perspective, I feel that some online video-content creators should check for excessive brightness. All video-content creators, in general that is, should check for usability problems with their audio as well. In this article, I have provided an easy-to-use shell script (using FFmpeg) that will fix both problems in one go.
Background
The video channels that I often watch are by other authors. Most of them are of European extraction and their videos have a common problem — the videos are too bright or have little contrast. Everything looks pale.
Excessively Bright Videos
This problem is exacerbated by the fact that the content creator:
- stands in front of light-coloured background.
- wears light-coloured clothes.
- uses excessive lighting.
- uses unsuitable camera settings that subdue colour and/or enhance brightness.
These issues can be corrected. But then, the pressures of working with online publishing platforms are already too much.
Low-Volume Videos
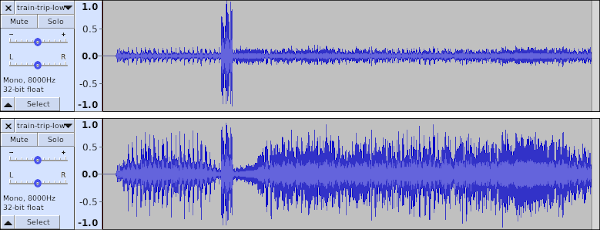
Another problem with videos in general (that is, not related to any particular group) is that the video-content creators record the videos using their phones or a laptop. This may be okay but they need to make sure that they do not shake or bump the recording device so as not to introduce high-volume spikes into the audio. Spikes will make the video play with low volume.
Video content creators may also unintentionally create low-volume videos when they insert intro or outro segments into their recorded content.
Low-volume videos by themselves are not dangerous. The danger arises when the listener plays a normal video subsequently as the volume levels have been raised so high that even a normal video will play too loud. If that video starts with some intro music, it will destroy the ears and audio equipment.
When a video has low volume, the recommended solution is normalization. Normalization attempts to increases the volume levels. When a video has high-volume spikes, normalization will have no effect. The spikes have already set a high bar. You have to first compress the spikes and then proceed with normalization.

Spikes in an audio will cause the audio to play with low volume. You have to first compress the spikes and then normalize the audio stream.
FFmpeg Fix for Both Problems
FFmpeg can be used to fix both problems. The first problem can be theoretically fixed by reducing the brightness. However, every adjustment of the brightness may require an adjustment of the contrast as well. This can go on endlessly. A simpler solution (for most brightness-affected videos) is to increase colour saturation. The colour information is already there in the video. We just need to give it more expression so that different parts of the video have adequate contrast.
The eq FFmpeg filter has a saturation option. The range for this filter option is 0.0 to 3.0. I have found enough success with a value of 1.6. Here is a before-and-after comparison of a randomly selected video.

By increasing saturation, the colour information that is already available in the video can be better expressed. This also improves contrast in a way that cannot be achieved by adjusting the brightness.
The second problem can also be fixed using FFmpeg. Ordinary normalization efforts fail because they consider the whole audio stream. The smarter way to fix low-volume audio is to take smaller chunks, compress spikes and/or apply normalization. This is called dynamic audio compression or dynamic audio normalization.
The dynaudnorm FFmpeg filter will do the job. It can perform both functions but the default is for normalization. When the guasssize option of this filter is set at the lower end of 3, it behaves like a typical compressor. At the other end of 300, it becomes a traditional normalizer.
sFile="$*"
sFilename="${sFile%.*}"
sFileExtension="${sFile##*.}"
sOutputFile="${sFilename}-filtered.${sFileExtension}"

ffmpeg -i "${sFile}" \
       -filter_complex \
         "[0:v:0]eq=saturation=1.6[v];
          [0:a:0]dynaudnorm=gausssize=3[a]" \
       -map '[v]' -map '[a]' \
       "${sOutputFile}"
Content creators should just apply this script on their edited video and then upload the 'filtered' suffixed video created by it. That video will play without causing the aforementioned problems. The saturation level may require some adjustment. It might be convenient to test the script on a short segment of the video before letting it process the whole video.
Points of Interest
Do not use the dynaudnorm filter indiscriminately. Dynamic audio compression is also known as dynamic range compression (DRC). DRC is the bane of popular music today. It makes the recording very boring. In Carl Orff’s composition of O Fortuna or Ryuichi Sakamoto’s score for the end-credits of the movie Femme Fatale, the music starts on a low note, building slowly in a steady crescendo and abruptly drops off a high cliff. Compressing such an audio would ruin the composer’s intent. DRC is not meant for music. In a video, where people just ramble on and on, using dynaudnorm filter is quite appropriate.
History
- 4th November, 2023: Initial version
- 6th November, 2023: Updated formatting. Added image subtext.
