This article will over a custom script I coded that is able to take your existing mp3s and normalize(raise the volume) or split the length of the mp3. The script uses the ffmpeg command line tool to achieve the normalize and split functionality. There is a step-by-step guide with pictures and structures that will explain how to use the script along with how to get ffmpeg installed and ready.
Introduction
Have you ever downloaded and mp3 but found that it wasn't loud enough? I created a utility that can easily raise (or lower) the decibel level of an mp3. Using the -volume command for ffmpeg its possible to adjust the volume of an mp3 file.
I also included a split function that can split an mp3 into a desired length.
Python is my favorite coding language. I learned it a few years back at a community college. I enjoy coding in Python due to the simplicity and ease of getting scripts off the ground. I often download YouTube videos or mp3s to listen to (including podcasts and tutorials). I often found clips that would be helpful but the volume was too low for my comfort. So, I decided to create this utility to get the sound louder on my computer and included a drop down box to select the desired number of dbs(decibels) to increase.
Getting Started
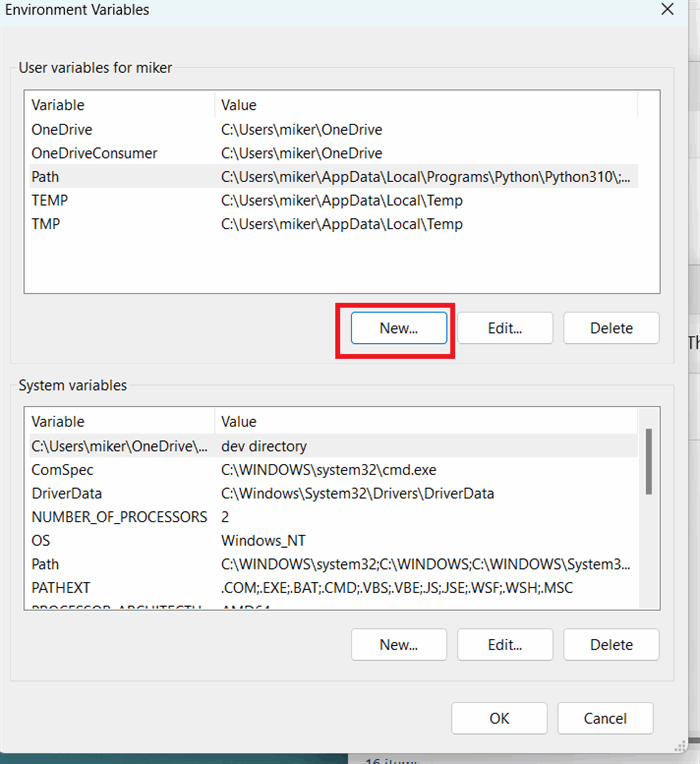
To get started, install ffmpeg (by vising the ffmpeg site: https://ffmpeg.org/download.html) and add the ffmpeg directory to the path environment variables, as shown below:


Click the first browse button to selected the source directory for the mp3, then click the 2nd browse button to select the destination, as shown:

After you've input the selected db range, click normalize and your file will appear in the destination directory with the string _n4 added to the name (to distinguish that its been modified).
Follow the same steps to split a file: just select the desired length to split, select the mp3 and then click split. The resulting files will be numbered, starting from one, going in sequential order.
This script utilizes two ffmpeg commands: volume and segment. Below are examples for each command (how they are generally used).
Increase volume (where 10 is decibels in this example):
ffmpeg -i input.mp3 filter:a volume= 10 output.mp3
Split by length (where 300 is seconds in below example):
ffmpeg -i input.mp3 -f segment -segment_time 300 -c copy output.mp3
Here's how it's implemented in the code:
subprocess.call(['ffmpeg ', '-i', str(source_dir) + edit_dir_files[i], '-filter:a', 'volume=' + db_level + 'dB', str(dest_dir)+ edit_dir_files[i][:-4] + '_n4.mp3'])
subprocess.call(['ffmpeg ', '-i', str(source_dir) + edit_dir_files[i], '-f', 'segment', '-segment_time', str(seconds), '-c', 'copy', str(dest_dir) +  edit_dir_files[i][:-4] + '_%03d.mp3'])
To use the ffmpeg command, the subprocess function is called (which uses the threading library, 'import threading'). The subprocess function is meant to take as input an executable path, with optional command line arguments. To input the parameters for the ffmpeg command into the subprocess call, each individual parameter is surrounded by quotation marks and separated from each other by a comma.
For the ffmpeg command for split, as you can see from above, the dest file includes %03d in the name (where edit_dir_files is list of mp3s in the source folder and the [i] part of this line represents the selected mp3. The [:-4] piece means for the file name, drop the last 4 characters from the string:
edit_dir_files[i][:-4] + '_%03d.mp3'
Using %03d adds automatic numbering (like 000, 001, 002, and so on) to all the chunks. This ensures that the pieces are in proper order.
If necessary, you can change it to %02d so that there are only two decimal places, like 00, 01, 02, and so on.
So to summarize, hopefully this script will you help you improve the volume of your mp3s. The source code is included with this article, you're free to tinker with the script, and change different variables, such as the decibel level (instead of increments of 5 in the script, it could be 1 for example).
Basic Principles
It would be helpful to have an understanding basic Python scripting and basic usage of the ffmpeg command line tool.
Conclusion and Points of Interest
Hopefully you will have learned a method for improving the volume or splitting the length of your mp3 files. This script will also introduce you on using ffmpeg within your script. The script uses just two ffmpeg commands (normalize and split) of the many ffmpeg commands available to edit/manipulate audio and video files. You are free to use this script to modify, one possibility is to use the basic tkinter GUI as a basis for your own project. This was not necessarily meant as an ffmpeg GUI, but maybe someone out there can improve upon this script.
Please contact me if you have any ideas or suggestions based on this article.
