WPF RichTextBox with well featured Text-formatting possibilities and dialogs.
Introduction
This NET8 WPF RichTextBox with well featured Text-formatting possibilities and dialogs includes almost everything that I collected for RichTextFormat over the years.
Background
This is an extended version of the "WPF RichTextEditor with Toolbar" article.
Using the code
Overview
I've added or changed the following features:
The following 2 paragraphs are taken from [1]:
"So, how does it all work. It is rather simple, my RTF-Editor is a WPF UserControl-Project.
It can easily be used like I demonstrated it in my TestApplication ..."
"The RTFBox class is my RTF-Editor. The UserInterface consists of a RichTextBox, a StatusBar and two ToolBars which hold all the buttons for text-formatting."
I would suggest to read the original article [1] first, because I will be focused on the features I have added only.
Toolbars
These buttons/items have been added:
<Separator/>
<ToggleButton x:Name="UpperCase"
                                ToolTip="Upper Case"
                                Click="UpperCase_Click" >
    <Image Source="/RTFEditorEx;component/Images/text_uppercase.png" Stretch="None" />
</ToggleButton>
<ToggleButton x:Name="LowerCase"
                                ToolTip="Lower Case"
                                Click="LowerCase_Click" >
    <Image Source="/RTFEditorEx;component/Images/text_lowercase.png" Stretch="None" />
</ToggleButton>
<Separator/>
<ToggleButton x:Name="_btnSelectAll" ToolTip="Select All"
                            Command="ApplicationCommands.SelectAll"  >
    <Image Source="/RTFEditorEx;component/Images/select16.png" Stretch="None" />
</ToggleButton>
<ToggleButton x:Name="Delete"
                                ToolTip="Delete Selected Text"
                                Command="EditingCommands.Delete" >
    <Image Source="/RTFEditorEx;component/Images/delete.png" Stretch="None" />
</ToggleButton>
<ToggleButton x:Name="EnterParagraphBreak"
                                ToolTip="Enter Paragraph Break"
                                Command="EditingCommands.EnterParagraphBreak" >
    <Image Source="/RTFEditorEx;component/Images/pilcrow.png"  Stretch="None" />
</ToggleButton>
<Separator/>
<ToggleButton x:Name="InsertImage"
                                ToolTip="Insert Image Dialog"
                                Click="InsertImage_Click">
    <Image Source="/RTFEditorEx;component/Images/image.png"  Stretch="None" />
</ToggleButton>
<ToggleButton x:Name="Search"
                                ToolTip="Search Dialog" Click="Search_Click"
                                >
    <Image Source="/RTFEditorEx;component/Images/search.png"  Stretch="None" />
</ToggleButton>
<ToggleButton x:Name="Replace"
                                ToolTip="Replace Dialog"
                                Click="Replace_Click" >
    <Image Source="/RTFEditorEx;component/Images/text_replace.png"  Stretch="None" />
</ToggleButton>
StatusBar
The Zoom feature did not work with [1] but I found an easy solution, based on [5]
<RichTextBox.LayoutTransform>
    <ScaleTransform ScaleX="{Binding ElementName=SliderZoom, Path=Value}"
        ScaleY="{Binding ElementName=SliderZoom, Path=Value}"/>
</RichTextBox.LayoutTransform>
...
...
<Slider x:Name="SliderZoom" Grid.Column="1"
    Width="100" Ticks="1, 2, 3, 4, 5, 6, 7, 8, 9, 10"
    Value="1" Delay="100" Interval="5" TickPlacement="BottomRight"
    Minimum="1" Maximum="10"
    HorizontalContentAlignment="Left" HorizontalAlignment="Left" />
ScaleX and ScaleY are bound to the value of SliderZoom - that's all!
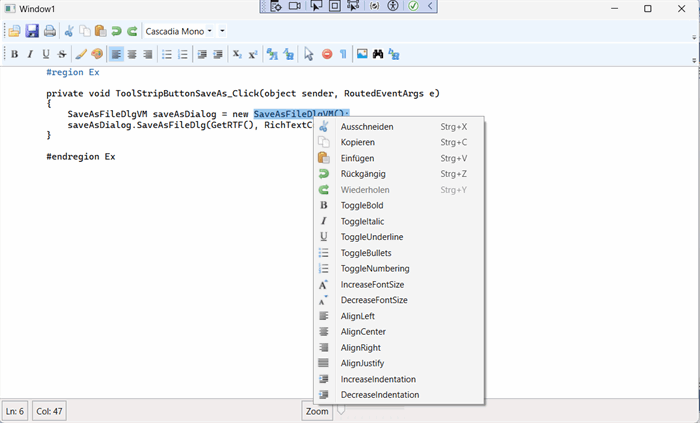
Context Menu for the RichTextBox, based on [4]
It appears when you make a selection and right-click within the RichTextBox.
The Context Menu holds most of the available Application and Editing Commands.
<RichTextBox.ContextMenu>
    <ContextMenu StaysOpen="False">
        <MenuItem Command="ApplicationCommands.Cut"
                    ToolTip="Cut">
            <MenuItem.Icon>
                <Image Source="/RTFEditorEx;component/Images/Cut.png"/>
            </MenuItem.Icon>
        </MenuItem>
        <MenuItem Command="ApplicationCommands.Copy"
                    ToolTip="Copy">
            <MenuItem.Icon>
                <Image Source="/RTFEditorEx;component/Images/Copy.png"/>
            </MenuItem.Icon>
        </MenuItem>
        <MenuItem Command="ApplicationCommands.Paste"
                    ToolTip="Paste">
            <MenuItem.Icon>
                <Image Source="/RTFEditorEx;component/Images/Paste.png"/>
            </MenuItem.Icon>
        </MenuItem>
        <MenuItem Command="ApplicationCommands.Undo"
                    ToolTip="Undo">
            <MenuItem.Icon>
                <Image Source="/RTFEditorEx;component/Images/Undo.png"/>
            </MenuItem.Icon>
        </MenuItem>
        <MenuItem Command="ApplicationCommands.Redo"
                    ToolTip="Redo">
            <MenuItem.Icon>
                <Image Source="/RTFEditorEx;component/Images/Redo.png"/>
            </MenuItem.Icon>
        </MenuItem>

        <MenuItem Command="EditingCommands.ToggleBold"
                    ToolTip="Bold">
            <MenuItem.Icon>
                <Image Source="/RTFEditorEx;component/Images/Bold.png"/>
            </MenuItem.Icon>
        </MenuItem>
        <MenuItem Command="EditingCommands.ToggleItalic"
                    ToolTip="Italic">
            <MenuItem.Icon>
                <Image Source="/RTFEditorEx;component/Images/Italic.png"/>
            </MenuItem.Icon>
        </MenuItem>
        <MenuItem Command="EditingCommands.ToggleUnderline"
                    ToolTip="Underline">
            <MenuItem.Icon>
                <Image Source="/RTFEditorEx;component/Images/Underline.png"/>
            </MenuItem.Icon>
        </MenuItem>

        <MenuItem Command="EditingCommands.ToggleBullets"
                    ToolTip="Bullets">
            <MenuItem.Icon>
                <Image Source="/RTFEditorEx;component/Images/BulletList.png"/>
            </MenuItem.Icon>
        </MenuItem>
        <MenuItem Command="EditingCommands.ToggleNumbering"
                    ToolTip="Numbering">
            <MenuItem.Icon>
                <Image Source="/RTFEditorEx;component/Images/NumbersList.png"/>
            </MenuItem.Icon>
        </MenuItem>

        <MenuItem Command="EditingCommands.IncreaseFontSize"
                    ToolTip="Increase Font">
            <MenuItem.Icon>
                <Image Source="/RTFEditorEx;component/Images/charactergrowfont.png"/>
            </MenuItem.Icon>
        </MenuItem>
        <MenuItem Command="EditingCommands.DecreaseFontSize"
                    ToolTip="Decrease Font">
            <MenuItem.Icon>
                <Image Source="/RTFEditorEx;component/Images/charactershrinkfont.png"/>
            </MenuItem.Icon>
        </MenuItem>

        <MenuItem Command="EditingCommands.AlignLeft"
                    ToolTip="Align Left">
            <MenuItem.Icon>
                <Image Source="/RTFEditorEx;component/Images/AlignLeft.png"/>
            </MenuItem.Icon>
        </MenuItem>
        <MenuItem Command="EditingCommands.AlignCenter"
                    ToolTip="Align Center">
            <MenuItem.Icon>
                <Image Source="/RTFEditorEx;component/Images/AlignCenter.png"/>
            </MenuItem.Icon>
        </MenuItem>
        <MenuItem Command="EditingCommands.AlignRight"
                    ToolTip="Align Right">
            <MenuItem.Icon>
                <Image Source="/RTFEditorEx;component/Images/AlignRight.png"/>
            </MenuItem.Icon>
        </MenuItem>
        <MenuItem Command="EditingCommands.AlignJustify"
                    ToolTip="Align Justify">
            <MenuItem.Icon>
                <Image Source="/RTFEditorEx;component/Images/paragraphfulljustify.png"/>
            </MenuItem.Icon>
        </MenuItem>
        <MenuItem Command="EditingCommands.IncreaseIndentation"
                    ToolTip="Increase Indentation">
            <MenuItem.Icon>
                <Image Source="/RTFEditorEx;component/Images/Indent.png"/>
            </MenuItem.Icon>
        </MenuItem>
        <MenuItem Command="EditingCommands.DecreaseIndentation"
                    ToolTip="Decrease Indentation">
            <MenuItem.Icon>
                <Image Source="/RTFEditorEx;component/Images/IndentRemove.png"/>
            </MenuItem.Icon>
        </MenuItem>

        </ContextMenu>
</RichTextBox.ContextMenu>
Dialogs for Insert Image, SaveAs File and Find & Replace
The last one is based on [6] and [7]. The Find & Replace uses the Extension TextRangeExt.cs file.
In many cases the replacement happens without loosing formatting, but not in all.
The Dialogs have their own classes which are located in SubFolder Dialogs.
Here is the code for the InsertImage feature:
namespace RTFEditorEx
{
public class DlgInsertImageVM
{
public DlgInsertImageVM()
{
}
public bool DlgInsertImage(object ActiveTBox)
{
if (ActiveTBox != null)
{
FileDialog ofd = new OpenFileDialog();
{
ofd.Filter = "Image Files(*.jpg; *.jpeg; *.gif; *.png; *.bmp)
|*.jpg; *.jpeg; *.gif; *.png; *.bmp";
{
ofd.ShowDialog();
string lstrFile = ofd.FileName;
Bitmap myBitmap = new Bitmap(lstrFile);
System.Windows.Clipboard.SetDataObject(myBitmap);
RichTextBox rtb = (RichTextBox)ActiveTBox;
rtb.Paste();
}
}
}
return default;
}
}
}
Show formatting of the selected text is controlled by RichTextControl_SelectionChanged.
Basic Drag and Drop features are available without further efforts.
A RangeSlider (or TextRuler) is on my wish list.
Another thing I could not get right was a working RT Table editor. It can create tables, but trying later to add a row or column, the table does not stay where it was, but is moved to the end of the document.
Points of Interest
This article does not use MVVM, if you need that then take a look at my https://www.codeproject.com/Articles/5355820/WPF-MVVM-RichText-Demo-using-YDock-Panel article.
I'm very interested in your opinion about the article and the code. Please leave some comments and let me know if the article could help you in any way.
Credits / References
History
- 4th June, 2024: Version 1.1 fixes two issues
- 3rd June, 2024: Initial Post


 General
  News
News  Suggestion
  Question
  Bug
Bug  Answer
  Joke
Joke  Praise
  Rant
Rant  Admin
Admin 


