Introduction
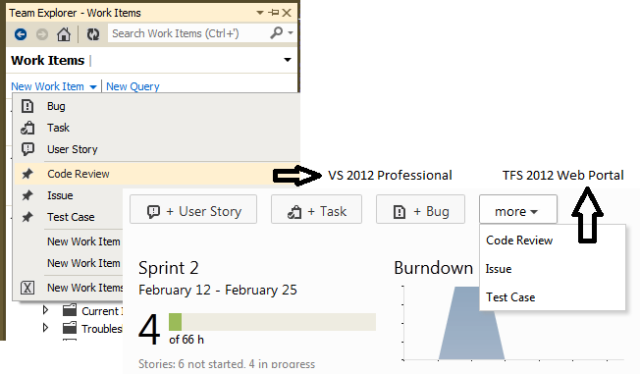
VS 2012 Professional or lower version does not have a Code Review module. To achieve this, I came up with a solution which will add a new work item type in TFS 2012, i.e., Code Review,
and help us to add a code review work item in TFS as given in the above
image. We can also learn how to create a new work item type in TFS.
Background
In VS 2012 Premium and Ultimate, we have a module for Code Review in which
the developer will request another user to review code and in the response,
the other user will give us suggestions. For more details, please visit Jeff Fattic blogs.
Also in VS 2010 with TFS 2010 there was no concept of code review. But CodePlex
members came up with a solution called TeamReview - TFS Code Review. But there is nothing for VS 2012 with TFS 2012. Even in the discussion thread, there is no solution for VS 2012. For more details, please visit TeamReview - TFS Code Review and you can download the setup from
TeamReview Download.
Steps
In Team Explorer (VS 2012 Professional), My Work pane is not available for requesting
a code review.

Even in the default setup of TFS 2012 web portal and VS 2012 Professional Team Explorer, there is no work item for code review.

Steps to create a Code Review work item type for VS 2012 Professional and TFS 2012
Open VS 2012 Professional, go to Tools -> Process Editor -> Work Item Types -> Export WIT.

If you are not connected to the TFS server, it will pop up a window to select the project collection.

After selecting the project collection name, it will display the list of projects.

Select the Bug work item, click OK, and it will pop up the Save As dialog box. Save the WIT
XML file as Code Review.xml in any folder.

This will display a popup to export Global List Definition, click No. Then it will display
a successfully exported message box.
Open the Code Review.xml file in the Visual Studio 2012. It will display the screen given below:

Click New and add two new fields.
To add new fields, please check the screen given below:

The field details are given below:
1. Code Review Suggestion
- Name: Code Review Suggestion
- Type: HTML
- Reference Name: CodeReview.Suggestion
2. Code Review Reviewed By
- Name: Code Review Reviewed By
- Type: string
- Reference Name: CodeReview.ReviewedBy
- Reportable: Dimension
- Go to Rules tab -> click New -> Select following rule types
- ALLOWEXISTINGVALUE
- VALIDUSER
- REQUIRED
Go to the Layout tab, rename label "Steps to Reproduce" to "Description", and delete
the System Info and Test Cases tab pages.

Go to Control under Description tab page ->
select the Control node, change the Field Name property to System.Description.
Right click on the tab group of the Description tab page and
click New Tab Page, set the Label property to Suggestion.
Right click on the Suggestion tab page and click New Control, set the Field Name property to CodeReview.Suggestion.
Click on the Preview Form button to see the Preview layout.

Repeat the same step for adding the Reviewed By field under the Status tab.
Go to the Workflow tab -> right click on Transition Item ->
click on Open Details -> popup will open -> go to Reason tab -> add or delete additional Reasons -> OK.
Check the complete workflow and save the file.

Once the changes in the template are complete, then we have to import the template in TFS.
Go to Tools -> Process Editor -> Work Item Types -> Import WIT.
In the popup, select the TFS project name to import the Work Item Type and in the browse field, select the template file, i.e.,
CodeReview.xml.

Once the import is complete, the pop will be closed.
Go to Team Explorer -> click Work Item -> click New Work Item. There you will see the Code Revieww menu.
Even in the Web Portal you can see the Code Review menu.

After performing the above step, we have to perform one more step. I.e.,
we have to create a work item query to view the code review.
Go to TFS Web portal -> Work -> Work Item -> right click Shared Queries -> New Query ->
set the name as My Code Review.
Go to Editor, set the values as in the image given below:

The layout in the web portal TFS 2012:

Points of Interest
If the Process Editor menu is not available then you have to install Microsoft Visual Studio Team Foundation Server 2012 Update 1 Power Tools.
While importing the work item type, if you get an error message similar
to the one given in the below image then you have to delete that Field from the Fields tab and then Import it. Do the needful changes and upload it again.

If you are using Team Foundation Service then while doing the above step you will receive the below error message
TF237113: You don't have enough permissions to complete the import operation.
For current release of Team Foundation Service (http://tfs.visualstudio.com/en-us/), edit process template is not supported.
History
- 27 Feb 2013: Initial post.
- 26 Sep 2013: Updated Points of Interest (Edit process template is not supported in Team Foundation Service)
