Introduction
- One of the cool features of Microsoft MVC web development framework since its inception was its rich HTML helpers library
- It provided helpers to create most common HTML controls like text boxes, drop down lists, text areas, etc.
- But there is No HTML helper extension for creation of a checkbox lists
- No such extension for latest .NET Framework 4.5 (MVC 4) also
- So, here I am explaining a nice and cool plugin, which fills that missing MVC
HtmlHelper - I have written a blog post about this. It's here (with the source code)
What is it?
- It is a custom extension of Microsoft MVC Framework's
HtmlHelper class, which creates a POSTable Model-based list of check boxes - It was created because there is no built-in MVC way to do this at all (including MVC4)
What are the Features of CheckBoxListFor Plugin ?
- Easy to use
- Creates POSTable check boxes from any set of data
- Strongly-typed, based on View Model
- Extensive control over layout and appearance
- Right-to-left language support (e.g. for Arabic, Hebrew, etc.)
- It's Free (Open source)
How to Use CheckBoxListFor with ASP.NET MVC 4 ?
- Here, I have used Visual Studio 2012 and
ASP.NET MVC 4 Web Application
- Please follow the inline comments for better understanding
Step 1: How to Install CheckBoxListFor Plugin?
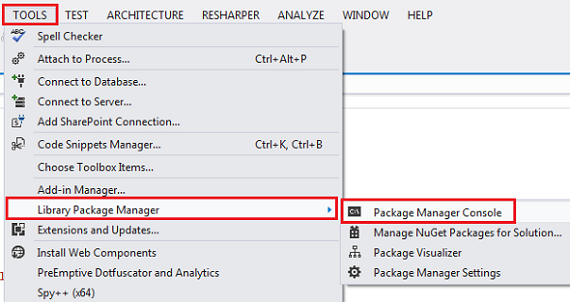
Tools ==> Library Package Manger ==> Package Manager Console

- Type Install-Package MvcCheckBoxList and press Enter.

- When it's Successful:

- After that, you could see that it adds
MvcCheckBoxList assembly into your project. 
Step 2: Create Class 'Fruit'
Fruit.cs
namespace CheckBoxListForApp.Models
{
public class Fruit
{
public int Id { get;set;}
public string Name { get;set; }
public bool IsSelected{get;set;}
public object Tags { get;set;}
}
}
Step 3: Create 'FruitViewModel' View Model
FruitViewModel.cs
using System.Collections.Generic;
namespace CheckBoxListForApp.Models
{
public class FruitViewModel
{
public IEnumerable<Fruit> AvailableFruits { get; set; }
public IEnumerable<Fruit> SelectedFruits { get; set; }
public PostedFruits PostedFruits { get; set; }
}
}
Step 4: Create 'PostedFruits' Helper class to make posting back selected values easier
PostedFruits.cs
namespace CheckBoxListForApp.Models
{
public class PostedFruits
{
public string[] FruitIds { get; set; }
}
}
Step 5 'HomeController' looks like below
HomeController.cs
using System.Collections.Generic;
using System.Globalization;
using System.Linq;
using System.Web.Mvc;
using CheckBoxListForApp.Models;
namespace CheckBoxListForApp.Controllers
{
public class HomeController : Controller
{
[HttpGet]
public ActionResult Index()
{
return View(GetFruitsInitialModel());
}
[HttpPost]
public ActionResult Index(PostedFruits postedFruits)
{
return View(GetFruitsModel(postedFruits));
}
private FruitViewModel GetFruitsModel(PostedFruits postedFruits)
{
var model = new FruitViewModel();
var selectedFruits = new List<Fruit>();
var postedFruitIds = new string[0];
if (postedFruits == null) postedFruits = new PostedFruits();
if (postedFruits.FruitIds != null && postedFruits.FruitIds.Any())
{
postedFruitIds = postedFruits.FruitIds;
}
if (postedFruitIds.Any())
{
selectedFruits = FruitRepository.GetAll()
.Where(x => postedFruitIds.Any(s => x.Id.ToString().Equals(s)))
.ToList();
}
model.AvailableFruits = FruitRepository.GetAll().ToList();
model.SelectedFruits = selectedFruits;
model.PostedFruits = postedFruits;
return model;
}
private FruitViewModel GetFruitsInitialModel()
{
var model = new FruitViewModel();
var selectedFruits = new List<Fruit>();
model.AvailableFruits = FruitRepository.GetAll().ToList();
model.SelectedFruits = selectedFruits;
return model;
}
}
}
Step 6: Create Data Retrieval Repository as 'FruitRepository'
FruitRepository.cs
using System.Collections.Generic;
using System.Linq;
namespace CheckBoxListForApp.Models
{
public static class FruitRepository
{
public static Fruit Get(int id)
{
return GetAll().FirstOrDefault(x => x.Id.Equals(id));
}
public static IEnumerable<Fruit> GetAll()
{
return new List<Fruit> {
new Fruit {Name = "Apple", Id = 1 },
new Fruit {Name = "Banana", Id = 2},
new Fruit {Name = "Cherry", Id = 3},
new Fruit {Name = "Pineapple", Id = 4},
new Fruit {Name = "Grape", Id = 5},
new Fruit {Name = "Guava", Id = 6},
new Fruit {Name = "Mango", Id = 7}
};
}
}
}
Step 7: View Page is as below
Index.cshtml
@using MvcCheckBoxList.Model
@model CheckBoxListForApp.Models.FruitViewModel

@{
    ViewBag.Title = "Home Page";
}

<section class="checkBoxListFor">
    <p>
        <label>Please Select Fruits:</label>
        @using (Html.BeginForm("Index", "Home", FormMethod.Post))
        {
            @Html.CheckBoxListFor(model => model.PostedFruits.FruitIds,
                                  model => model.AvailableFruits,
                                  fruit => fruit.Id,
                                  fruit => fruit.Name,
                                  model => model.SelectedFruits,
                                  Position.Horizontal)
            <input class="green" type="submit"
                      value="POST to Controller" />
        }
    </p>
</section>
Note: You saw that you have to add reference to the 'MvcCheckBoxList.Model' as above.
Step 8: When you Run the Application
- When Page loads for the First Time:

- When you Post the Page:

That's it. You're done.
Conclusion
- In this tip, I have shown the basic usage of
CheckBoxListFor - There are number of overload methods that exist for this extension
- So if you need to learn all of them, you have to browse the below mentioned URL
- Some of them are, can change Orientation (Horizontal/Vertical),
can use Custom Layouts,Templates and much much more ....
- So enjoy with this Great Missing MVC Extension
References
