Introduction
This article will show you how to create a WCF Service self hosted application. I have used Visual Studio 2012, but it should be very similar approach with 2010. I also use WPF (you should use that too, but you can probably do it with WF if you want). Hopefully this will give you a quick start.
Background
If you want to go further, it may be useful to know how WCF work, and it exists lots of articles about it. For this article, it's not necessary.
To create a service, you need something that defines the service, and something that implements it. The definition (also known as contract) is a interface that lists the methods the implementation (a class) must implement. These methods will be available for the clients.
How to do it
Make sure firewall isn't blocking the application. For a quick testing-solution, you may want to just disable it. Otherwise, allow TCP-connections on the port you're planning to use (or 8888 as I use).
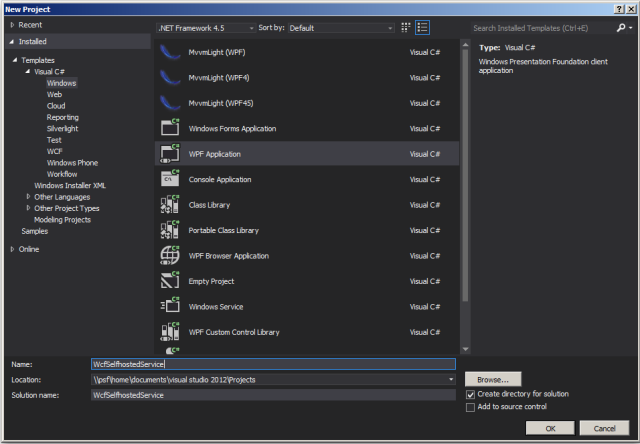
First create a new blank application. I named mine "WcfSelfhostedService".

Then, add reference to System.ServiceModel.

Now, create a new file with name "IService.cs". This file shall contain one interface (the contract).
using System;
using System.ServiceModel;
namespace WcfSelfhostedService
{
    [ServiceContract]
    public interface IService
    {
        [OperationContract]
        String Hello(String name);
    }
}
Now, let's implement the definition. Create a file with name "Service.cs".
using System;
namespace WcfSelfhostedService
{
    class Service : IService
    {
        public String Hello(string name)
        {
            return String.Format("Hello {0}", name);
        }
    }
}
To start the service, some configuration of it must exist. Here, everything is done from code. I just put this in MainWindow.xaml.
using System;
using System.ServiceModel;
using System.ServiceModel.Description;
using System.Windows;
namespace WcfSelfhostedService
{
public partial class MainWindow : Window
{
public MainWindow()
{
InitializeComponent();
var uri = new Uri("http://localhost:8888/WcfSelfhostedService");
var host = new ServiceHost(typeof (Service), uri);
var wsHttpBinding = new WSHttpBinding
{
ReliableSession = {Enabled = true, Ordered = true}
};
wsHttpBinding.Security.Mode = SecurityMode.None;
host.AddServiceEndpoint(typeof (IService), wsHttpBinding, "service");
var smb = new ServiceMetadataBehavior
{
HttpGetEnabled = true,
MetadataExporter = {PolicyVersion = PolicyVersion.Policy15}
};
host.Description.Behaviors.Add(smb);
host.Open();
}
}
}
With this code, you're actually ready to start the service. Do it!
Time to create the client. Create a new console application.

You need to add Service Reference. Right click on References and choose "Add Service Reference".

Search for the URI that was specified earlier (http://localhost:8888/WcfSelfhostedService). If your firewall isn't causing trouble for you, the service should be visible.

In Program.cs, add some code to verify that the service is working.
using System;
using WcfSelfhostedServiceClient.SelfhostedService;
namespace WcfSelfhostedServiceClient
{
internal class Program
{
private static void Main(string[] args)
{
var client = new ServiceClient();
string response = client.Hello("World");
Console.WriteLine(response);
Console.ReadLine();
}
}
}
Start the client, and you should see "Hello World". Yes, it's that easy!
History
