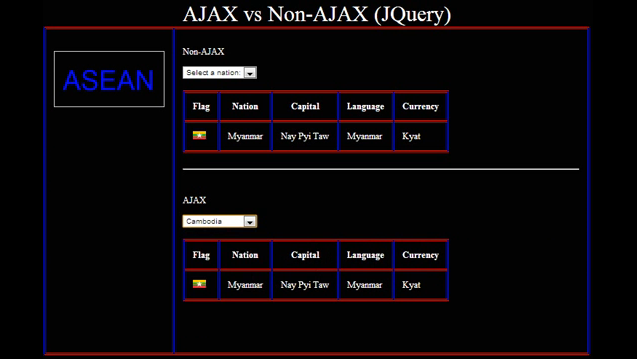
Click on the following image to view a demo video on YouTube.

Introduction
This is a simple web application to illustrate visually the difference between AJAX and non-AJAX calls that take place all in a single web page. The web app comprises a simple MySQL database and two web pages that do exactly the same demonstration but one uses raw JavaScript to perform while the next one jQuery to perform AJAX call. I have expanded the scope so that my students can now study and compare the difference between the jQuery and non-jQuery AJAX code. jQuery and HTML5 are also used to create animated text to enhance the effect of the illustration.
Background
In an effort to help my students understand the AJAX concept, I have tried searching on the Internet for web examples that could illustrate visually the difference between AJAX call and non-AJAX call all in one web page but to no avail. So I decided to make one myself and to share it with the community. Along the way, I expanded the scope to include jQuery for AJAX call and animation and HTML 5 for drawing text.
Using the Code
First of all, you have to set up a LAMP development environment on your machine. The simplest and most straight forward way is to install XAMPP from http://www.apachefriends.org. Among other things, it comes with an Apache server and a MySQL server which are all you need to start creating simple web applications and for running this application. In fact, there are other options like WAMP for Windows or MAMP for Macs. If you are already using any one of these, then stick to it.
My web application consists of a simple one-table database, four PHP files, 10 images, and a jQuery library. Simply download and unzip the source file and you should get the following contents:
- A folder named "ajax_demos" contains an image folder and 4 PHP files
- A SQL script named "database.sql" and
- A one-page README.txt
Import the database.sql into your MySQL server and you will see a database named ajax_demo with a table called asean being created. You may set up a user name and password for this database.
In the "ajax_demos" folder, open the "db_config.php" file in some text editor, type in the user name and password that you have assigned to the ajax_demo database to the two variables $username and $password respectively. Next, move the "ajax_demos" folder to the webroot of your Apache server. If you are using XAMPP, the default web root should be at "c:\xampp\htdocs\". For WAMP, it should be located at "c:\wamp\www\", while that for MAMP at "/Applications/MAMP/htdocs/".
Make sure your Apache and MySQL servers are running, then launch your favorite browser and enter any of the following URLs to view the demonstrations. A short video clip can be viewed here.
- http://localhost/index_jquery.php
- http://localhost/index_non_jquery.php
The web application should work on any browser, i.e., Internet Explorer, Firefox, Chrome, and Safari. If not, it means that the browser needs an urgent upgrade.
Every selection change performed on the non-AJAX drop down box will cause the page to reload and thus interrupt and re-start the animation. On the other hand, selection change performed on the Ajax drop down box will only change the content at the designated location without affecting other elements on the page which is evident by the uninterrupted run of the animation. This is asynchronization at work!
Both URLs will show the same effect. They are only different in that the former had its AJAX coded in jQuery while the latter in raw JavaScript. The following code snippets reveal the difference and it lends support to the "Write Less Do More" tagline that jQuery advocates.
$.get("getcountry.php?id="+$(this).val(),function(data,status){
$("#ajax_placeholder").html(data);
});
if (window.XMLHttpRequest)
{
xmlhttp=new XMLHttpRequest();
}
else
{
xmlhttp=new ActiveXObject("Microsoft.XMLHTTP");
}
xmlhttp.onreadystatechange=function()
{
if (xmlhttp.readyState==4 && xmlhttp.status==200)
{
document.getElementById("ajax_placeholder").innerHTML=xmlhttp.responseText;
}
}
xmlhttp.open("GET","getcountry.php?id="+str,true);
xmlhttp.send();
In addition, HTML5 and JavaScript were used to draw the text ASEAN which was then animated in jQuery. This is shown in the code snippets below. Take note of the link here which is the id="aCanvas":
// HTML5
<canvas id="aCanvas" width="200" height="100"
    style="border: 1px solid #d3d3d3; position: relative;">
    Your browser does not support HTML5.
</canvas>
// JavaScript
<script>
    var c=document.getElementById("aCanvas");
    var context=c.getContext("2d");
    context.font="50px Arial";
    context.fillStyle="blue";
    context.fillText("ASEAN",15,70);
</script>

// JQuery animation
$(aCanvas).hide().fadeIn(2000).animate({top:"-430px"}, 5000);
Points of Interest
With the help of this simple web application, my students have been able to grasp the concept of AJAX better and faster. They have also learned and appreciated the power and simplicity of HTML5 and jQuery in enhancing the dynamism of web contents. I hope this tip will entice our readers to learn and explore the many new emerging web technologies. Thank you.
