Introduction
This tip explains developing a .NET application which can connect to Mongo Database and perform various operations. This also touches slightly on Mongo Database and various commands.
Using the Code
Let's start with details about the Mongo database, basic commands and finally cover creating a .NET Windows application which connects to Mongo Database.
Mongo Database
MongoDB is a cross-platform document oriented database system which is classified as a "NoSQL" database. MongoDB avoids the traditional table based relational database structure and uses JSON like documents with dynamic schemas. MongoDB calls this format as BSON (Binary Json). This dynamic schema makes the integration of data in certain types of applications easier and faster. MongoDB is free and open source software.
Features of Mongo Database
- Ad hoc queries
- Indexing
- Replication
- Load balancing
- File storage
- Aggregation
- Server-side JavaScript execution
- Capped collections
Users can download Mongo Database from here and extract the contents to any folder. Once the file has been downloaded, user needs to configure data folder for MongoDB. For this, create a folder named "DB" within "C:\Data" folder.

Once the data folder has been created, Mongo database can be started by running "mongod.exe" command using a command prompt under "bin" folder.

Now the database has been started and is running.
Creating a .NET Application
Create a .NET web/Windows application. In this example, we will utilize a simple employee table.
In order to start, we need to make sure that we have .NET driver for MongoDB available in the system. You can follow the below instructions to install the driver for a particular project.
Open package manager within Visual Studio:

Once the package manager console has been opened, user can execute the below command:
Install-Package mongocsharpdriver


Add the reference to the below namespace to the project:
using MongoDB.Bson;
using MongoDB.Driver;
using MongoDB.Driver.Builders;
using MongoDB.Driver.GridFS;
using MongoDB.Driver.Linq;
Declare variables for database server and database:
MongoServer _server;
MongoDatabase _database;
Connect to database using the below command. Here the database server is running on local host with the port number : 27017 and database name is given as "anoop".
private void Form1_Load(object sender, EventArgs e)
{
    string connection = "mongodb://localhost:27017";
    _server = MongoServer.Create(connection);
    _database = _server.GetDatabase("anoop", SafeMode.True);
}
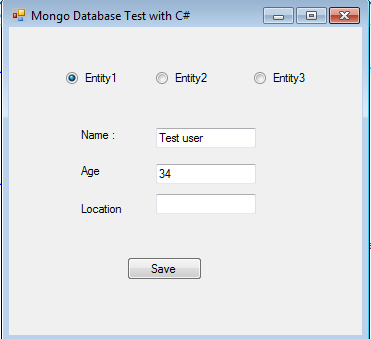
Here, we have created 3 classes with different set of properties. We could fill the properties of these classes and can save the data to the same database and the same table. This is the real advantage of No-Schema database as it doesn't check schema while inserting the data. Each record can get saved with different set of fields and the other fields will be treated as NULL by default.
public class Users1
{
    public ObjectId Id { get; set; }
    public string Name { get; set; }
    public int Age { get; set; }
}
public class Users2
{
    public ObjectId Id { get; set; }
    public string Name { get; set; }
    public string Location { get; set; }
}
public class Users3
{
    public ObjectId Id { get; set; }
    public string Name { get; set; }
    public int Age { get; set; }
    public string Location { get; set; }
}
private void rbEntity1_CheckedChanged(object sender, EventArgs e)
{
    txtName.Enabled = true;
    txtAge.Enabled = true;
    txtLocation.Enabled = true;
}
private void rbEntity2_CheckedChanged(object sender, EventArgs e)
{
    txtName.Enabled = true;
    txtAge.Enabled = false;
    txtLocation.Enabled = true;
}
private void rbEntity3_CheckedChanged(object sender, EventArgs e)
{
    txtName.Enabled = true;
    txtAge.Enabled = true;
    txtLocation.Enabled = false;
}
private void btnSave_Click(object sender, EventArgs e)
{
    if (rbEntity1.Checked)
    {
        var _users = _database.GetCollection<users3 />("users");
        var user = new Users3 { };
        user.Age = Convert.ToInt32(txtAge.Text);
        user.Name = txtName.Text;
        user.Location = txtLocation.Text;
        _users.Insert(user);
        var id = user.Id;
    }
    else if (rbEntity2.Checked)
    {
        var _users = _database.GetCollection<users2 />("users");
        var user = new Users2 { };
        user.Name = txtName.Text;
        user.Location = txtLocation.Text;
        _users.Insert(user);
        var id = user.Id;
    }
    else if (rbEntity3.Checked)
    {
        var _users = _database.GetCollection<users1 />("users");
        var user = new Users1 { };
        user.Age = Convert.ToInt32(txtAge.Text);
        user.Name = txtName.Text;
        _users.Insert(user);
        var id = user.Id;
    }
    MessageBox.Show("User with name " + txtName.Text + " created");
}
_collection = _database.GetCollection<users1 />("users");
IMongoQuery query = Query.EQ("Name", "Anoop");
Users1 _user = _collection.FindAs<users1 />(query).FirstOrDefault();
MessageBox.Show(_user.Age.ToString());
_collection = _database.GetCollection<users1 />("users");
IMongoQuery query = Query.EQ("Name", "Anoop");
Users1 _user = _collection.FindAs<users1 />(query).FirstOrDefault();
MessageBox.Show("Age before update :" + _user.Age.ToString());
_user.Age = 30;
_collection.Save(_user);
MessageBox.Show("Age after update :" + _user.Age.ToString());
References
