Introduction
Sometimes your Arduino program may start crashing suddenly. Or it stops working after you add just another Serial.print() command. It is possible that you have run out of RAM memory.
When I recently needed to see how much RAM my program for Arduino is using, I was surprised what a problem this seems to be. I am used to working with the AVR microcontrollers in "plain" C, in Atmel Studio or Eclipse, and there you get the memory usage statistics after each build, so you can see how much data (RAM) and program (FLASH) memory your program is using. On the contrary, the Arduino IDE does not display the amount of RAM used. It displays "binary sketch size" which is in fact the size of the program (which goes to FLASH memory).
Quick Google search gives in first places results which use code with dynamic memory allocation to find out the amount of available RAM. Even if this produced reasonable results (which I am not sure of), it seems like a big overkill. All I ever needed was to see the statistic after build. This statistic does not include the stack usage, so you cannot think that up to 99% of RAM used you are OK. You should have about 200 bytes of RAM (the more the better) free for the stack. So depending on the total amount of RAM on your MCU, you should not see higher usage than about 90%. Personally, I would not feel comfortable with usage above 80%, but if there is no way to use less RAM, it may be possible to go to higher numbers. Just be careful and if your program suddenly starts to behave strangely, it may be that your stack already overflew into the data and you simply have to use less RAM.
Checking the size
There is a program called avr-size in the avr tools included in Arduino, which can display the usage of the memory for your program. I created a script size.bat which should make it easier to use. So how to find out the memory usage for your program:
- In Arduino IDE enable verbose output for compilation in File > Preferences.
- Build (verify) your sketch.
- In the output window in Arduino IDE notice the path where the resulting files are placed. It may be somewhere in C:\users\[your name]\AppData\Local\Temp\build[some long number].tmp\
- Go to this folder and find the output file with .elf extension (the "executable"). It will have the same name as your sketch with ".cpp.elf" added. For example, if your sketch is named test, the file will be test.cpp.elf.
- Copy this file to the folder where you placed the size.bat file from the attachment. Or you can copy the size.bat file to the folder where the .elf file is located. All that matters is that these 2 files are in the same folder.
- Start the size.bat file.
- It will ask you to enter the location of your Arduino installation. For example: c:\Programs\arduino-1.0.5-r2. Do not put the path into double quotes and do not end it with backslash!
- Next enter the name of your .elf file, for example, test.cpp.elf
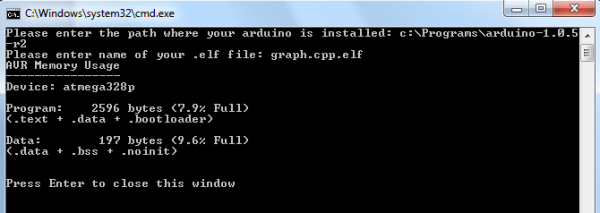
- Press Enter and you will see how much of RAM your program is using - this is the "data" part. The "program" part shows how much FLASH the program is using.

More comfortable way
If you do not want to enter the path to your Arduino installation every time, you can edit the .bat file and enter the path there:
- Open the .bat file in any text editor, for example, Windows notepad. Note that you cannot just double-click the .bat file; this would run it, not open it. Use right-mouse button and Edit or drag and drop it to running Notepad..
- Change this line:
set /p arduino_path= Please enter the path where your arduino is installed:
to, for example,
set arduino_path= c:\Programs\arduino-1.0.5-r2
Note that the "/p" after the "set" word was removed! - Save the file.
- Now you should only need to enter the name of your .elf file. Of course, if you want, you can also "hard-code" the .elf file name into the script, so that you do not need to enter any names and just run it. Just change the line:
set /p hex_file= Please enter name of your .elf file:
to something like:
set hex_file= myfile.cpp.elf
Note again, that the "/p" after the "set" word is removed!
Points of Interest
To have the used memory shown also in percents, we need to specify the microcontroller which we use. This is done with the: --mcu=atmega328p option. The provided .bat file is for Atmega 328 used in Arduino Uno. For other boards, you can find the name of the MCU in the boards.txt file in your Arduino folder\hardware\arduino. Look at the [board].build.mcu= line in this file for your board. For Uno it looks like this: uno.build.mcu=atmega328p.
If you do not trust .bat downloads, just copy and paste this text into a new text file and save it with .bat extension to create your own script.
@echo off
set /p arduino_path= Please enter the path where your arduino is installed:
set /p hex_file= Please enter name of your .elf file:
"%arduino_path%\hardware\tools\avr\bin\avr-size.exe" --format=avr --mcu=atmega328p %hex_file%
set /p anykey= Press Enter to close this window
Perhaps I should also mention that this script works only on Windows.
History
April 2, 2014 - First version
