Creating an Android Activity in Droidio
With your project opens in Android Studio, right-click <appname>\app\src\main\java\<bla>.app and select New > Activity >
Blank Activity.
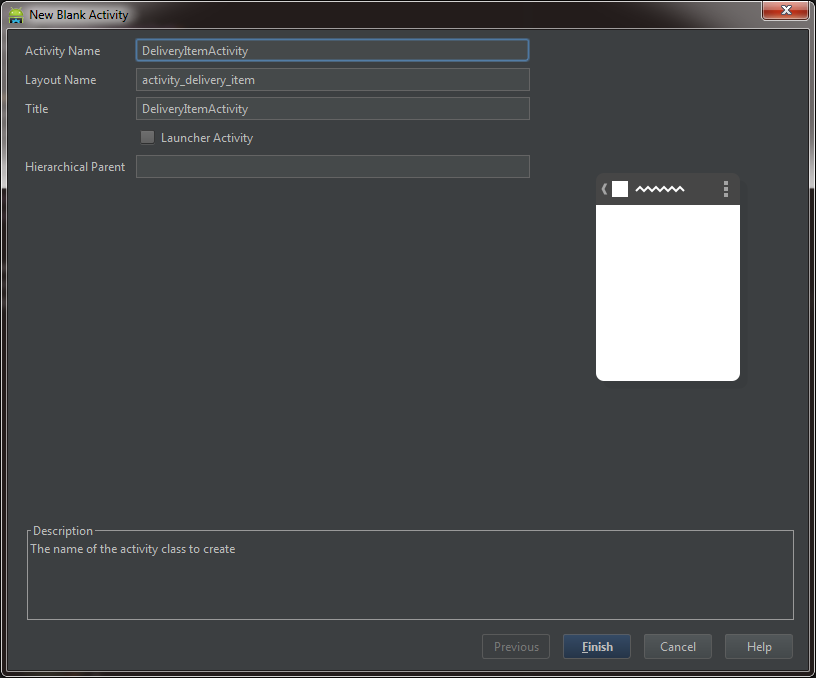
You will be greeted, unsurprisingly perhaps, by the "New Blank Activity" dialog. Give the Activity a name, such as
"DeliveryItemActivity".
As you do so, the Layout Name property below it will be automatically populated with an appropriate corresponding
name, such as, in this case, "activity_delivery_item" (this layout file will have a .xml extension).
Your dialog will now look something like this:

Now mash the "Finish" button.
This will open the layout file in the <appname>\app\src\main\java\res\layout folder, with a default layout and one widget: a TextView with the all-too-typical "Hello world!" verbiage:
<RelativeLayout xmlns:android="http://schemas.android.com/apk/res/android"
    xmlns:tools="http://schemas.android.com/tools"
    android:layout_width="match_parent"
    android:layout_height="match_parent"
    android:paddingLeft="@dimen/activity_horizontal_margin"
    android:paddingRight="@dimen/activity_horizontal_margin"
    android:paddingTop="@dimen/activity_vertical_margin"
    android:paddingBottom="@dimen/activity_vertical_margin"
    tools:context="hhs.app.DeliveryItemActivity">

    <TextView
        android:text="@string/hello_world"
        android:layout_width="wrap_content"
        android:layout_height="wrap_content" />

</RelativeLayout>
To prevent an oncoming nervous breakdown, change this to something more interesting by opening the \app\src\main\java\res\values\strings.xml file and replacing that:
<string name="hello_world">Hello world!</string>
...with:
<string name="hello_world">You say Hello I say Goodbye Mr. Chips Ahoy Matey!</string>
Note: If you change the pre-defined "hello_world" string in this way, all subsequent Layout files will use your verbiage (instead of the boring-but-safe default "Hello World").
Now open the Activity you created in <appName>\app\src\main\java\<appname>\app\DeliveryItemActivity. You will
see the basic default Activity code:
package hhs.app;
import android.support.v7.app.ActionBarActivity;
import android.os.Bundle;
import android.view.Menu;
import android.view.MenuItem;
public class DeliveryItemActivity extends ActionBarActivity {
@Override
protected void onCreate(Bundle savedInstanceState) {
super.onCreate(savedInstanceState);
setContentView(R.layout.activity_delivery_item);
}
@Override
public boolean onCreateOptionsMenu(Menu menu) {
getMenuInflater().inflate(R.menu.delivery_item, menu);
return true;
}
@Override
public boolean onOptionsItemSelected(MenuItem item) {
int id = item.getItemId();
if (id == R.id.action_settings) {
return true;
}
return super.onOptionsItemSelected(item);
}
}
You'll notice that the constructor contains this line:
setContentView(R.layout.activity_delivery_item);
So, this Controller (the Activity) has set its View (the Layout file) to the expected one - the one we were just tweaking a bit. You could set it to some other view here easily enough:
setContentView(R.layout.why_do_fools_fall_out_of_love);
Of course, for that to make sense (and to work), you will have to have created a layout (xml) file named, in this case, "why_do_fools_fall_out_of_love.xml"
And, in fact, that's part of the beauty of the MVC (Model/View/Controller) paradigm - you can swap out Views for a particular controller based on the user (based on what features they need or what features they have the right to access, for example), the device your app is running on, the state of the device (such as whether it currently has an Internet connection, or something else), celestial phenomena (just joking, but you get the picture), or what have you.
Instantiating the Activity/Layout from Another Activity
Now that we've got an Activity/Layout pair, we want to invoke/instantiate them from another Activity.
To do so, you might respond to an event, such as a button being clicked or tapped. So to demonstrate this, drag and drop a button onto your main Activity (or any other one).
Go to the Activity's layout file (such as activity_main.xml) and open it. Make sure you're in Design (not "Text") mode (toggle to the Design tab, if necessary, in the SE corner of Droidio's midriff). From Palette > Widgets, drag a button. To give it a reasonable name, now go into "Text" mode; locate the XML that describes the button you just added. It will look something like this:
<Button
        android:layout_width="wrap_content"
        android:layout_height="wrap_content"
        android:text="Bla"
        android:id="@+id/button2"
        android:layout_alignBottom="@+id/textView2"
        android:layout_alignRight="@+id/listViewXactionList"
        android:layout_alignEnd="@+id/listViewXactionList" />
Change the "text" and "id" properties to give your button a non-generic caption and name, such as:
android:text="Delivery Item"
android:id="@+id/buttonDeliveryItem"
Now open MainActivity, and add code like the following below the call to "setContentView()" shown earlier:
Button button = (Button) findViewById(R.id.buttonDeliveryItem);
button.setOnClickListener(new View.OnClickListener() {
    public void onClick(View v) {
        Intent delItemIntent = new Intent(MainActivity.this, DeliveryItemActivity.class);
        MainActivity.this.startActivity(delItemIntent);
    }
});
...and voila! Run the app, mash the button, and the Activity you created shoves the previous Activity out of the way and takes over center screen:

